Build a Shipment Notification Service with Python, Flask, Twilio and EasyPost
Time to read: 11 minutes
March 09, 2020
Written by

With eCommerce becoming more mainstream, companies are shipping goods directly to their consumers now more than ever. Once consumers buy something online, they want to know where their order is in the fulfillment process and when it should arrive, and that’s where Twilio and EasyPost come in handy.
In this tutorial, you’ll see how easy it is to track the movement of shipments with the EasyPost API for Tracking, and programmatically notify individuals via the Twilio SMS API and the Flask framework for Python.
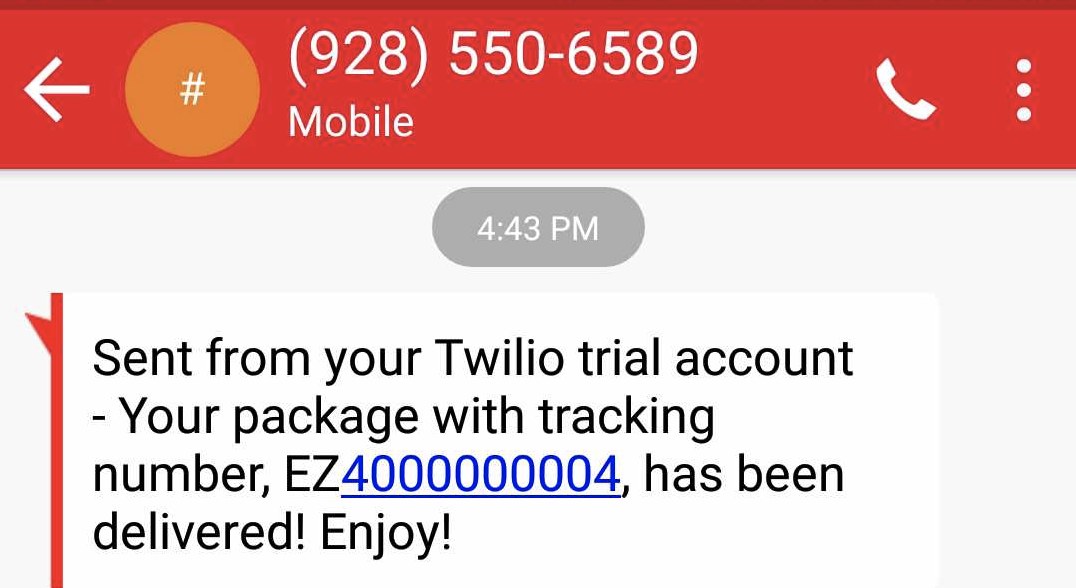
Below is an example of the type of notifications that you’ll be sending automatically with this app:
Tutorial requirements
To follow this tutorial you need the following components:
- Python 3.6 or newer. If your operating system does not provide a Python interpreter, you can go to python.org to download an installer.
- Flask. We will create a web application that responds to incoming webhooks from EasyPost with it.
- ngrok. We will use this handy utility to connect the Flask application running on your system to a public URL that EasyPost can connect to. This is necessary for the development version of the notification app because your computer is likely behind a router or firewall, so it isn’t directly reachable on the Internet. If you don’t have ngrok installed, you can download a copy for Windows, MacOS or Linux.
- A Twilio account. If you are new to Twilio create a free account now. Use this link to sign up and you’ll receive a $10 credit when you upgrade to a paid account.
- An EasyPost account. If you are new to EasyPost create a free account now. EasyPost offers a free test environment that will be sufficient to complete this tutorial.
Create a Python virtual environment
Following Python best practices, we are going to make a separate directory for our shipment notification project, and inside it we are going to create a virtual environment. We then are going to install the Python packages that we need for our chatbot on it.
If you are using a Unix or Mac OS system, open a terminal and enter the following commands to do the tasks described above:
For those of you following the tutorial on Windows, enter the following commands in a command prompt window:
The last command uses pip, the Python package installer, to install the three packages that we are going to use in this project, which are:
- The Flask framework, to create the web application
- The Twilio Python Helper library, to work with the Twilio APIs
- The EasyPost Python Client library, to work with the EasyPost APIs
For your reference, at the time this tutorial was released these were the versions of the above packages and their dependencies tested:
Create a Flask shipment notification service
Time to start writing some code, so we can delight our customers!
In this tutorial we’re going to build a very basic service to initiate EasyPost tracking on our shipments, receive webhook events, and trigger Twilio notifications. This is fairly straightforward functionality, but along the way I’ll point out some ways that you could expand the functionality to support more sophisticated use cases.
Setting up a webhook
We’ll need to define an endpoint in our application that we share with EasyPost so it knows where to send us shipment notifications.
This is as simple as adding a route to a basic Flask App. Below is an example of how easy it is to create a webhook in Flask:
If you save this code in a app.py file, you should be able to run the following command in your terminal to get your app running.
The service is now running as a private service on port 5000 inside your computer and will sit there waiting for incoming connections.
Congrats! In just a few lines of code, you already have a basic Flask app and webhook running locally!
At this point, all your app does is print “Webhook Received” in the terminal when it gets an HTTP POST, but before long it’ll do a lot more.
To make this service reachable from the Internet we need to use ngrok.
Open a second terminal window and run ngrok http 5000 to allocate a temporary public domain that redirects HTTP requests to our local port 5000. On a Unix or Mac OS computer you may need to use ./ngrok http 5000 if you have the ngrok executable in your current directory. The output of ngrok should be something like this:
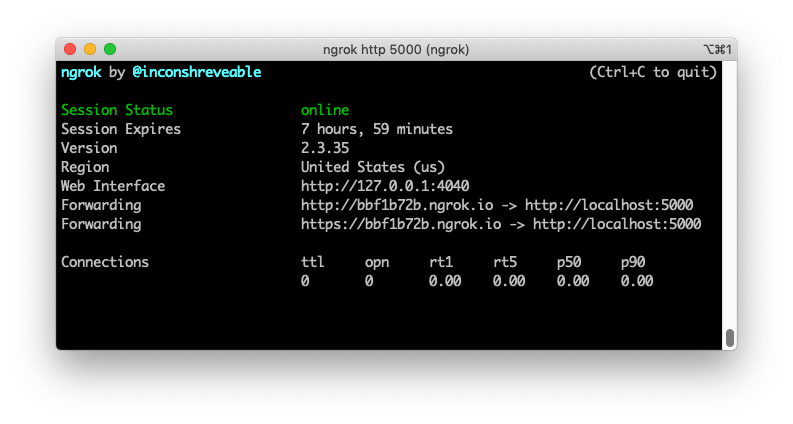
Note the lines beginning with “Forwarding”. These show the public URL that ngrok uses to redirect requests into our service. What we need to do now is tell EasyPost to use this URL to send us shipment event notifications.
Getting started with EasyPost
Now that you have a very basic webhook running, let’s set up your EasyPost account.
Sharing your Flask webhook with EasyPost
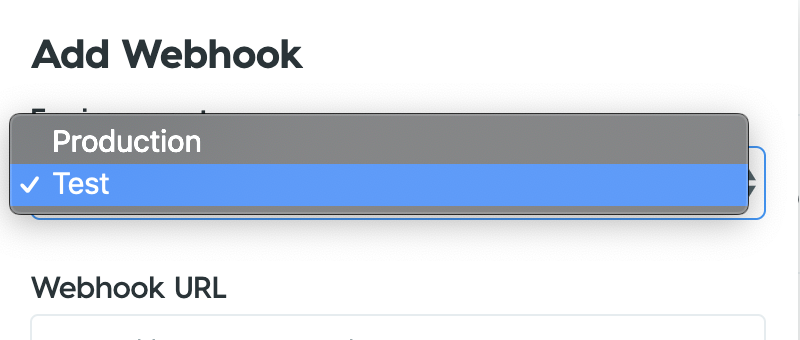
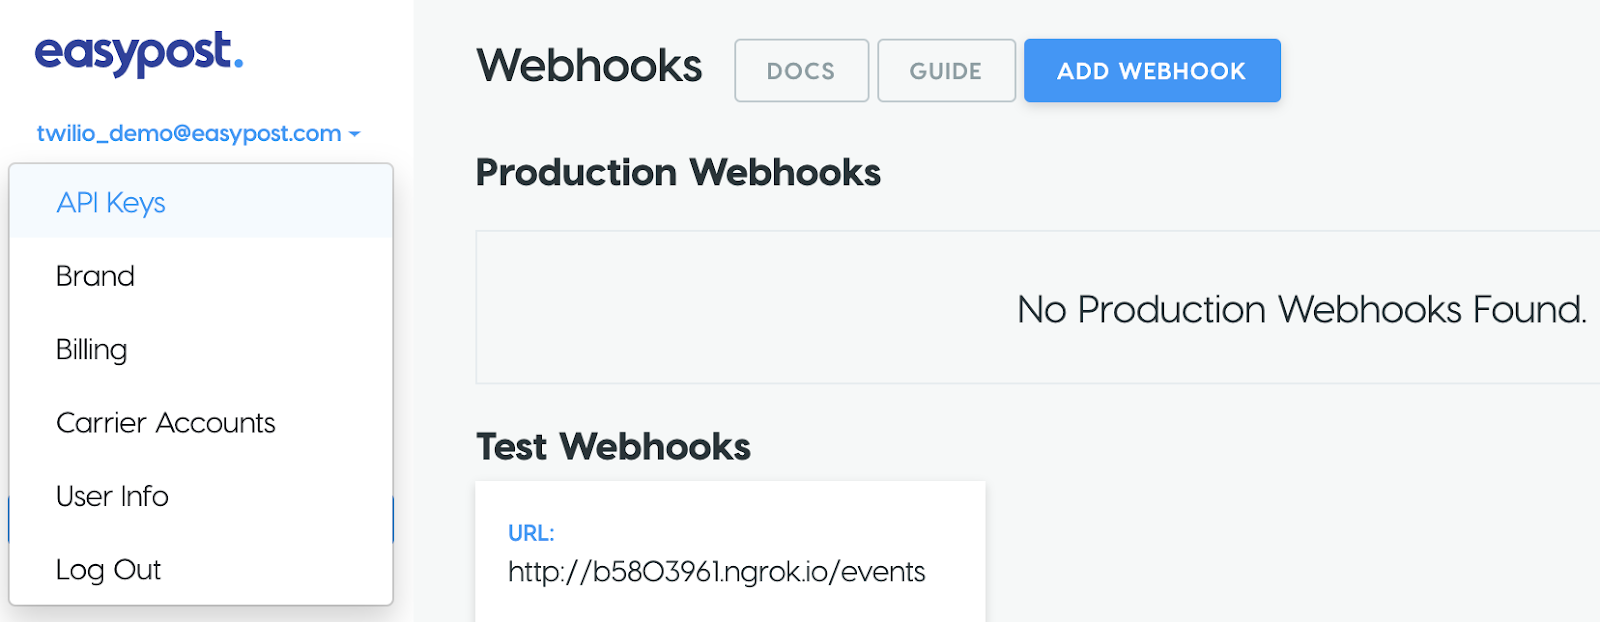
Registering your webhook with EasyPost is incredibly simple. Once you’ve created and verified your account, go to the “Webhooks & Events” section of your dashboard. Click “Add Webhook” and make sure you select “Test” as the environment. If you accidentally create a production webhook, none of your test events will be received.
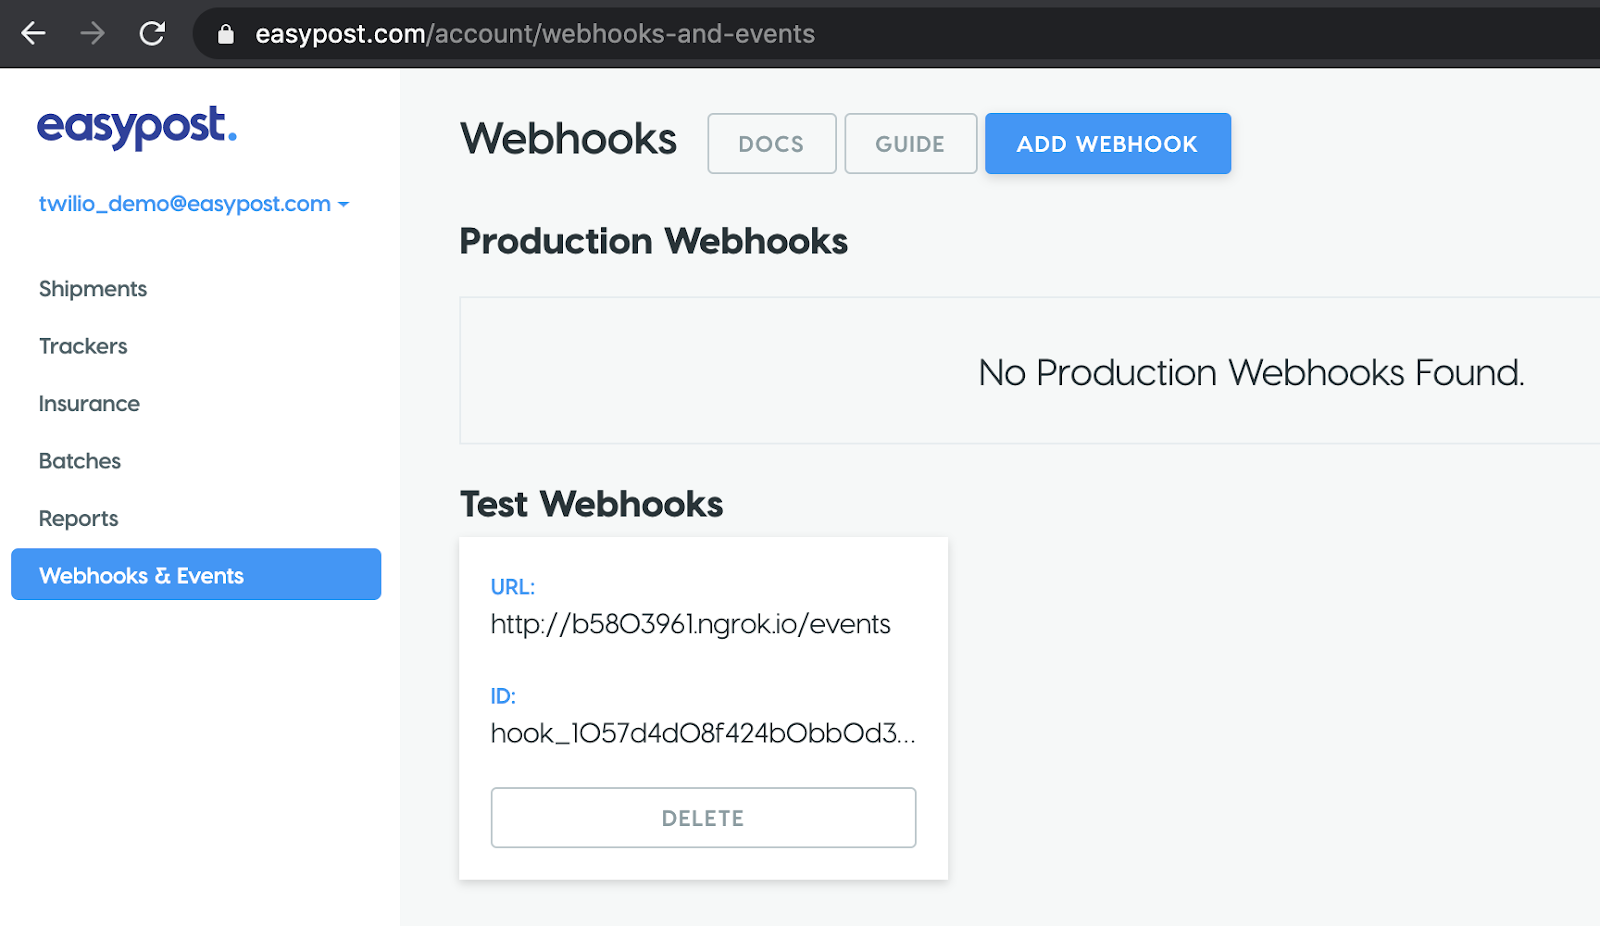
You’ve created a “/events” route in our app so you’ll append that to the end of the ngrok URL generated previously. Your webhook URL should look something like “http://bbf1b72b.ngrok.io/events” and once you click “Create Webhook”, it should show up among your “Test Webhooks” as in the image below.
Retrieving your EasyPost API key
To get your API Key from EasyPost, log into your dashboard and click on your email address which will prompt the drop down menu shown below. Click “API Keys” and you should see a screen that has a “Production API Keys” and “Test API Keys” section. Copy your test API key from the next screen. If you use your production key by mistake, you will run into issues using the test webhook events we’ll trigger later, and you might incur charges from EasyPost unintentionally.
Now that you have your test key copied to your clipboard. Let’s save it as an environment variable.
Getting started with Twilio SMS
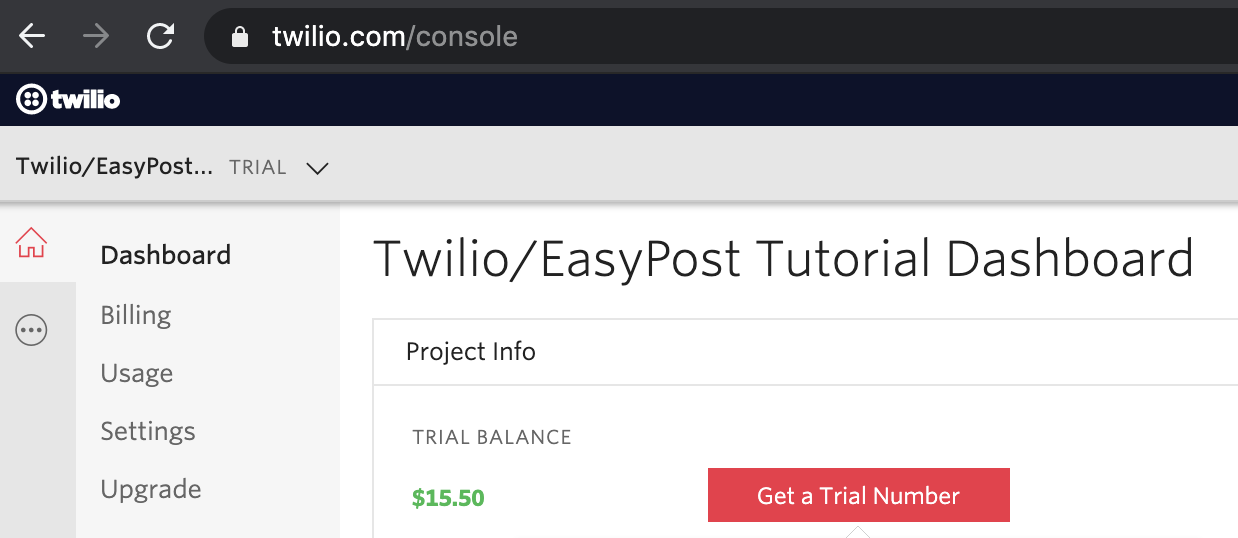
In order to use Twilio SMS, you’ll need a working phone number from which you can send outbound messages.
If you do not already have one, you can get it from the Twilio console. Clicking the red “Get a Trial Number” button will give you a number you can use with your trial credit, but all messages will be prefixed with text indicating you are using a trial number. To send messages without this trial text, you’ll need to upgrade to a paid account.
If you want more flexibility in choosing a phone number for your preferred country and area, use the Phone Numbers page to search and browse available numbers.
Setting and accessing environment variables
Now that you have your account with both EasyPost and Twilio set up, we need to set a few more environment variables so that our app knows what credentials to use to talk to these services, as well as what phone numbers we want to send our SMS notifications to go to and from for testing purposes.
Set the following environment variables, replacing the angle brackets and inner text with the appropriate values for your accounts:
Note that if you are following this tutorial on a Windows computer you have to use set instead of export.
Great, now to access these values, we need to change a few things in our code.
First, we need to import some dependencies. Then we need to create the Twilio client, so that we can send a message once we receive the webhook event. Your app.py file should now look like the following:
Creating trackers in EasyPost
In order to tell EasyPost which shipments we want to track, we need to create a “tracker”. This can happen in one of two ways:
- Any shipping label purchased through EasyPost automatically creates a corresponding tracker.
- Creating a tracker object independently of label creation.
For the purpose of this tutorial we’re going to use the later, and EasyPost provides a very handy test environment in which we can trigger simulated test shipments events, without having to worry about waiting hours or days for a carrier to transport a physical package.
To simulate our shipments in this tutorial we’ll need to make a simple script that we can run apart from our app that will send tracker creation requests to EasyPost.
Save a new file called test_tracker.py and input the following code:
I’ve set my test tracker to leverage one of the test trackers provided in EasyPost’s documentation, which you can also see below:
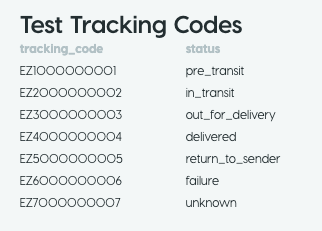
The code I used will simulate a delivered shipment, but you can use any of the available test codes. These are the only codes that can be used with your EasyPost test API key, but conveniently you can expect the simulated events to arrive at your webhook within a few minutes.
In test mode, you’ll get a few consecutive events of the same status, this will give you the ability to test deduplication logic if you like, as it’s common for some carriers to have different events with the same status, particularly ‘in_transit’ events. For the purpose of this tutorial we are not going to worry about managing duplicate events, but I’ll go over this problem a bit more later.
When we are ready to test our app, you’ll just run the app, and then open a separate terminal window to run the test_tracker.py script.
Handling webhook events
The events we receive from EasyPost will be JSON strings so we’ll use the standard json package to help us parse the events. When we receive an event, we’ll use the Flask request object to retrieve the data and load it into JSON format.
Adding notification rules
Every time there are new details for a given shipment, EasyPost will make a POST request to your webhook to make you aware, but sending an SMS message for every single event will probably get a bit noisy for our hypothetical customers.
Instead let’s add some business logic to make sure that we only send messages when a shipment is in the “out_for_delivery” or “delivered” status. Now my code looks like this, but feel free to add your own business logic if you like.
Assuming you followed my logic, when using the EasyPost testing API you should only receive SMS messages if you used test tracking code EZ3000000003 or EZ4000000004, as those are the ones that trigger the appropriate tracker statuses.
Sending messages for humans
This is a great start, but we have a bit of a problem. If we send a message with just the status of the shipment without any context, it won’t be very useful. Additionally, it’s not a great experience if the message looks like it was meant for a machine. It should be human readable to make the person receiving it feel like they are receiving a real message.
To achieve this outcome, we can create a simple dictionary with static data that maps the shipment statuses we expect to see from EasyPost to human readable text we want to send to our customers. I’ll make a few small changes to app.py, and I should be good to go.
This is much better, now we have some text that references the carrier and tracking code and looks like it was meant for a human.
Testing the service
Now that we have some handling for events, let’s make sure that our app and ngrok are running. Keep in mind that if you stop and restart ngrok you will be assigned a different public URL, so you will need to go back to the EasyPost configuration and update the webhook URL. While this is tedious to do, it is only necessary in a testing environment, since ngrok will not be used in production.
Once you’ve confirmed that things are running, let’s run our script to create test trackers in another terminal window. Assuming all goes well, we should be able to watch our SMS notifications come through from Twilio.
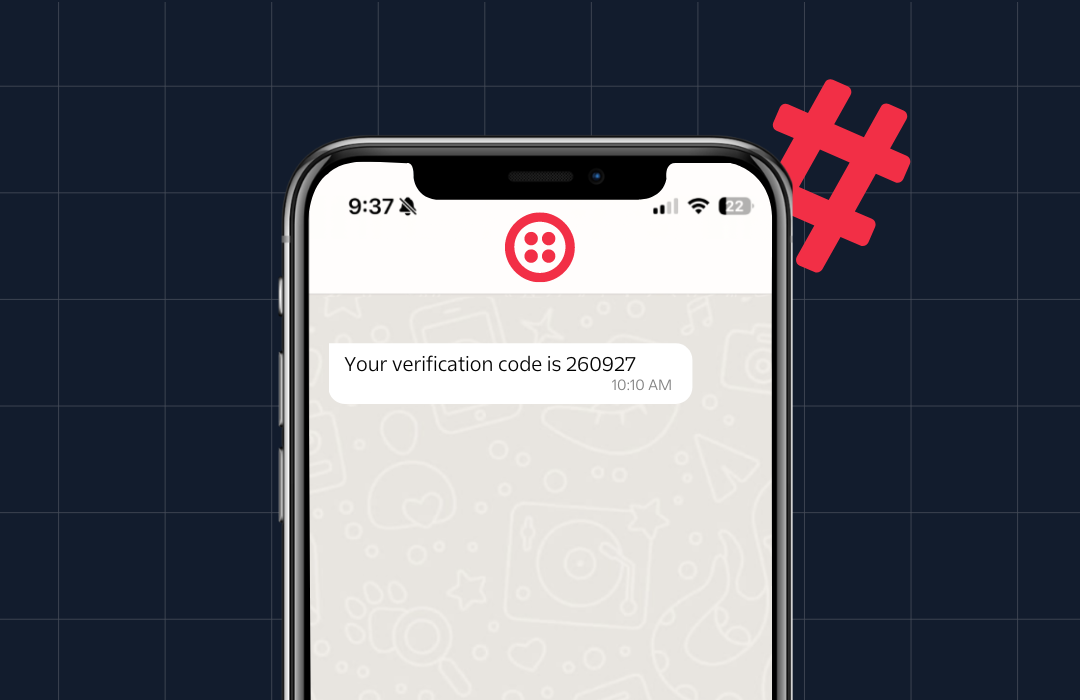
A minute or two after you run the script you should receive an SMS message from the Twilio number you created previously, like the one below.
Congrats, you’re now processing webhooks from EasyPost and using them to trigger SMS messages!
Notes on production deployment
There are several things that you’ll want to consider when deploying this app in production. For starters, you should not use the Flask development server. As the warning that presents itself states when you run your app, it is not made for production traffic.
The two most common production ready web servers for Python web applications are gunicorn and uWSGI, both installable on your virtual environment with pip. For example, here is how to run the application with gunicorn:
Also keep in mind that for a production deployment you will be running the service on a cloud server and not out of your own computer, so there is no need to use ngrok.
Handling high volume traffic
When planning your deployment, you’ll also want to think carefully about the amount of traffic you expect to be flowing to your webhook. If you’re shipping and tracking a lot of packages, you’ll want to make sure that your webhook can handle surges in event traffic which can happen unpredictably.
While you can scale up the number of instances of your app, this is not very efficient as you might have periods of low activity, which you’ll be wasting production resources hosting. Instead, I’d recommend keeping your ingestion of webhooks as lightweight as possible, and processing them asynchronously.
In this tutorial we checked the body of the webhook and triggered an SMS message with Twilio whenever we received the key events we were looking for from EasyPost. This is relatively lightweight, but in a production scenario we would likely need to take on a bit more technical overhead to process the event. Specifically, we’d need to check the shipment associated with the event, correlate it with an order and corresponding customer in our hypothetical order management system, find the customer contact information that we should use to send our notification, and send the notification through Twilio. Depending on the size of your customer base and dependent application architecture, this could result in multiple database queries.
Instead of doing this synchronously upon receiving the POST from EasyPost, I’d highly recommend just adding the request bodies to a queue for asynchronous processing. Redis is a powerful in-memory datastore that is commonly used to manage queues like this in conjunction with RQ. You can check out Sam Agnew’s blog post about this technique here.
If for some reason you’re getting so many events that you can’t process them at the time they are posted to your webhook, don’t worry, EasyPost has built in redundancy with progressive backoff retry logic to help ensure your webhook is able to receive the event later should your webhook be temporarily unavailable.
Securing the webhook
Adding security is also an important consideration. In our tutorial example, any POST data sent to our webhook will be received and processed, but this presents a pretty glaring security vulnerability. If this were a production application, we would want to add some authentication to our webhook to ensure that we are getting notifications from known sources and not bad actors.
EasyPost supports basic authentication to secure your webhook, which is covered in their webhook guide. It would also be a good idea to rotate your basic authentication credentials periodically to decrease the likelihood that they become compromised. You can do this automatically via EasyPost’s Webhooks API.
Event deduplication
As you probably noticed in testing, EasyPost sends multiple webhook events in test mode as I mentioned, and this is to help you test deduplication logic for events. If you’re sending out notifications for events like we are in this tutorial, you don’t want to spam your customers with duplicate events. To help manage this, I recommend maintaining a database that helps you track events. SQLAlchemy plays very nicely with Flask via the Flask-SQLAlchemy package and is a great tool to help manage the state of shipments and events with a relational database.
When events come in, you can check if you’ve received a similar event already, and decide what you want to do from there. In all likelihood, you probably won’t care about every in_transit event that the package has in it’s journey, but EasyPost sends you the events to provide as much granularity as possible as other business use cases require it.
Conclusion
As the popularity of e-commerce grows, and consumers’ attention spans shrink, it’s increasingly important to provide customers with the best buying experience possible.
Merely sending a notification to customers is just the beginning though. Perhaps you want to automatically provide a coupon if an order gets delayed or lost. That’s easy to link to in your Twilio message, and you’ve just turned a negative customer experience into a positive one!
Hopefully you have found this to be a useful tutorial. Below are some additional resources that cover some of the things I alluded to in this tutorial that we didn’t get to cover in depth.
I’d love to see what you build, find me on LinkedIn!

Related Resources
Twilio Docs
From APIs to SDKs to sample apps
API reference documentation, SDKs, helper libraries, quickstarts, and tutorials for your language and platform.
Resource Center
The latest ebooks, industry reports, and webinars
Learn from customer engagement experts to improve your own communication.
Ahoy
Twilio's developer community hub
Best practices, code samples, and inspiration to build communications and digital engagement experiences.