Getting Started with iOS v4.x
To make sure your app is ready for iOS 14 please visit this page.
- Video API Overview
- Prerequisites
- Connect to a Room
- Join a Room
- Set up local media
- Working with Remote Participants
- Participating in a Room
- Server-side Control
- Getting help
This guide provides you with an overview of the key objects you'll use in the Programmable Video API to build your video application with the Twilio Programmable Video iOS SDK.
Note: If you haven't already done so, take a look at the open source video collaboration app and quickstart apps. Then come back to this guide for more detail on how to add video to your own app.
If you've worked with WebRTC in the past, you'll find that Programmable Video provides a simple wrapper around WebRTC's lower-level APIs to make it easy to build rich audio and video applications. You can still access lower-level primitives, but that's not required to get started.
Additionally, Programmable Video provides the missing pieces required to use WebRTC to build sophisticated applications: Global STUN/TURN relays, media services for large-scale group conferences and recording, and signaling infrastructure are all included.
Let's start with an overview of the Programmable Video API:
- A
Roomrepresents a real-time audio, video, and/or screen-share session, and is the basic building block for a Programmable Video application. - In a
Peer-to-peer Room, media flows directly between participants. Supports up to 10 participants in a mesh topology. - In a
Group Room, media is routed through Twilio's Media Servers. Supports up to 50 participants. Participantsrepresent client applications that are connected to a Room and sharing audio and/or video media with one another.Tracksrepresent the individual audio and video media streams that are shared within a Room.LocalTracksrepresent the audio and video captured from the local microphone and camera.RemoteTracksrepresent the audio and video tracks from other participants connected to the Room.
The following code samples illustrate common tasks that you as a developer may wish to perform related to a Room and its Participants.
To start using the iOS Programmable Video SDK in your apps, you need to perform a few basic tasks first.
The Twilio Video iOS SDK dynamic framework can be installed using Swift Package Manager, CocoaPods or manually, as you prefer.
You can add Programmable Video for iOS by adding the https://github.com/twilio/twilio-video-ios repository as a Swift Package.
In your Build Settings, you will also need to modify Other Linker Flags to include -ObjC.
There is a known issue with consuming binary frameworks distributed via Swift Package Manager. The workaround to this issue is to add a Run Script Phase to the Build Phases of your Xcode project. This Run Script Phase should come after the Embed Frameworks build phase. This new Run Script Phase should contain the following code:
1find "${CODESIGNING_FOLDER_PATH}" -name '*.framework' -print0 | while read -d $'\0' framework2do3codesign --force --deep --sign "${EXPANDED_CODE_SIGN_IDENTITY}" --preserve-metadata=identifier,entitlements --timestamp=none "${framework}"4done5
1source 'https://github.com/CocoaPods/Specs'23platform :ios, '9.0'45target 'TARGET_NAME' do6pod 'TwilioVideo', '~> 4.6'7end
Then run pod install to install the dependencies to your project.
TwilioVideo.xcframework is distributed as a dynamic iOS framework that you can drag and drop into your existing projects.
View all Video iOS Releases here or just download the latest Video dynamic framework here.
Once you've downloaded and unpacked the XCFramework, navigate to your Xcode project's General settings page. Drag and drop TwilioVideo.xcframework onto the Frameworks, Libraries, and Embedded Content section. Ensure that "Copy items if needed" is checked and press Finish. Ensure that "Embed & Sign" is selected.
In your Build Settings, you will also need to modify Other Linker Flags to include -ObjC.
Carthage is not currently a supported distribution mechanism for Twilio Video. Carthage does not currently work with .xcframeworks as documented here. Once Carthage supports binary .xcframeworks, Carthage distribution will be re-added.
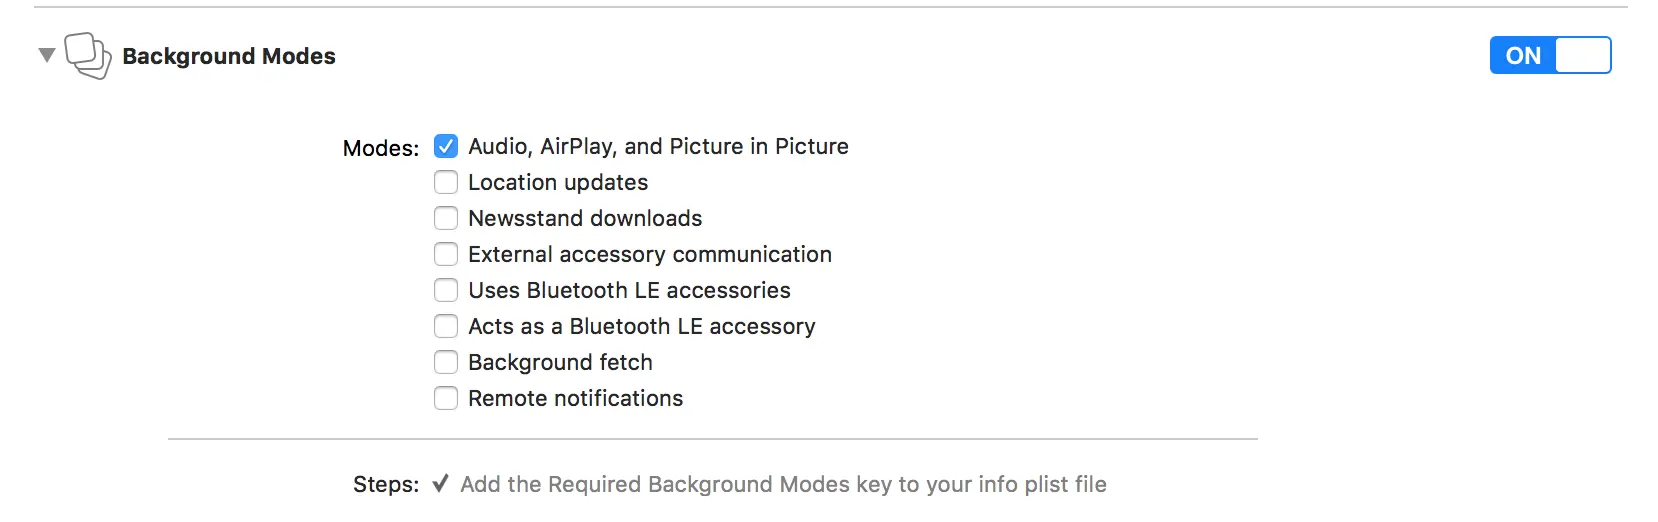
To allow a connection to a Room to be persisted while an application is running in the background, you must select the Audio, AirPlay, and Picture in Picture background mode from the Capabilities project settings page.
Twilio Video requires user permission for features like sharing video from the camera or audio from the microphone. Consider how your applications might function with reduced functionality in case some permissions (like the camera) are declined.
| Friendly Name | Privacy Usage Description Key | iOS Version | Recommendation | |
|---|---|---|---|---|
| Camera | NSCameraUsageDescription | All | Request permissions using AVCaptureDevice.requestAccess(for:completionHandler:) before calling TwilioVideoSDK.connect(options:delegate:) with a TVICameraSource. | |
| Microphone | NSMicrophoneUsageDescription | All | Request permissions using AVAudioSession.requestRecordPermission() before calling TwilioVideoSDK.connect(options:delegate:) when Participants publish or subscribe to audio tracks with TVIDefaultAudioDevice. (*) | |
| Local Network | NSLocalNetworkUsageDescription | 14.0 + | This permission is not recommended unless your app is already using NWConnection APIs on the local network. Twilio Video only requests permissions after you connect to a Peer-to-Peer Room with TVILocalNetworkPrivacyPolicyAllowAll on iOS 14. |
- Custom audio devices do not require microphone permissions for playback only use cases. See video-quickstart-ios/issues/207 for more information.
The iOS SDK supports iOS 9.0 or higher at build time, and 11.0 or higher at run time. It is built for armv7, arm64, i386 and x86_64 architectures with Bitcode slices for armv7 and arm64 devices.
The TwilioVideo.framework is built with Xcode 12. The framework can be consumed with previous versions of Xcode. However, re-compiling Bitcode when exporting for Ad Hoc or Enterprise distribution requires the use of Xcode 12.x.
API Keys represent credentials to access the Twilio API. They are used for two purposes:
- to authenticate to the REST API.
- to create and revoke Access Tokens
For the purposes of this guide, we will create our API Key from the Twilio Console.
- Go to the API Keys section under Tools in the Twilio Console.
- Click on "Create a New API Key", add a friendly name and save your Key and Secret.
To execute the code samples below, you'll need to generate an Access Token. An Access Token is a short-lived credential used to authenticate your client-side application to Twilio.
You can generate an Access Token using either the Twilio CLI or a Twilio server-side SDK. For application testing purposes, the Twilio CLI provides a quick way to generate Access Tokens that you can then copy/paste into your application.
To use the CLI, you will need to install the Twilio CLI and log in to your Twilio account from the command line; see the CLI Quickstart for instructions. Then, you can install the Token CLI plugin with the following command:
twilio plugins:install @twilio-labs/plugin-token
To generate an Access Token, run the following command. --identity is a required argument and should be a string that represents the user identity for this Access Token.
twilio token:video --identity=<identity>
In a production application, your back-end server will need to generate an Access Token for every user in your application. Visit the User Identity and Access Token guide to learn more. You can find examples of how to generate an Access Token for a participant using Twilio server-side SDKs in the User Identity and Access Token guide.
Call TwilioVideo.connect() to connect to a Room from your iOS application. Once connected, you can send and receive audio and video streams with other Participants who are connected to the Room.
1@IBAction func createARoom(sender: AnyObject) {2let connectOptions = ConnectOptions(token: accessToken) { (builder) in3builder.roomName = "my-room"4}5room = TwilioVideoSDK.connect(options: connectOptions, delegate: self)6}78// MARK: RoomDelegate910func roomDidConnect(room: Room) {11print("Did connect to Room")1213if let localParticipant = room.localParticipant {14print("Local identity \(localParticipant.identity)")1516// Set the delegate of the local particiant to receive callbacks17localParticipant.delegate = self18}19}
You must pass the Access Token when connecting to a Room. You may also optionally pass the following:
- Local audio, video or data tracks, to begin sharing pre-created local media with other Participants in the Room upon connecting.
- A room name, which allows you to dynamically specify the name of the Room you wish to join. (Note: You can also encode the Room name in the Access Token, which will allow the user to connect to only the Room specified in the token.)
- An ICE transport policy, which allows you to force calls through TURN relay for testing purposes.
The name of the Room specifies which Room you wish to join. If a Room by that name does not already exist, it will be created upon connection. If a Room by that name is already active, you'll be connected to the Room and receive notifications from any other Participants also connected to the same Room. Room names must be unique within an account.
You can also create a Room using the Rooms REST API. Look at the REST API Rooms resource docs for more details.
Example: Create a Room called DailyStandup
Note: If you don't specify a Type attribute, then Twilio will create a Group Room by default.
You can also set the room type from the Room Settings page in the Twilio Video Console. Twilio will use the room type set on Room Settings page, when you create a room from the client-side or the REST API.
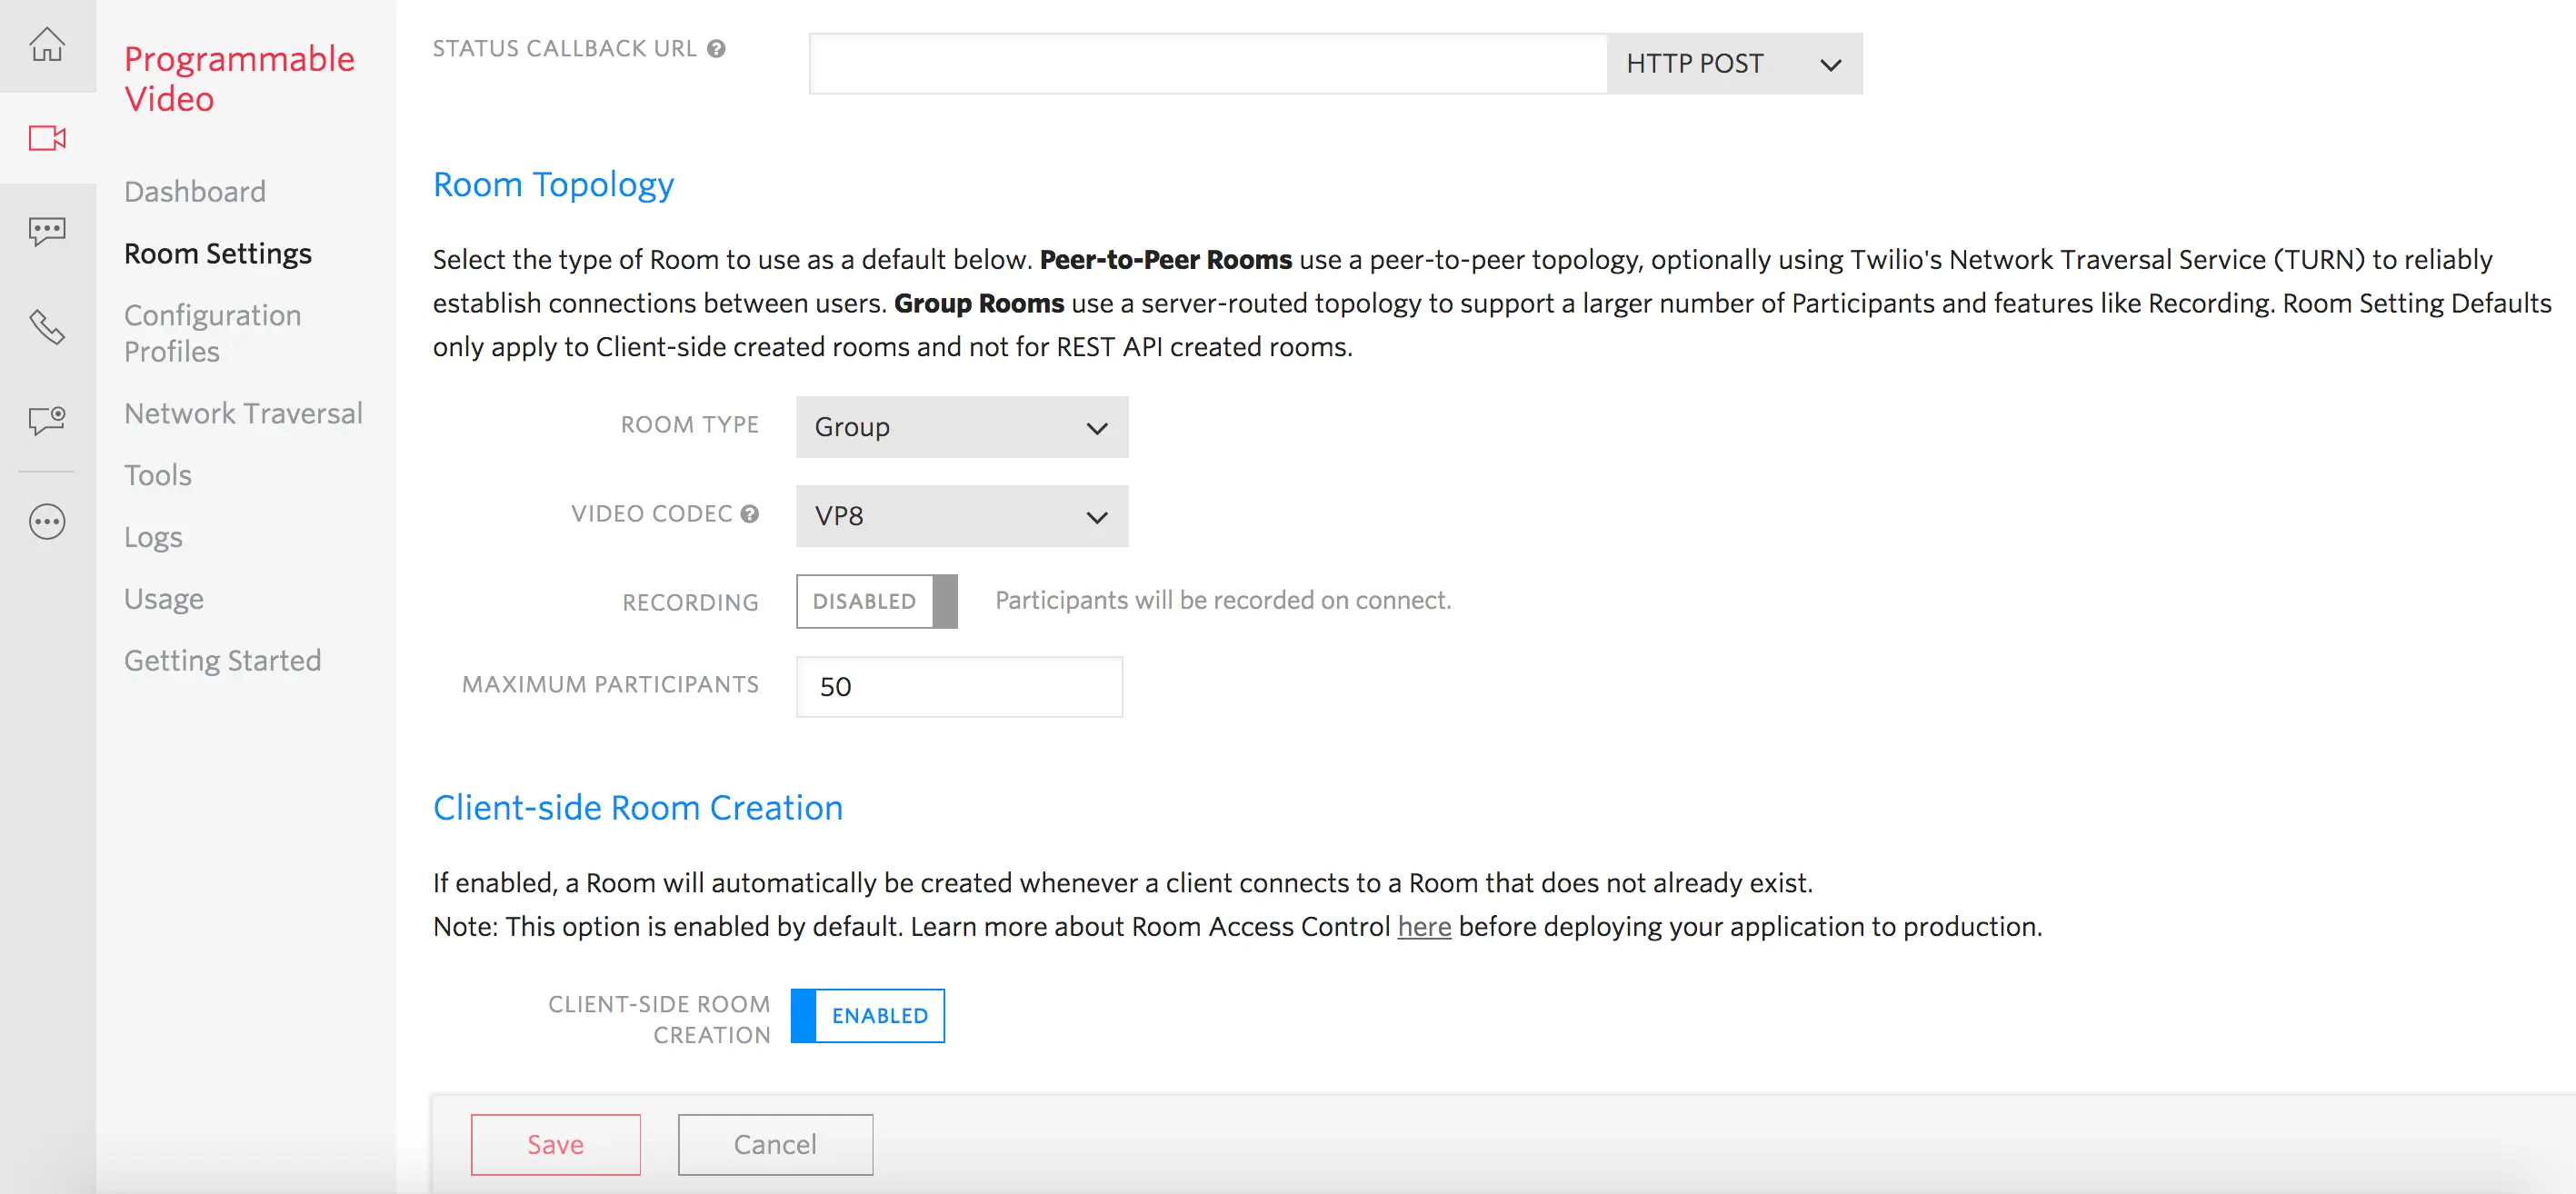
Note: Twilio will set the Room Type as Group by default on the Room Settings page.
Once a Room is created, Twilio will fire a room-created webhook event, if the StatusCallback URL is set. You can set the StatusCallback URL on the Room Settings page, if you want create a room from the client-side.
If you create a room using the REST API, then you need to provide a StatusCallback URL while creating the room.
1curl -X POST "https://video.twilio.com/v1/Rooms" \2--data-urlencode "UniqueName=DailyStandup" \3--data-urlencode "StatusCallback=https://hooks.example.com/room-events" \4--data-urlencode "StatusCallbackMethod=POST" \5--data-urlencode "Type=group" \6-u $TWILIO_API_KEY:$TWILIO_API_SECRET
Recordings can be enabled only on Group Rooms. Set Recordings to Enabled to record participants when they connect to a Group Room.
Recordings can also be enabled on Group Rooms through via the Rest API at Room creation time by setting the RecordParticipantsOnConnect property to true.
If you'd like to join a Room you know already exists, you handle that exactly the same way as creating a room: just pass the Room name to the connect method.
Once in a Room, you'll receive a room:participantDidConnect: callback for each Participant that successfully joins. Querying the remoteParticipants getter will return any existing Participants who have already joined the Room.
1@IBAction func joinRoom(sender: AnyObject) {2let connectOptions = ConnectOptions(token: accessToken) { (builder) in3builder.roomName = "existing-room"4})5room = TwilioVideoSDK.connect(options: connectOptions, delegate: self)6}78// MARK: RoomDelegate910func roomDidConnect(room: Room) {11print("Did connect to room")1213if let localParticipant = room.localParticipant {14print("Local identity \(localParticipant.identity)")1516// Set the delegate of the local particiant to receive callbacks17localParticipant.delegate = self18}19}
You can capture local media from your device's microphone, camera or screen-share on different platforms in the following ways:
In an iOS application, begin capturing audio data by creating a TVILocalAudioTrack, and begin capturing video by creating a TVILocalVideoTrack with an associated TVIVideoCapturer. The iOS Video SDK provides customizable video capturers for both camera and screen capture.
1// Create an audio track2var localAudioTrack = LocalAudioTrack()34// Create a data track5var localDataTrack = LocalDataTrack()67// Create a CameraSource to provide content for the video track8var localVideoTrack : LocalVideoTrack?910// Create a video track with the capturer.11if let camera = CameraSource(delegate: self) {12localVideoTrack = LocalVideoTrack(source: camera)13}
When the client joins a Room, the client can specify which Tracks they wish to share with other Participants. Imagine we want to share the audio and video Tracks we created earlier.
1let connectOptions = ConnectOptions(token: accessToken) { (builder) in2builder.roomName = "my-room"34if let audioTrack = localAudioTrack {5builder.audioTracks = [ audioTrack ]6}7if let dataTrack = localDataTrack {8builder.dataTracks = [ dataTrack ]9}10if let videoTrack = localVideoTrack {11builder.videoTracks = [ videoTrack ]12}13}1415var room = TwilioVideoSDK.connect(options: connectOptions, delegate: self)
For some use cases (such as a ReplayKit broadcast extension) you may wish to connect as a publish-only Participant that is not subscribed to any Tracks. If you are connecting to a Group Room, you may disable automatic subscription behavior via ConnectOptions.
1let connectOptions = ConnectOptions(token: accessToken) { (builder) in2builder.isAutomaticSubscriptionEnabled = false3builder.roomName = "my-room"45if let audioTrack = localAudioTrack {6builder.audioTracks = [ audioTrack ]7}8}910var room = TwilioVideo.connect(options: connectOptions, delegate: self)
When you join a Room, Participants may already be present. You can check for existing Participants in the roomDidConnect: callback by using the remoteParticipants getter. To receive RemoteParticipantDelegate callbacks you will need to set the RemoteParticipant.delegate property for each connected Remote Participant.
1room = TwilioVideo.connect(options: connectOptions, delegate: self)23// MARK: RoomDelegate45func roomDidConnect(room: Room) {6// The Local Participant7if let localParticipant = room.localParticipant {8print("Local identity \(localParticipant.identity)")910// Set the delegate of the local participant to receive callbacks11localParticipant.delegate = self12}1314// Connected participants already in the room15print("Number of connected Participants \(room.remoteParticipants.count)")1617// Set the delegate of the remote participants to receive callbacks18for remoteParticipant in room.remoteParticipants {19remoteParticipant.delegate = self20}21}2223func participantDidConnect(room: Room, participant: RemoteParticipant) {24print ("Participant \(participant.identity) has joined Room \(room.name)")2526// Set the delegate of the remote participant to receive callbacks27participant.delegate = self28}2930func participantDidDisconnect(room: Room, participant: RemoteParticipant) {31print ("Participant \(participant.identity) has left Room \(room.name)")32}
When Participants connect to or disconnect from a Room that you're connected to, you'll be notified via an event listener: Similar to Room Events, Twilio will fire Participant events if the StatusCallback webhook URL is set when the Room is created. These events help your application keep track of the participants who join or leave a Room.
1// MARK: RoomDelegate23// First, we set a Participant Delegate when a Participant first connects:4func participantDidConnect(room: Room, participant: RemoteParticipant) {5print("Participant connected: \(participant.identity)")6participant.delegate = self7}
To see the Video Tracks being sent by remote Participants, we need to render them to the screen:
1// MARK: RemoteParticipantDelegate23/*4* In the Participant Delegate, we can respond when the Participant adds a Video5* Track by rendering it on screen.6*/7func didSubscribeToVideoTrack(videoTrack: RemoteVideoTrack,8publication: RemoteVideoTrackPublication,9participant: RemoteParticipant) {1011print("Participant \(participant.identity) added a video track.")1213if let remoteView = VideoView.init(frame: self.view.bounds,14delegate:self) {1516videoTrack.addRenderer(remoteView)17self.view.addSubview(remoteView)18self.remoteView = remoteView19}20}2122// MARK: VideoViewDelegate2324// Lastly, we can subscribe to important events on the VideoView25func videoViewDimensionsDidChange(view: VideoView, dimensions: CMVideoDimensions) {26print("The dimensions of the video track changed to: \(dimensions.width)x\(dimensions.height)")27self.view.setNeedsLayout()28}
Sometimes you need to make sure you're looking fantastic before entering a Room. We get it. The iOS SDK provides a means to render a local camera preview outside the context of an active Room:
1// Use CameraSource to produce video from the device's front camera.23if let camera = CameraSource(delegate: self),4let videoTrack = LocalVideoTrack(source: camera) {56// VideoView is a VideoRenderer and can be added to any VideoTrack.7let renderer = VideoView(frame: view.bounds)8}9if let camera = TVICameraCapturer(source: .frontCamera),10let videoTrack = TVILocalVideoTrack(capturer: camera) {1112// TVIVideoView is a TVIVideoRenderer and can be added to any TVIVideoTrack.13let renderer = TVIVideoView(frame: view.bounds)1415// Add renderer to the video track16videoTrack.addRenderer(renderer)1718self.localVideoTrack = videoTrack19self.camera = camera20self.view.addSubview(renderer)21} else {22print("Couldn't create CameraCapturer or LocalVideoTrack")23}
You can disconnect from a Room you're currently participating in. Other Participants will receive a participantDisconnected event.
1// To disconnect from a Room, we call:2room?.disconnect()34// This results in a callback to RoomDelegate#roomDidDisconnect(room: Room, error: Error?)56// MARK: RoomDelegate78func roomDidDisconnect(room: Room, error: Error?) {9print("Disconnected from room \(room.name)")10}
The Video SDK will raise notifications when a Room is reconnecting due to a network disruption. A Room reconnection is triggered due to a signaling or media reconnection event. To capture when a reconnection is triggered or that it has reconnected:
1// MARK: RoomDelegate23// Error will be either TwilioVideoSDK.Error.signalingConnectionError or TwilioVideoSDK.Error.mediaConnectionError4func roomIsReconnecting(room: Room, error: Error) {5print("Reconnecting to room \(room.name), error = \(String(describing: error))")6}78func roomDidReconnect(room: Room) {9print("Reconnected to room \(room.name)")10}
In a Peer-to-Peer Room, each Participant has media connections to all the other Participants in the Room. If all media connections between the LocalParticipant and all other Participants are broken, then the LocalParticipant's Room will enter the reconnecting state until media connectivity with at least one Participant is re-established.
There are certain instances when an application is put into the background that both the signaling and media connection are closed, which will cause the reconnecting delegate method to be invoked:
- When connected to a Peer-to-Peer Room with no Remote Participants.
- When connected to a Peer-to-Peer Room with other Remote Participants and no shared audio tracks.
- When connected to a Group Room with no shared audio tracks.
The Programmable Video REST API allows you to control your video applications from your back-end server via HTTP requests. To learn more check out the Programmable Video REST API docs.
We love feedback and questions especially those with helpful debugging information so we can diagnose and respond quickly. When submitting issues or support tickets, it would be great if you add the following:
- Description - A description of the issue
- Steps to reproduce - List the steps necessary to reproduce the issue
- Code - Include any applicable code snippets that would assist in reproduction and troubleshooting
- Expected Behavior - What you expect to happen
- Actual Behavior - What actually happens
- Reproduces How Often - What percentage of the time does it reproduce?
- Logs - Any log output when the issue occurs. See below for enabling debug level logging.
- Video iOS SDK - The version(s) of the Video iOS SDK where this issue is apparent
- Xcode - The version(s) of Xcode where this issue is apparent
- iOS Version - The version(s) of iOS where this issue is apparent
- iOS Device - The iOS device(s) where this issue is apparent
- Room SID - Room SIDs can be useful for tracing backend issues
After gathering the above information, you can get help in a few ways:
For issues related to the Twilio Video iOS SDK itself:
For issues related to the Twilio Video iOS Quickstarts:
To enable debug level logging, add the following code in your application:
TwilioVideoSDK.setLogLevel(.debug)