Content API Quickstart
Create your first content template and send it using the Content API. Follow the steps to create your own content template and send it to your customers on WhatsApp.
- Create a content template.
- Optional: Review content templates.
- Optional: Submit content templates for approval to WhatsApp.
- Optional: Fetch an approval status.
- Send a message on WhatsApp.
For other requests, see Content API resources.
Before you send content templates created using the Content API, you must have at least one registered sender. A sender can be one of the following:
To send messages across different channels, configure the appropriate sender as follows:
- RCS: Request an RCS sender. For more information, see RCS Onboarding Guide.
- SMS or MMS: Use a phone number. You can port a number or purchase one from the Twilio Console.
- WhatsApp: Use your Twilio phone number or your own number to register a WhatsApp sender.
- Facebook Messenger: Connect your Facebook page to create a Facebook Messenger sender.
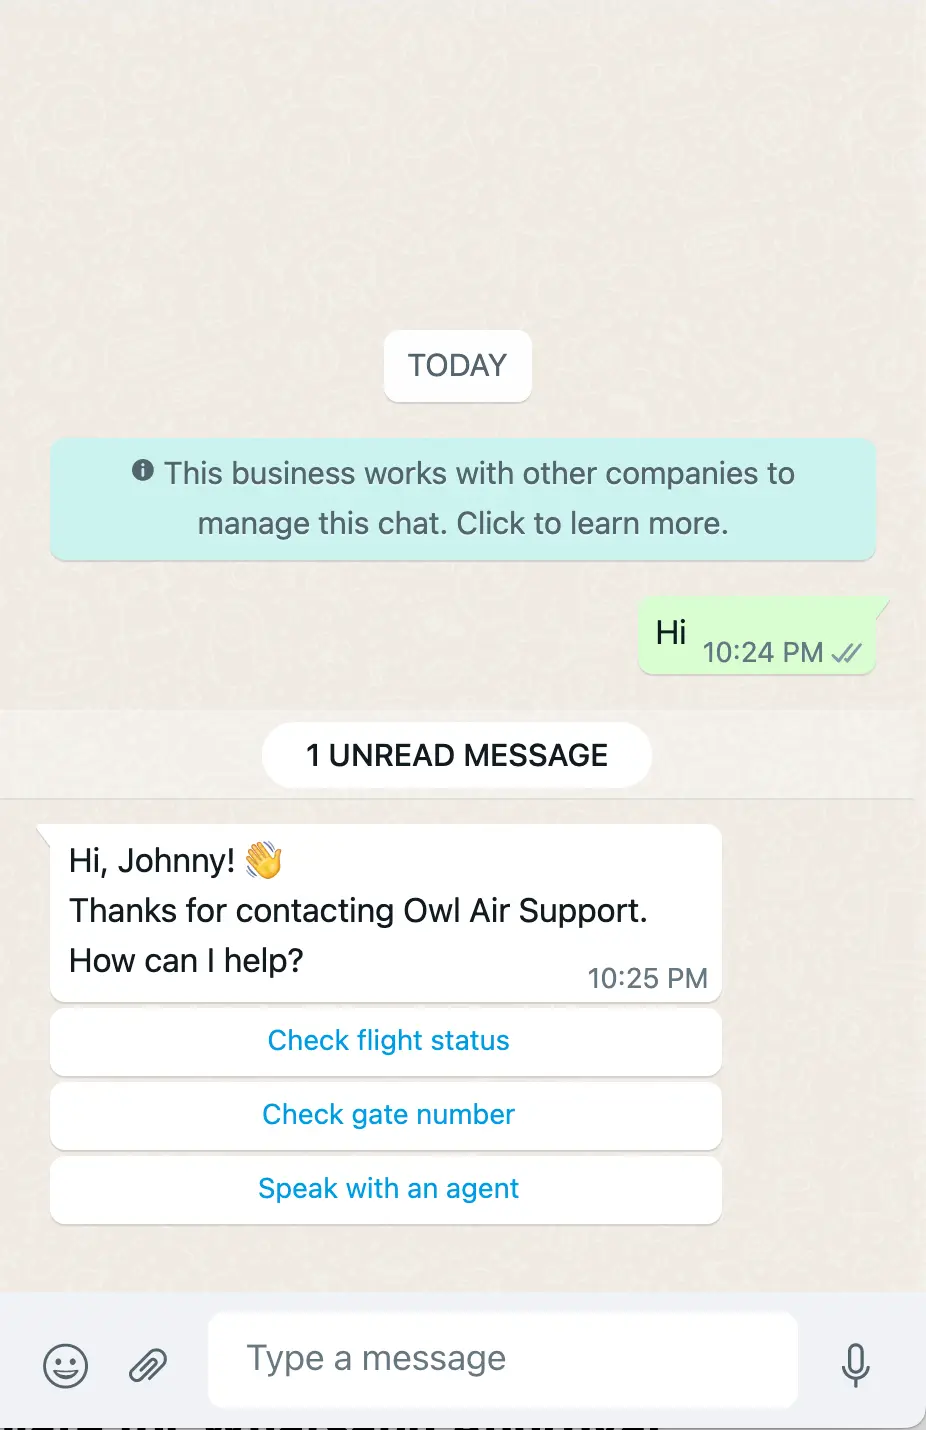
Create a twilio/quick-reply template so recipients can tap, rather than type, to respond to messages on WhatsApp and Facebook Messenger.
If you create a twilio/text template, recipients can send quick replies using the pre-configured messages you created. If the recipient's channel doesn't support quick replies, Twilio automatically defaults to a text message. This lets you send the same content across multiple messaging channels.
You can include placeholders (for example, {{1}}) in the message body. The placeholder values are updated dynamically when you send the message. If you omit a placeholder value at send time, Twilio uses the default value specified in variables.
See the content types overview to learn more about additional content types.
Use self-evident default variable values for WhatsApp template approval
If you plan to submit your content template for WhatsApp approval, use self-evident default variable values. These values are used as sample values during the approval process.
Replace the $TWILIO_ACCOUNT_SID with your Twilio Account SID and $TWILIO_AUTH_TOKEN with your Twilio Auth Token for the following examples.
1curl -X POST 'https://content.twilio.com/v1/Content' \2-H 'Content-Type: application/json' \3-u $TWILIO_ACCOUNT_SID:$TWILIO_AUTH_TOKEN \4-d '{5"friendly_name": "owl_air_qr",6"language": "en",7"variables": {"1":"Owl Air Customer"},8"types": {9"twilio/quick-reply": {10"body": "Hi, {{1}} 👋 \nThanks for contacting Owl Air Support. How can I help?",11"actions": [12{13"title": "Check flight status",14"id": "flightid1"15},16{17"title": "Check gate number",18"id": "gateid1"19},20{21"title": "Speak with an agent",22"id": "agentid1"23}24]25},26"twilio/text": {27"body": "Hi, {{1}}. \n Thanks for contacting Owl Air Support. How can I help?."28}29}30}'
Output
1{2"account_sid": "ACXXXXXXXXXXXXXXXXXXXXXXXXXXXXXX",3"date_created": "2022-08-29T10:43:20Z",4"date_updated": "2022-08-29T10:43:20Z",5"friendly_name": "owl_air_qr",6"language": "en",7"links": {8"approval_create": "https://content.twilio.com/v1/Content/HXXXXXXXXXXXXXXXXXXXXXXXXXXXXXXX/ApprovalRequests/whatsapp",9"approval_fetch": "https://content.twilio.com/v1/Content/HXXXXXXXXXXXXXXXXXXXXXXXXXXXXXXX/ApprovalRequests"10},11"sid": "HXXXXXXXXXXXXXXXXXXXXXXXXXXXXXXX",12"types": {13"twilio/text": {14"body": "Hi, {{ 1 }}. \n Thanks for contacting Owl Air Support. How can I help?."15},16"twilio/quick-reply": {17"body": "Hi, {{ 1 }}. \n Thanks for contacting Owl Air Support. How can I help?",18"actions": [19{20"id": "flightid1",21"title": "Check flight status"22},23{24"id": "gateid1",25"title": "Check gate number"26},27{28"id": "agentid1",29"title": "Speak with an agent"30}31]32}33},34"url": "https://content.twilio.com/v1/Content/HXXXXXXXXXXXXXXXXXXXXXXXXXXXXXXX",35"variables": {36"1": "Owl Air Customer"37}38}
After you create your first content template, make a note of the sid value (for example, HXXXXXXXXXXXXXXXXXXX) in the response. You'll use the sid for other requests.
WhatsApp template limits
The Content API supports an unlimited number of content templates. However, WhatsApp limits each business to 6,000 approved content templates per WhatsApp Business Account (WABA).
Make a GET request to review all content templates. To review a specific content template, include {ContentSid} in the request URL path.
1// Download the helper library from https://www.twilio.com/docs/node/install2const twilio = require("twilio"); // Or, for ESM: import twilio from "twilio";34// Find your Account SID and Auth Token at twilio.com/console5// and set the environment variables. See http://twil.io/secure6const accountSid = process.env.TWILIO_ACCOUNT_SID;7const authToken = process.env.TWILIO_AUTH_TOKEN;8const client = twilio(accountSid, authToken);910async function fetchContent() {11const content = await client.content.v1.contents("HXXXXXXX").fetch();1213console.log(content.dateCreated);14}1516fetchContent();
Response
1{2"sid": "HXXXXXXX",3"account_sid": "ACaaaaaaaaaaaaaaaaaaaaaaaaaaaaaaaa",4"friendly_name": "Some content",5"language": "en",6"variables": {7"name": "foo"8},9"types": {10"twilio/text": {11"body": "Foo Bar Co is located at 39.7392, 104.9903"12},13"twilio/location": {14"longitude": 104.9903,15"latitude": 39.7392,16"label": "Foo Bar Co"17}18},19"url": "https://content.twilio.com/v1/Content/HXaaaaaaaaaaaaaaaaaaaaaaaaaaaaaaaa",20"date_created": "2015-07-30T19:00:00Z",21"date_updated": "2015-07-30T19:00:00Z",22"links": {23"approval_create": "https://content.twilio.com/v1/Content/HXaaaaaaaaaaaaaaaaaaaaaaaaaaaaaaaa/ApprovalRequests/whatsapp",24"approval_fetch": "https://content.twilio.com/v1/Content/HXaaaaaaaaaaaaaaaaaaaaaaaaaaaaaaaa/ApprovalRequests"25}26}
To start business-initiated conversations on WhatsApp, you must submit your message template for approval. The approval process typically takes between 5 minutes and 24 hours.
WhatsApp has strict template approval criteria. Learn more about WhatsApp approval requirements and best practices.
1curl -X POST 'https://content.twilio.com/v1/Content/HXXXXXXXXXXXXXXXXXXXXXXXXXXXXXXX/ApprovalRequests/whatsapp' \2-H 'Content-Type: application/json' \3-u $TWILIO_ACCOUNT_SID:$TWILIO_AUTH_TOKEN \4-d '{5"name": "flight_replies",6"category": "UTILITY"7}'
Output
1{2"category": "TRANSPORTATION_UPDATE",3"status": "received",4"rejection_reason": "",5"name": "flight_replies",6"content_type": "twilio/quick-reply"7}
Fetching an approval status returns the current state of the WhatsApp template approval submission. The following statuses are possible:
Received: The request has successfully been submitted to Twilio. Generally Twilio submits these immediately to WhatsApp.Pending: WhatsApp has received the submission and is processing the request.Approved: WhatsApp has approved the template and it's now available for use.Rejected: WhatsApp has rejected the request. You can find the rejection reason in therejection_reasonfield. Learn more about the approval process and best practices.
WhatsApp template approval status
To support WhatsApp flows, Twilio returns a flow object in the approval request response.
1curl -X GET 'https://content.twilio.com/v1/Content/HXXXXXXXXXXXXXXXXXXXXXXXXXXXXXXX/ApprovalRequests' \2-H 'Content-Type: application/json' \3-u $TWILIO_ACCOUNT_SID:$TWILIO_AUTH_TOKEN
Output
1{2"url": "https://content.twilio.com/v1/Content/HXXXXXXXXXXXXXXXXXXXXXXXXXXXXXXX/ApprovalRequests",3"whatsapp": {4"category": "TRANSPORTATION_UPDATE",5"status": "pending",6"name": "flight_replies",7"type": "whatsapp",8"content_type": "twilio/quick-reply",9"rejection_reason": ""10},11"account_sid": "ACXXXXXXXXXXXXXXXXXXXXXXXXXXXXXX",12"sid": "HXXXXXXXXXXXXXXXXXXXXXXXXXXXXXXX"13}
You can send messages without WhatsApp approval for up to 24 hours by responding to an inbound message from the end user.
After you receive an inbound message (for example, "hi") from the user, send the twilio/quick-reply template you created. Include the following parameters:
| Field | Description |
|---|---|
From | The identifier of the sender. Use the following format:
|
To | The identifier of the recipient. Use the following format:
|
ContentSid | The Content SID (for example, HXXXXXXXXXXXXXXXX). |
ContentVariables | The values you want to substitute into your placeholder variables. |
1// Download the helper library from https://www.twilio.com/docs/node/install2const twilio = require("twilio"); // Or, for ESM: import twilio from "twilio";34// Find your Account SID and Auth Token at twilio.com/console5// and set the environment variables. See http://twil.io/secure6const accountSid = process.env.TWILIO_ACCOUNT_SID;7const authToken = process.env.TWILIO_AUTH_TOKEN;8const client = twilio(accountSid, authToken);910async function createMessage() {11const message = await client.messages.create({12contentSid: "HXXXXXXX",13contentVariables: JSON.stringify({ 1: "Name" }),14from: "whatsapp:+18551234567",15to: "whatsapp:+18551234567",16});1718console.log(message.body);19}2021createMessage();
Response
1{2"account_sid": "ACXXXXXXX",3"api_version": "2010-04-01",4"body": "Hello! 👍",5"date_created": "Thu, 24 Aug 2023 05:01:45 +0000",6"date_sent": "Thu, 24 Aug 2023 05:01:45 +0000",7"date_updated": "Thu, 24 Aug 2023 05:01:45 +0000",8"direction": "outbound-api",9"error_code": null,10"error_message": null,11"from": "whatsapp:+18551234567",12"num_media": "0",13"num_segments": "1",14"price": null,15"price_unit": null,16"messaging_service_sid": "MGaaaaaaaaaaaaaaaaaaaaaaaaaaaaaaaa",17"sid": "SMaaaaaaaaaaaaaaaaaaaaaaaaaaaaaaaa",18"status": "queued",19"subresource_uris": {20"media": "/2010-04-01/Accounts/ACaaaaaaaaaaaaaaaaaaaaaaaaaaaaaaaa/Messages/SMaaaaaaaaaaaaaaaaaaaaaaaaaaaaaaaa/Media.json"21},22"to": "whatsapp:+18551234567",23"uri": "/2010-04-01/Accounts/ACaaaaaaaaaaaaaaaaaaaaaaaaaaaaaaaa/Messages/SMaaaaaaaaaaaaaaaaaaaaaaaaaaaaaaaa.json"24}
You receive a response from your WhatsApp sender.
If you change the recipient and sender in the To and From fields to SMS-capable phone numbers, you'll receive the twilio/text content instead.
- Learn more about the supported content types.
- Review the Content API resources.