API Getting Started: Compliance Information Update
Info
For general information about Regulatory Compliance APIs, go to Regulatory Compliance API Docs.
This guide is for developers who use Twilio's Regulatory Compliance APIs to build their own application. By following this guide, you can implement a self-service mechanism that lets your customers update their compliance information without you having to communicate with them manually.
The ValidUntil parameter on the Bundles resource applies to a Bundle in the twilio-approved state. The Bundle transitions to a twilio-rejected state unless you update the compliance information before this date.
The first step is to know when a Regulation is updated that will create a call-to-action for you to update the compliance information of your affected Bundles. To do this, you should have a status callback webhook enabled for all of your Bundles. An email alias is required, so all information will always be sent to the email assigned to any affected Bundle. Once the Bundles have been identified, you will create a copy to begin updating all compliance information required. After updating the compliance information, submit the Bundle to Twilio for review. Once Twilio reviews and approves the newly updated compliance information, you will then replace all of the newly updated items to the original Bundle. This prevents you from having to reassign any dependencies such as Phone Numbers to a new Bundle. After the items have been replaced, delete the Bundle Copy to ensure you have a clean reference moving forward. Once completed, the Bundle will no longer have a ValidUntil date and everything is up to current compliance.
- Find all Bundles that require information to be updated/added
- Create a Bundle Copy to begin updating/adding information
- Run an Evaluation to find the exact incorrect or missing piece of information
- Retrieve list of Supporting Document(s) and End-User assigned to the Bundle
- Present and update Supporting Document(s) - [optional, if needs updating]
- Present and update End-User - [optional, if needs updating]
- Submit Bundle Copy for review
- Twilio reviews & approves Bundle
- After approval, replace Item Assignments from Bundle Copy to original Bundle
- Delete Bundle Copy
Below is an API sequence diagram illustrating the sequence of requests that will be performed within this Getting Started page of updating compliance information. The domain objects are abbreviated for brevity purposes.
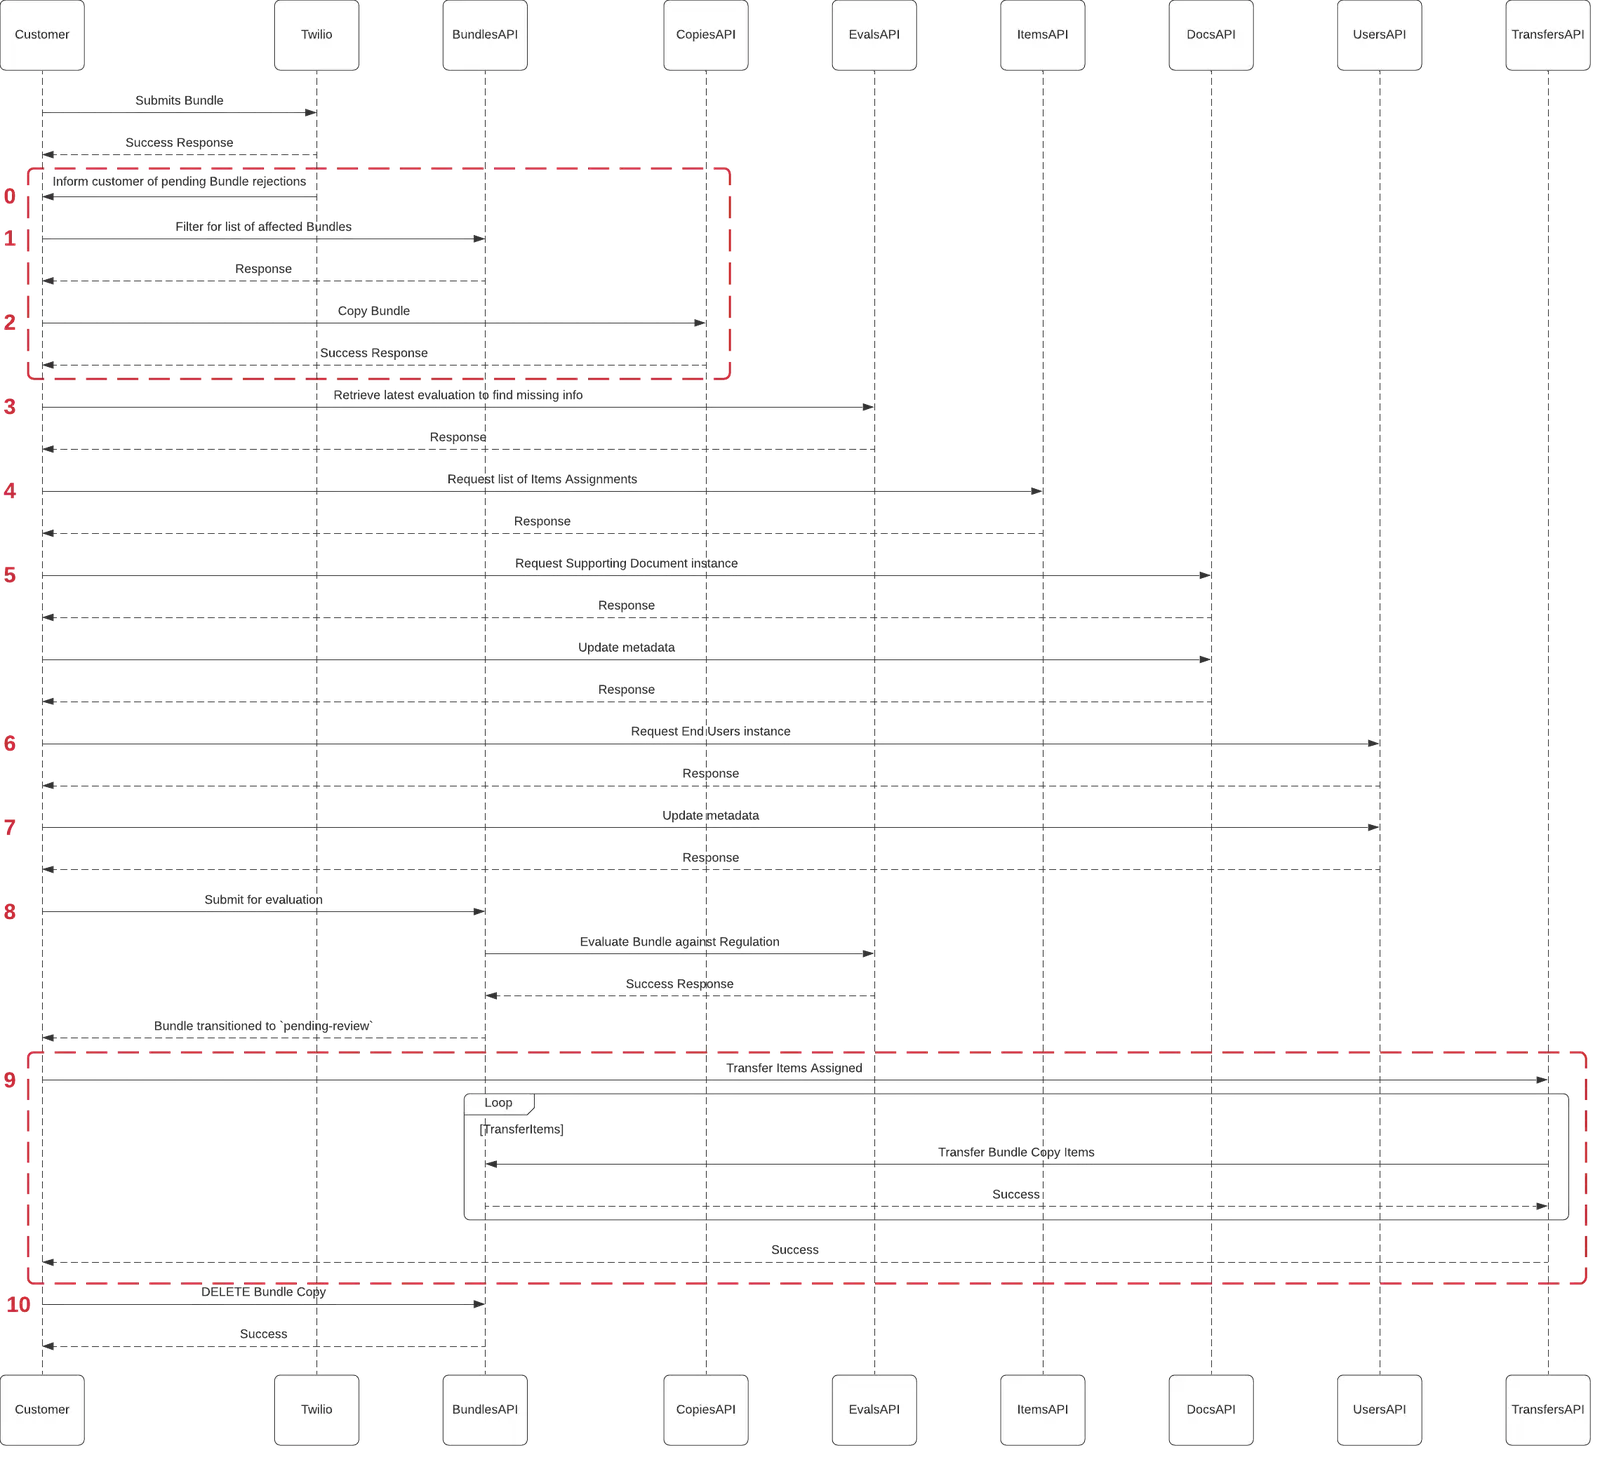
If you have configured the status callback webhook parameter on the Bundle, you will receive the following webhook request. Notice that there is a new field in the response; ValidUntil that acts as a date parameter when the Bundle will be moved to a twilio-rejected status unless the compliance information is updated. If you do not remember how to configure your status callback webhook, please refer to the Bundles Public API resource page. There is a table within the page that details the status callback parameters.
1{2"account_sid":"ACXXXXXXXXXXXXXXXXXXXXXXXXXXXXXXXX",3"bundle_sid":"BUef3a237936fb63163fd852d77c5ba27b",4"status":"twilio-approved",5"valid_until":"2022-02-01T00:00:00Z",6"failure_reason":""7}8
Besides the status callback webhooks and the email, your customers will need to filter all of their Bundles every time their job is to update compliance information. To find all of the Bundles that need their compliance information updated, Query the list of Bundles and apply the ValidUntil filter along with order by date descending.
1// Download the helper library from https://www.twilio.com/docs/node/install2const twilio = require("twilio"); // Or, for ESM: import twilio from "twilio";34// Find your Account SID and Auth Token at twilio.com/console5// and set the environment variables. See http://twil.io/secure6const accountSid = process.env.TWILIO_ACCOUNT_SID;7const authToken = process.env.TWILIO_AUTH_TOKEN;8const client = twilio(accountSid, authToken);910async function listBundle() {11const bundles = await client.numbers.v2.regulatoryCompliance.bundles.list({12hasValidUntilDate: true,13sortBy: "valid-until",14sortDirection: "DESC",15limit: 20,16});1718bundles.forEach((b) => console.log(b.sid));19}2021listBundle();
Response
1{2"results": [3{4"sid": "BUaaaaaaaaaaaaaaaaaaaaaaaaaaaaaaaa",5"account_sid": "ACaaaaaaaaaaaaaaaaaaaaaaaaaaaaaaaa",6"regulation_sid": "RNaaaaaaaaaaaaaaaaaaaaaaaaaaaaaaaa",7"friendly_name": "friendly_name",8"status": "twilio-approved",9"email": "email",10"status_callback": "http://www.example.com",11"valid_until": "2022-11-29T01:00:00Z",12"date_created": "2021-08-30T22:29:24Z",13"date_updated": "2021-08-31T01:09:00Z",14"url": "https://numbers.twilio.com/v2/RegulatoryCompliance/Bundles/BUaaaaaaaaaaaaaaaaaaaaaaaaaaaaaaaa",15"links": {16"evaluations": "https://numbers.twilio.com/v2/RegulatoryCompliance/Bundles/BUaaaaaaaaaaaaaaaaaaaaaaaaaaaaaaaa/Evaluations",17"item_assignments": "https://numbers.twilio.com/v2/RegulatoryCompliance/Bundles/BUaaaaaaaaaaaaaaaaaaaaaaaaaaaaaaaa/ItemAssignments",18"bundle_copies": "https://numbers.twilio.com/v2/RegulatoryCompliance/Bundles/BUaaaaaaaaaaaaaaaaaaaaaaaaaaaaaaaa/Copies"19}20}21],22"meta": {23"page": 0,24"page_size": 50,25"first_page_url": "https://numbers.twilio.com/v2/RegulatoryCompliance/Bundles?Status=twilio-approved&IsoCountry=AU&ValidUntilDate%3C=2022-11-29T23%3A59%3A59Z&NumberType=mobile&PageSize=50&Page=0",26"previous_page_url": null,27"url": "https://numbers.twilio.com/v2/RegulatoryCompliance/Bundles?Status=twilio-approved&IsoCountry=AU&ValidUntilDate%3C=2022-11-29T23%3A59%3A59Z&NumberType=mobile&PageSize=50&Page=0",28"next_page_url": null,29"key": "results"30}31}
After receiving the initial status callback webhook request, the next step is to take the Bundle SID from webhook request which included the valid_until parameter and create a new Copy of the Bundle. The new Bundle Copy will make a new instance of the Bundle and all of the Item Assignments consisting of an End-User and Supporting Document(s). These instances will allow you to update information while the original Bundle continues to stay in a twilio-approved compliance state that allows you to continue provisioning new Phone Numbers.
Note: By performing this operation via Public API, you are opting in to the full API lifecycle after the Bundle Copy has been approved. If the Bundle Copy operation is performed via Twilio's Console, the Bundle will opt-in to automated lifecycle transitioning after Twilio has reviewed and approved the Bundle Copy. For API operation, it is up to you to coordinate that lifecycle transition and management.
1// Download the helper library from https://www.twilio.com/docs/node/install2const twilio = require("twilio"); // Or, for ESM: import twilio from "twilio";34// Find your Account SID and Auth Token at twilio.com/console5// and set the environment variables. See http://twil.io/secure6const accountSid = process.env.TWILIO_ACCOUNT_SID;7const authToken = process.env.TWILIO_AUTH_TOKEN;8const client = twilio(accountSid, authToken);910async function createBundleCopy() {11const bundleCopy = await client.numbers.v2.regulatoryCompliance12.bundles("BUef3a237936fb63163fd852d77c5ba27b")13.bundleCopies.create({ friendlyName: "Copy Bundle Metadata" });1415console.log(bundleCopy.sid);16}1718createBundleCopy();
Response
1{2"sid": "BUaaaaaaaaaaaaaaaaaaaaaaaaaaaaaaaa",3"account_sid": "ACaaaaaaaaaaaaaaaaaaaaaaaaaaaaaaaa",4"regulation_sid": "RNaaaaaaaaaaaaaaaaaaaaaaaaaaaaaaaa",5"friendly_name": "Copy Bundle Metadata",6"status": "draft",7"valid_until": "2015-07-30T20:00:00Z",8"email": "email",9"status_callback": "http://www.example.com",10"date_created": "2015-07-30T20:00:00Z",11"date_updated": "2015-07-30T20:00:00Z"12}
After understanding that a given Bundle will be valid until an expiration date and then creating a Bundle Copy, the next step is to understand what exactly is missing from the Bundle Copy. To retrieve the exact requirements of what information passed versus not, send a new create request to the Evaluations subresource of the Bundle instance. The response will provide the necessary information to add/remove any compliance information enforced by the new requirements of the Regulation.
1// Download the helper library from https://www.twilio.com/docs/node/install2const twilio = require("twilio"); // Or, for ESM: import twilio from "twilio";34// Find your Account SID and Auth Token at twilio.com/console5// and set the environment variables. See http://twil.io/secure6const accountSid = process.env.TWILIO_ACCOUNT_SID;7const authToken = process.env.TWILIO_AUTH_TOKEN;8const client = twilio(accountSid, authToken);910async function createEvaluation() {11const evaluation = await client.numbers.v2.regulatoryCompliance12.bundles("BU504eddd19f1efa428458f6daed683667")13.evaluations.create();1415console.log(evaluation.results);16}1718createEvaluation();
Response
1{2"sid": "ELaaaaaaaaaaaaaaaaaaaaaaaaaaaaaaaa",3"account_sid": "ACaaaaaaaaaaaaaaaaaaaaaaaaaaaaaaaa",4"regulation_sid": "RNaaaaaaaaaaaaaaaaaaaaaaaaaaaaaaaa",5"bundle_sid": "BU504eddd19f1efa428458f6daed683667",6"status": "noncompliant",7"date_created": "2020-04-28T18:14:01Z",8"url": "https://numbers.twilio.com/v2/RegulatoryCompliance/Bundles/BUaaaaaaaaaaaaaaaaaaaaaaaaaaaaaaaa/Evaluations/ELaaaaaaaaaaaaaaaaaaaaaaaaaaaaaaaa",9"results": [10{11"friendly_name": "Business",12"object_type": "business",13"passed": false,14"failure_reason": "A Business End-User is missing. Please add one to the regulatory bundle.",15"error_code": 22214,16"valid": [],17"invalid": [18{19"friendly_name": "Business Name",20"object_field": "business_name",21"failure_reason": "The Business Name is missing. Please enter in a Business Name on the Business information.",22"error_code": 2221523},24{25"friendly_name": "Business Registration Number",26"object_field": "business_registration_number",27"failure_reason": "The Business Registration Number is missing. Please enter in a Business Registration Number on the Business information.",28"error_code": 2221529},30{31"friendly_name": "First Name",32"object_field": "first_name",33"failure_reason": "The First Name is missing. Please enter in a First Name on the Business information.",34"error_code": 2221535},36{37"friendly_name": "Last Name",38"object_field": "last_name",39"failure_reason": "The Last Name is missing. Please enter in a Last Name on the Business information.",40"error_code": 2221541}42],43"requirement_friendly_name": "Business",44"requirement_name": "business_info"45},46{47"friendly_name": "Excerpt from the commercial register (Extrait K-bis) showing name of Authorized Representative",48"object_type": "commercial_registrar_excerpt",49"passed": false,50"failure_reason": "An Excerpt from the commercial register (Extrait K-bis) showing name of Authorized Representative is missing. Please add one to the regulatory bundle.",51"error_code": 22216,52"valid": [],53"invalid": [54{55"friendly_name": "Business Name",56"object_field": "business_name",57"failure_reason": "The Business Name is missing. Or, it does not match the Business Name you entered within Business information. Please enter in the Business Name shown on the Excerpt from the commercial register (Extrait K-bis) showing name of Authorized Representative or make sure both Business Name fields use the same exact inputs.",58"error_code": 2221759}60],61"requirement_friendly_name": "Business Name",62"requirement_name": "business_name_info"63},64{65"friendly_name": "Excerpt from the commercial register showing French address",66"object_type": "commercial_registrar_excerpt",67"passed": false,68"failure_reason": "An Excerpt from the commercial register showing French address is missing. Please add one to the regulatory bundle.",69"error_code": 22216,70"valid": [],71"invalid": [72{73"friendly_name": "Address sid(s)",74"object_field": "address_sids",75"failure_reason": "The Address is missing. Please enter in the address shown on the Excerpt from the commercial register showing French address.",76"error_code": 2221977}78],79"requirement_friendly_name": "Business Address (Proof of Address)",80"requirement_name": "business_address_proof_info"81},82{83"friendly_name": "Excerpt from the commercial register (Extrait K-bis)",84"object_type": "commercial_registrar_excerpt",85"passed": false,86"failure_reason": "An Excerpt from the commercial register (Extrait K-bis) is missing. Please add one to the regulatory bundle.",87"error_code": 22216,88"valid": [],89"invalid": [90{91"friendly_name": "Document Number",92"object_field": "document_number",93"failure_reason": "The Document Number is missing. Please enter in the Document Number shown on the Excerpt from the commercial register (Extrait K-bis).",94"error_code": 2221795}96],97"requirement_friendly_name": "Business Registration Number",98"requirement_name": "business_reg_no_info"99},100{101"friendly_name": "Government-issued ID",102"object_type": "government_issued_document",103"passed": false,104"failure_reason": "A Government-issued ID is missing. Please add one to the regulatory bundle.",105"error_code": 22216,106"valid": [],107"invalid": [108{109"friendly_name": "First Name",110"object_field": "first_name",111"failure_reason": "The First Name is missing. Or, it does not match the First Name you entered within Business information. Please enter in the First Name shown on the Government-issued ID or make sure both First Name fields use the same exact inputs.",112"error_code": 22217113},114{115"friendly_name": "Last Name",116"object_field": "last_name",117"failure_reason": "The Last Name is missing. Or, it does not match the Last Name you entered within Business information. Please enter in the Last Name shown on the Government-issued ID or make sure both Last Name fields use the same exact inputs.",118"error_code": 22217119}120],121"requirement_friendly_name": "Name of Authorized Representative",122"requirement_name": "name_of_auth_rep_info"123},124{125"friendly_name": "Executed Copy of Power of Attorney",126"object_type": "power_of_attorney",127"passed": false,128"failure_reason": "An Executed Copy of Power of Attorney is missing. Please add one to the regulatory bundle.",129"error_code": 22216,130"valid": [],131"invalid": [],132"requirement_friendly_name": "Power of Attorney",133"requirement_name": "power_of_attorney_info"134},135{136"friendly_name": "Government-issued ID",137"object_type": "government_issued_document",138"passed": false,139"failure_reason": "A Government-issued ID is missing. Please add one to the regulatory bundle.",140"error_code": 22216,141"valid": [],142"invalid": [143{144"friendly_name": "First Name",145"object_field": "first_name",146"failure_reason": "The First Name is missing on the Governnment-Issued ID.",147"error_code": 22217148},149{150"friendly_name": "Last Name",151"object_field": "last_name",152"failure_reason": "The Last Name is missing on the Government-issued ID",153"error_code": 22217154}155],156"requirement_friendly_name": "Name of Person granted the Power of Attorney",157"requirement_name": "name_in_power_of_attorney_info"158}159]160}
Go through the necessary steps to update the newly created Bundle Copy by either adding/removing information to the End-User and/or Supporting Document(s) assigned. Firstly, Retrieve a list of all Item Assignments from the Bundle Copy. Next step is to fetch the End-User instance (IT prefix) and the Supporting Document instance(s) (RD prefix). Analyzing the difference between the previously ran Evaluation against the End-User and Supporting Document(s) instances will allow you to see the exact parameters that need to be updated.
1// Download the helper library from https://www.twilio.com/docs/node/install2const twilio = require("twilio"); // Or, for ESM: import twilio from "twilio";34// Find your Account SID and Auth Token at twilio.com/console5// and set the environment variables. See http://twil.io/secure6const accountSid = process.env.TWILIO_ACCOUNT_SID;7const authToken = process.env.TWILIO_AUTH_TOKEN;8const client = twilio(accountSid, authToken);910async function listItemAssignment() {11const itemAssignments = await client.numbers.v2.regulatoryCompliance12.bundles("BU504eddd19f1efa428458f6daed683667")13.itemAssignments.list({ limit: 20 });1415itemAssignments.forEach((i) => console.log(i.sid));16}1718listItemAssignment();
Response
1{2"results": [3{4"sid": "BVaaaaaaaaaaaaaaaaaaaaaaaaaaaaaaaa",5"bundle_sid": "BUaaaaaaaaaaaaaaaaaaaaaaaaaaaaaaaa",6"account_sid": "ACaaaaaaaaaaaaaaaaaaaaaaaaaaaaaaaa",7"object_sid": "RDaaaaaaaaaaaaaaaaaaaaaaaaaaaaaaaa",8"date_created": "2019-07-31T02:34:41Z",9"url": "https://numbers.twilio.com/v2/RegulatoryCompliance/Bundles/BUaaaaaaaaaaaaaaaaaaaaaaaaaaaaaaaa/ItemAssignments/BVaaaaaaaaaaaaaaaaaaaaaaaaaaaaaaaa"10}11],12"meta": {13"page": 0,14"page_size": 50,15"first_page_url": "https://numbers.twilio.com/v2/RegulatoryCompliance/Bundles/BUaaaaaaaaaaaaaaaaaaaaaaaaaaaaaaaa/ItemAssignments?PageSize=50&Page=0",16"previous_page_url": null,17"url": "https://numbers.twilio.com/v2/RegulatoryCompliance/Bundles/BUaaaaaaaaaaaaaaaaaaaaaaaaaaaaaaaa/ItemAssignments?PageSize=50&Page=0",18"next_page_url": null,19"key": "results"20}21}
If the Evaluation that you previously requested determines that one or many Supporting Documents are missing information given the new requirements, you must update that information. First, show the user the Supporting Document instance and inform them exactly what is missing per the Evaluation. Allow the user to enter the information required and send an update operation for that instance. If there are more Supporting Documents that failed the Evaluation, repeat this step until finished.
1// Download the helper library from https://www.twilio.com/docs/node/install2const twilio = require("twilio"); // Or, for ESM: import twilio from "twilio";34// Find your Account SID and Auth Token at twilio.com/console5// and set the environment variables. See http://twil.io/secure6const accountSid = process.env.TWILIO_ACCOUNT_SID;7const authToken = process.env.TWILIO_AUTH_TOKEN;8const client = twilio(accountSid, authToken);910async function fetchSupportingDocument() {11const supportingDocument = await client.numbers.v2.regulatoryCompliance12.supportingDocuments("RD45b349d9f268c66581786cc8b2e21bd6")13.fetch();1415console.log(supportingDocument.sid);16}1718fetchSupportingDocument();
Response
1{2"sid": "RD45b349d9f268c66581786cc8b2e21bd6",3"account_sid": "ACaaaaaaaaaaaaaaaaaaaaaaaaaaaaaaaa",4"friendly_name": "friendly_name",5"mime_type": "mime_type",6"status": "draft",7"failure_reason": null,8"errors": null,9"type": "type",10"attributes": {11"first_name": "foo",12"last_name": "bar"13},14"date_created": "2019-07-31T02:11:52Z",15"date_updated": "2019-07-31T02:11:52Z",16"url": "https://numbers.twilio.com/v2/RegulatoryCompliance/SupportingDocuments/RDaaaaaaaaaaaaaaaaaaaaaaaaaaaaaaaa"17}
1// Download the helper library from https://www.twilio.com/docs/node/install2const twilio = require("twilio"); // Or, for ESM: import twilio from "twilio";34// Find your Account SID and Auth Token at twilio.com/console5// and set the environment variables. See http://twil.io/secure6const accountSid = process.env.TWILIO_ACCOUNT_SID;7const authToken = process.env.TWILIO_AUTH_TOKEN;8const client = twilio(accountSid, authToken);910async function updateSupportingDocument() {11const supportingDocument = await client.numbers.v2.regulatoryCompliance12.supportingDocuments("RD45b349d9f268c66581786cc8b2e21bd6")13.update({ friendlyName: "FriendlyName" });1415console.log(supportingDocument.sid);16}1718updateSupportingDocument();
Response
1{2"sid": "RD45b349d9f268c66581786cc8b2e21bd6",3"account_sid": "ACaaaaaaaaaaaaaaaaaaaaaaaaaaaaaaaa",4"friendly_name": "FriendlyName",5"mime_type": "mime_type",6"status": "draft",7"failure_reason": null,8"errors": null,9"type": "type",10"attributes": {11"first_name": "foo",12"last_name": "bar"13},14"date_created": "2019-07-31T02:11:52Z",15"date_updated": "2019-07-31T02:11:52Z",16"url": "https://numbers.twilio.com/v2/RegulatoryCompliance/SupportingDocuments/RDaaaaaaaaaaaaaaaaaaaaaaaaaaaaaaaa"17}
If the Evaluation that you previously requested determines that the End User is missing information given the new requirements, you must update that information. First, show the user the End-User instance and inform them exactly what is missing per the Evaluation. Allow the user to enter the information required and send an update operation for that instance.
1// Download the helper library from https://www.twilio.com/docs/node/install2const twilio = require("twilio"); // Or, for ESM: import twilio from "twilio";34// Find your Account SID and Auth Token at twilio.com/console5// and set the environment variables. See http://twil.io/secure6const accountSid = process.env.TWILIO_ACCOUNT_SID;7const authToken = process.env.TWILIO_AUTH_TOKEN;8const client = twilio(accountSid, authToken);910async function fetchEndUser() {11const endUser = await client.numbers.v2.regulatoryCompliance12.endUsers("ITb365fb008a947f565dc45b73f4641dab")13.fetch();1415console.log(endUser.sid);16}1718fetchEndUser();
Response
1{2"sid": "ITb365fb008a947f565dc45b73f4641dab",3"account_sid": "ACaaaaaaaaaaaaaaaaaaaaaaaaaaaaaaaa",4"friendly_name": "friendly_name",5"type": "individual",6"attributes": {7"email": "foobar@twilio.com"8},9"date_created": "2019-07-30T21:57:45Z",10"date_updated": "2019-07-30T21:57:45Z",11"url": "https://numbers.twilio.com/v2/RegulatoryCompliance/EndUsers/ITaaaaaaaaaaaaaaaaaaaaaaaaaaaaaaaa"12}
1// Download the helper library from https://www.twilio.com/docs/node/install2const twilio = require("twilio"); // Or, for ESM: import twilio from "twilio";34// Find your Account SID and Auth Token at twilio.com/console5// and set the environment variables. See http://twil.io/secure6const accountSid = process.env.TWILIO_ACCOUNT_SID;7const authToken = process.env.TWILIO_AUTH_TOKEN;8const client = twilio(accountSid, authToken);910async function updateEndUser() {11const endUser = await client.numbers.v2.regulatoryCompliance12.endUsers("ITb365fb008a947f565dc45b73f4641dab")13.update({ friendlyName: "FriendlyName" });1415console.log(endUser.sid);16}1718updateEndUser();
Response
1{2"sid": "ITb365fb008a947f565dc45b73f4641dab",3"account_sid": "ACaaaaaaaaaaaaaaaaaaaaaaaaaaaaaaaa",4"friendly_name": "FriendlyName",5"type": "individual",6"attributes": {7"email": "foobar@twilio.com"8},9"date_created": "2019-07-30T21:57:45Z",10"date_updated": "2019-07-30T21:57:45Z",11"url": "https://numbers.twilio.com/v2/RegulatoryCompliance/EndUsers/ITaaaaaaaaaaaaaaaaaaaaaaaaaaaaaaaa"12}
After finishing the necessary updates, repeat Step 2 to create a new Evaluation instance with all of the updated information. By performing this check before submitting the Bundle Copy for Twilio to review, you can ensure that the request will be accepted.
1// Download the helper library from https://www.twilio.com/docs/node/install2const twilio = require("twilio"); // Or, for ESM: import twilio from "twilio";34// Find your Account SID and Auth Token at twilio.com/console5// and set the environment variables. See http://twil.io/secure6const accountSid = process.env.TWILIO_ACCOUNT_SID;7const authToken = process.env.TWILIO_AUTH_TOKEN;8const client = twilio(accountSid, authToken);910async function updateBundle() {11const bundle = await client.numbers.v2.regulatoryCompliance12.bundles("BU504eddd19f1efa428458f6daed683667")13.update({ status: "pending-review" });1415console.log(bundle.sid);16}1718updateBundle();
Response
1{2"sid": "BU504eddd19f1efa428458f6daed683667",3"account_sid": "ACaaaaaaaaaaaaaaaaaaaaaaaaaaaaaaaa",4"regulation_sid": "RNaaaaaaaaaaaaaaaaaaaaaaaaaaaaaaaa",5"friendly_name": "friendly_name",6"status": "pending-review",7"email": "email",8"status_callback": "http://www.example.com",9"valid_until": null,10"date_created": "2019-07-30T22:29:24Z",11"date_updated": "2019-07-31T01:09:00Z",12"url": "https://numbers.twilio.com/v2/RegulatoryCompliance/Bundles/BUaaaaaaaaaaaaaaaaaaaaaaaaaaaaaaaa",13"links": {14"evaluations": "https://numbers.twilio.com/v2/RegulatoryCompliance/Bundles/BUaaaaaaaaaaaaaaaaaaaaaaaaaaaaaaaa/Evaluations",15"item_assignments": "https://numbers.twilio.com/v2/RegulatoryCompliance/Bundles/BUaaaaaaaaaaaaaaaaaaaaaaaaaaaaaaaa/ItemAssignments",16"bundle_copies": "https://numbers.twilio.com/v2/RegulatoryCompliance/Bundles/BUaaaaaaaaaaaaaaaaaaaaaaaaaaaaaaaa/Copies"17}18}
After receipt, Twilio reviews the Bundle Copy within the 24 business hour SLA. If approved, you receive the following status callback:
1{2"account_sid":"ACXXXXXXXXXXXXXXXXXXXXXXXXXXXXXXXX",3"bundle_sid":"BU504eddd19f1efa428458f6daed683667",4"status":"twilio-approved",5"failure_reason":""6}7
Note: If your Regulatory Bundle was rejected to one or more Supporting Document issues, you will be allowed to self-service fix your Supporting Documents by leveraging the FailureReason on the Supporting Document instances. By first referencing the Bundle Copy Item Assignments resource and then traversing to the Supporting Document instances for more detailed FailureReason information.
After the Bundle Copy has been reviewed and approved, it is up to you to replace the newly approved End-User Supporting Document(s) to the original Bundle. Once replaced, the valid until date parameter on the Bundle will be nulled out. By replacing only the Item Assignments, no Phone Numbers nor any other dependencies will have to be replacing and the history of the Bundle can continue.
Note: as explained in Step 1, by creating the Bundle Copy via Public API, you are responsible for replacing the Item Assignments and deleting the Bundle Copy after approval.
1// Download the helper library from https://www.twilio.com/docs/node/install2const twilio = require("twilio"); // Or, for ESM: import twilio from "twilio";34// Find your Account SID and Auth Token at twilio.com/console5// and set the environment variables. See http://twil.io/secure6const accountSid = process.env.TWILIO_ACCOUNT_SID;7const authToken = process.env.TWILIO_AUTH_TOKEN;8const client = twilio(accountSid, authToken);910async function createReplaceItems() {11const replaceItem = await client.numbers.v2.regulatoryCompliance12.bundles("BUef3a237936fb63163fd852d77c5ba27b")13.replaceItems.create({14fromBundleSid: "BU504eddd19f1efa428458f6daed683667",15});1617console.log(replaceItem.sid);18}1920createReplaceItems();
Response
1{2"sid": "BUaaaaaaaaaaaaaaaaaaaaaaaaaaaaaaaa",3"account_sid": "ACaaaaaaaaaaaaaaaaaaaaaaaaaaaaaaaa",4"regulation_sid": "RNaaaaaaaaaaaaaaaaaaaaaaaaaaaaaaaa",5"friendly_name": "friendly_name",6"status": "draft",7"valid_until": "2015-07-30T20:00:00Z",8"email": "email",9"status_callback": "http://www.example.com",10"date_created": "2015-07-30T20:00:00Z",11"date_updated": "2015-07-30T20:00:00Z"12}
To clean up any leftover data that no longer has a purpose for you or Twilio, delete the Bundle Copy. The Bundle Copy no longer has any Item Assignments and is no longer usable.
Note: as explained in Step 1, by creating the Bundle Copy via Public API, you are responsible for replacing the Item Assignments and deleting the Bundle Copy after approval.
1// Download the helper library from https://www.twilio.com/docs/node/install2const twilio = require("twilio"); // Or, for ESM: import twilio from "twilio";34// Find your Account SID and Auth Token at twilio.com/console5// and set the environment variables. See http://twil.io/secure6const accountSid = process.env.TWILIO_ACCOUNT_SID;7const authToken = process.env.TWILIO_AUTH_TOKEN;8const client = twilio(accountSid, authToken);910async function deleteBundle() {11await client.numbers.v2.regulatoryCompliance12.bundles("BU504eddd19f1efa428458f6daed683667")13.remove();14}1516deleteBundle();