Build to scale: queueing and latency on Twilio
Delivering messages at scale is a top-of-mind consideration when building applications for high-traffic events, such as Black Friday sales in the U.S.. Therefore, we've created a guide of best practices that you can follow to ensure your applications with Twilio scale.
Imagine you have a list of 1,000 products that go on sale at 11:00 AM the morning of Black Friday. Now, you have one million eager end users who want to be notified of your Black Friday deals as soon as they're live. You're planning to send out a blast of promotional SMS messages to that entire group at 10:00 AM Black Friday morning to let them know the deals will be live in an hour.
You also know the best products run out within a few minutes. To protect against automated bots and to ensure that your potential audience has an equitable experience, you need to incorporate an OTP code verification step as part of the checkout flow. In this case, you require two messages to safely and securely facilitate the sale.
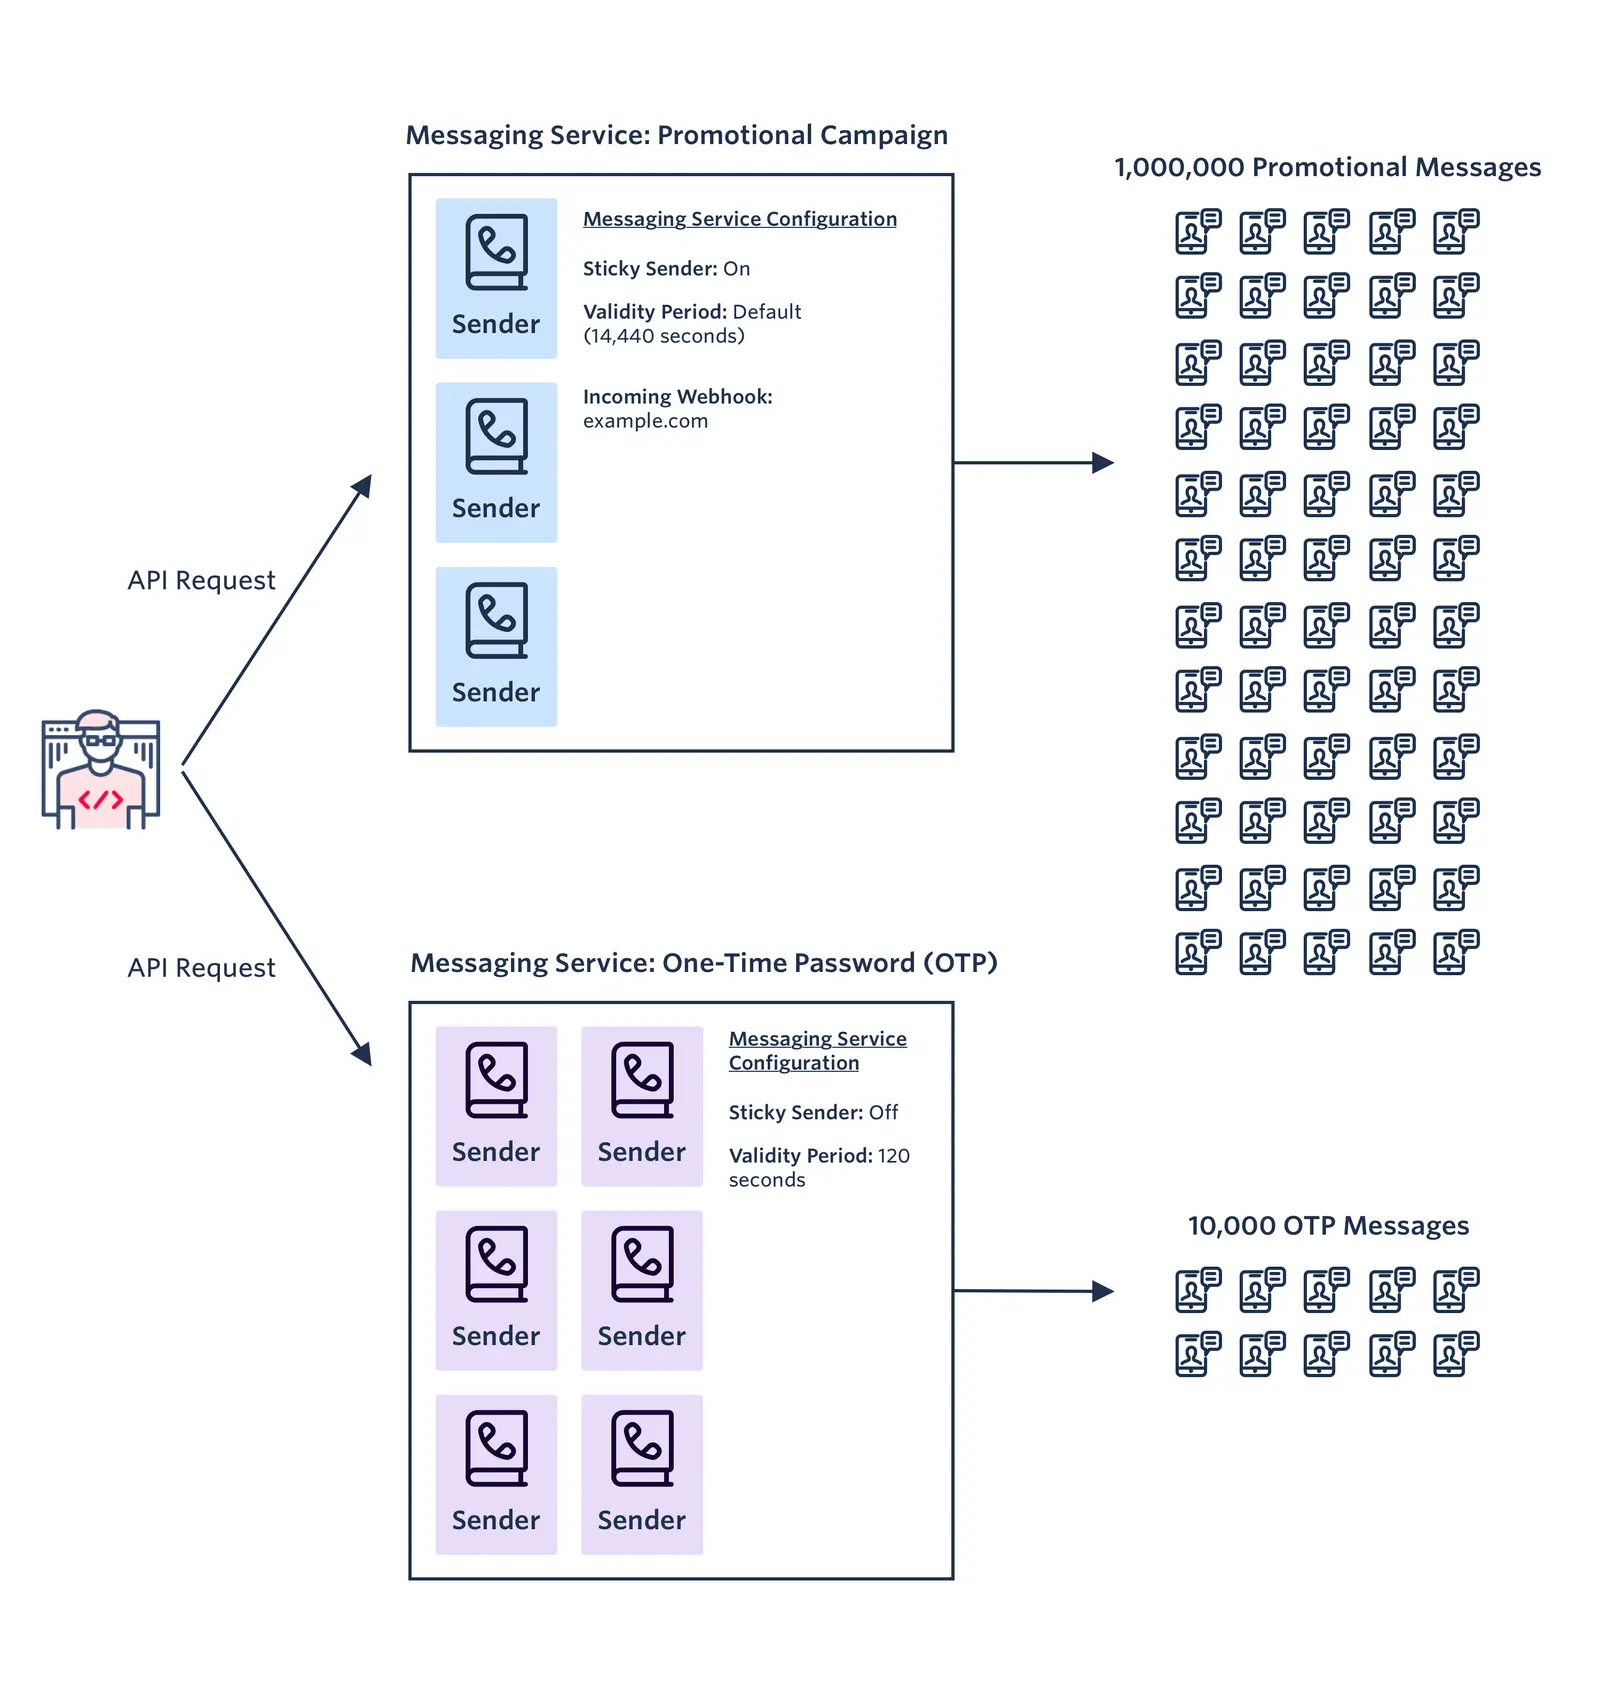
Based on your use case, on Black Friday, you have two separate use cases for Twilio Messaging: one for promotional messages sent an hour before the sales go live and one for OTP verification messages during checkout. For each of these use cases, we recommend creating a Messaging Service with a dedicated Sender Pool and Validity Period setting.
- Message 1, Promotional - The end user gets a marketing link in a message just before your Black Friday sales go live. The link takes them to an application where they have to login or signup.
- Message 2, OTP - Upon signup, the end user must enter a one-time-passcode (OTP) pin for logging in. This message has to arrive immediately, so that the user can purchase before the items run out! For this example, let's conservatively assume that 2% of your audience clicks the link and eventually, 0.1% buy.
You can think of a Twilio Messaging Service as a bundling of both senders (in this case, phone numbers) and settings for a specific messaging use case. When you need to consider messaging at scale, a Messaging Service handles intelligent routing and features like opt-out management for you, across multiple senders. So instead of configuring multiple individual numbers, you can create a Messaging Service and add as many senders to the sender pool as you need. The configuration will apply to all of the numbers in your sender pool.
Info
Whenever you are using multiple Senders to service a single use case (as in this example), you should be aware that this practice is governed by various local regulations, depending on the country into which you are messaging. Twilio strongly encourages you to be aware of and adhere to these guidelines. On this page you can find current guidelines for sms use in many countries outside the U.S. Among U.S. carriers, the practice of using multiple senders for the same message as a way to circumvent regulations is known as "snowshoeing"; here's is Twilio's policy regarding this. Here you can find guidelines and registration steps for the use of Toll Free numbers for sms messaging within the U.S. Finally, the use of 10DLC numbers to send sms messages within the U.S. is governed by new regulations you should definitely be aware of before choosing a scaling solution with large numbers of 10DLC numbers in the U.S.; see this overview document.
When you send a Message with a Messaging Service, the Service queues the API Request before sending it to the specific Sender, then onto the Carrier for eventual delivery to the end user. Instead of a from phone number, you will enter a Messaging Service SID in your API request to Twilio.

Recall that in our Black Friday example, we plan to send two types of Messages: one promotional, pre-sale message and one OTP verification message.
In this case, you'll want to create two different Messaging Services, one for each use case. Each Messaging Service will have a separate Sender Pool (or group of numbers)
Once you have defined your use cases, you can plan for your anticipated messaging traffic and ensure that the messages are delivered in the necessary timeframe.
For each messaging service, we recommend defining both how many messages you'll need to send (traffic) and the delivery timeframe. For example, in our Black Friday example, the Promotional and OTP use cases have different levels of traffic and time-sensitivity, so we want to queue up our messages differently.
- Promotional: Let's say you need to send 1,000,000 messages to your audience through the special day. You may queue up a million message requests on your Twilio Promotional Messaging Service.
- OTP: Let's say 2% customers clicking on the link to sign up or to login and purchase items at exactly 5 PM when sales go live. OTP messages need to be delivered urgently, let's assume within 180 seconds.
Info
As noted above, there are new and significant regulations governing the use of 10DLC numbers for A2P sms messaging to numbers in the United States (see our overview documentation here). These regulations require the registration of an A2P-compliant Brand, and then at least one compliant Campaign associated with the Messaging Service that contains the pool of 10DLC numbers to be used. Compliance is judged by 3rd-party organizations within the A2P ecosystem, and registration entails one-time and recurring fees.
The present document on Message scaling does not assume the use of 10DLC (as opposed to Toll-free or short-code) senders, nor does it assume messaging to numbers in the U.S. However, if you are considering using 10DLC senders to US numbers, it would be worth considering alternatives in order to avoid the complexities of the new US A2P regulations. For example, if OTP (or any other form of 2-Factor Authentication) is your only use case for SMS messaging with 10DLC numbers in the U.S., you would probably be better served by Twilio's Verify service, with which you do not need to worry about A2P registration or any other aspect of sender provisioning.
In this document, however, we are assuming a customer with multiple use cases, only one of which is OTP/2FA (with Marketing being the other). In that situation, if your messaging was to US end-users and if you had compelling reasons for using 10DLC senders rather than Toll-Free or short code, you would need to complete A2P Brand registration as well as Campaign registration in order to service your non-2FA use cases anyway, so the additional regulatory burden of including a 2FA use case would only be marginal.
Calculating your MPS (Messages Per Second) rate is crucial for building for scale. This will determine how big your queue will get and the rate at which messages will be sent.
Twilio queues your messages for 10 hours (36000 seconds) by default, so we will use this for the example calculations.
To calculate your MPS, divide the number of messages to be sent over the queue length. This will give you the required MPS limit to send out your messages. That means we would need to plan for the right Senders in your Messaging Service Sender Pool to be able to send messages at 2x your MPS.
To be safe, Twilio suggests that customers apply a 100% buffer to this MPS requirement, in the event that Telco carriers have capacity issues.
- Promotional: To calculate our MPS, we divide our 1M promotional messages by 36,000 seconds, about 30 Messages need to be sent per second. In the name of safety, we'll have our the senders in our Messaging Service's Sender Pool send messages at a rate of 60 MPS.
- OTP: Say you apply a 180-second validity period for 20,000 messages, with that buffer factor of 2x. That would require a 220 MPS limit requirement.
(We'll cover how to meet your various MPS limit requirements by provisioning your Senders in a later step.)
After you've determine the key factors affecting your messaging for your use case(s), you can create Messaging Services for each one.
- Promotional: Leave the Validity period to the default (10 hours/36000 seconds).
- OTP: Set the Validity period to be a short duration, say 2 minutes (120 seconds).
You can create and manage your Messaging Service in the Services section of the Twilio Console or using the REST API using the Service Resource.
1// Download the helper library from https://www.twilio.com/docs/node/install2const twilio = require("twilio"); // Or, for ESM: import twilio from "twilio";34// Find your Account SID and Auth Token at twilio.com/console5// and set the environment variables. See http://twil.io/secure6const accountSid = process.env.TWILIO_ACCOUNT_SID;7const authToken = process.env.TWILIO_AUTH_TOKEN;8const client = twilio(accountSid, authToken);910async function createService() {11const service = await client.messaging.v1.services.create({12friendlyName: "My OTP Messaging Service",13validityPeriod: 120,14});1516console.log(service.sid);17}1819createService();
Response
1{2"account_sid": "ACaaaaaaaaaaaaaaaaaaaaaaaaaaaaaaaa",3"sid": "MGaaaaaaaaaaaaaaaaaaaaaaaaaaaaaaaa",4"date_created": "2015-07-30T20:12:31Z",5"date_updated": "2015-07-30T20:12:33Z",6"friendly_name": "My OTP Messaging Service",7"inbound_request_url": "https://www.example.com/",8"inbound_method": "POST",9"fallback_url": "https://www.example.com",10"fallback_method": "GET",11"status_callback": "https://www.example.com",12"sticky_sender": true,13"smart_encoding": false,14"mms_converter": true,15"fallback_to_long_code": true,16"scan_message_content": "inherit",17"area_code_geomatch": true,18"validity_period": 120,19"synchronous_validation": true,20"usecase": "marketing",21"us_app_to_person_registered": false,22"use_inbound_webhook_on_number": true,23"links": {24"phone_numbers": "https://messaging.twilio.com/v1/Services/MGaaaaaaaaaaaaaaaaaaaaaaaaaaaaaaaa/PhoneNumbers",25"short_codes": "https://messaging.twilio.com/v1/Services/MGaaaaaaaaaaaaaaaaaaaaaaaaaaaaaaaa/ShortCodes",26"alpha_senders": "https://messaging.twilio.com/v1/Services/MGaaaaaaaaaaaaaaaaaaaaaaaaaaaaaaaa/AlphaSenders",27"messages": "https://messaging.twilio.com/v1/Services/MGaaaaaaaaaaaaaaaaaaaaaaaaaaaaaaaa/Messages",28"us_app_to_person": "https://messaging.twilio.com/v1/Services/MGaaaaaaaaaaaaaaaaaaaaaaaaaaaaaaaa/Compliance/Usa2p",29"us_app_to_person_usecases": "https://messaging.twilio.com/v1/Services/MGaaaaaaaaaaaaaaaaaaaaaaaaaaaaaaaa/Compliance/Usa2p/Usecases",30"channel_senders": "https://messaging.twilio.com/v1/Services/MGaaaaaaaaaaaaaaaaaaaaaaaaaaaaaaaa/ChannelSenders",31"destination_alpha_senders": "https://messaging.twilio.com/v1/Services/MGaaaaaaaaaaaaaaaaaaaaaaaaaaaaaaaa/DestinationAlphaSenders"32},33"url": "https://messaging.twilio.com/v1/Services/MGaaaaaaaaaaaaaaaaaaaaaaaaaaaaaaaa"34}
In a previous step, you calculated your MPS requirements and added a buffer to make sure your messages were sent in the appropriate window of time for your two use cases. To meet these requirements, you'll want to add different Senders to your Messaging Services' Sender Pools.
To adhere to carrier requirements, each Sender (phone number) on Twilio has specific MPS limits. These limits vary by both Sender type and location. For example, Short Codes have a 100 MPS limit. A Long Code in the US has 1 MPS, but a Long Code in the UK could have 10 MPS.
Now that you have Messaging Services with the appropriate configurations and Sender Pool, you can set up your messages to be delivered on time with the Twilio Programmable Messaging API.
- Promotional: Queue them up in the morning so your messages have plenty of time to get delivered.
- OTP: Set up your application to automatically send OTP messages as needed.
1// Download the helper library from https://www.twilio.com/docs/node/install2const twilio = require("twilio"); // Or, for ESM: import twilio from "twilio";34// Find your Account SID and Auth Token at twilio.com/console5// and set the environment variables. See http://twil.io/secure6const accountSid = process.env.TWILIO_ACCOUNT_SID;7const authToken = process.env.TWILIO_AUTH_TOKEN;8const client = twilio(accountSid, authToken);910async function createMessage() {11const message = await client.messages.create({12body: "Our biggest sale of the year starts in one hour! Make sure you're already signed-up and logged in.",13messagingServiceSid: "MG9752274e9e519418a7406176694466fa",14to: "+14155552345",15});1617console.log(message.body);18}1920createMessage();
Response
1{2"account_sid": "ACaaaaaaaaaaaaaaaaaaaaaaaaaaaaaaaa",3"api_version": "2010-04-01",4"body": "Our biggest sale of the year starts in one hour! Make sure you're already signed-up and logged in.",5"date_created": "Thu, 24 Aug 2023 05:01:45 +0000",6"date_sent": "Thu, 24 Aug 2023 05:01:45 +0000",7"date_updated": "Thu, 24 Aug 2023 05:01:45 +0000",8"direction": "outbound-api",9"error_code": null,10"error_message": null,11"from": "+14155552345",12"num_media": "0",13"num_segments": "1",14"price": null,15"price_unit": null,16"messaging_service_sid": "MG9752274e9e519418a7406176694466fa",17"sid": "SMaaaaaaaaaaaaaaaaaaaaaaaaaaaaaaaa",18"status": "queued",19"subresource_uris": {20"media": "/2010-04-01/Accounts/ACaaaaaaaaaaaaaaaaaaaaaaaaaaaaaaaa/Messages/SMaaaaaaaaaaaaaaaaaaaaaaaaaaaaaaaa/Media.json"21},22"to": "+14155552345",23"uri": "/2010-04-01/Accounts/ACaaaaaaaaaaaaaaaaaaaaaaaaaaaaaaaa/Messages/SMaaaaaaaaaaaaaaaaaaaaaaaaaaaaaaaa.json"24}
Warning
Latency is calculated as the time on Twilio Platform (the time taken by Twilio from receiving an API request to sending the Message to carriers). It does not represent any downstream carrier-related latency because Twilio does not have full visibility into handset delivery.
You can keep an eye on your messaging application using Twilio's Messaging Insights in the Twilio Console. (Check out our doc on Exploring Messaging Insights.)
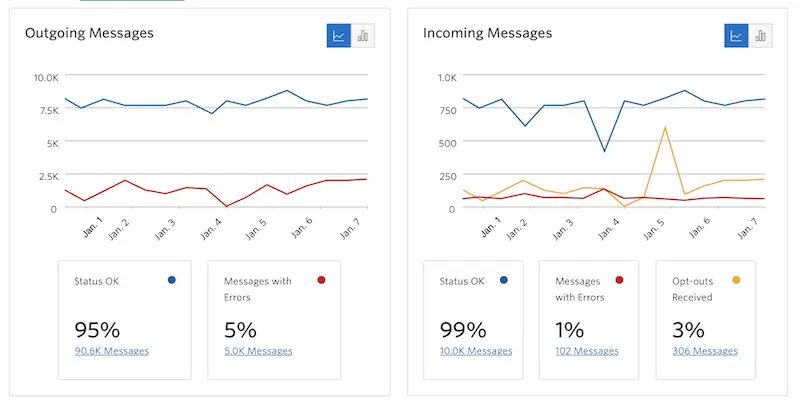
Within Messaging Insights, the Latency Insights report will highlight if there are latency issues with any of your Senders, Messaging Services, or Twilio sub-accounts, in near real-time. The Messaging Insights Delivery & Errors report will help you determine the health of delivery rates and identify if there are certain errors you should troubleshoot.
View the Latency Report to see how quickly your messages are being processed by the Twilio platform. If there are issues contributing to increased latency of your messages on Twilio's platform, they will show up in the charts dedicated to Sender, Messaging Service and Account-level queueing.
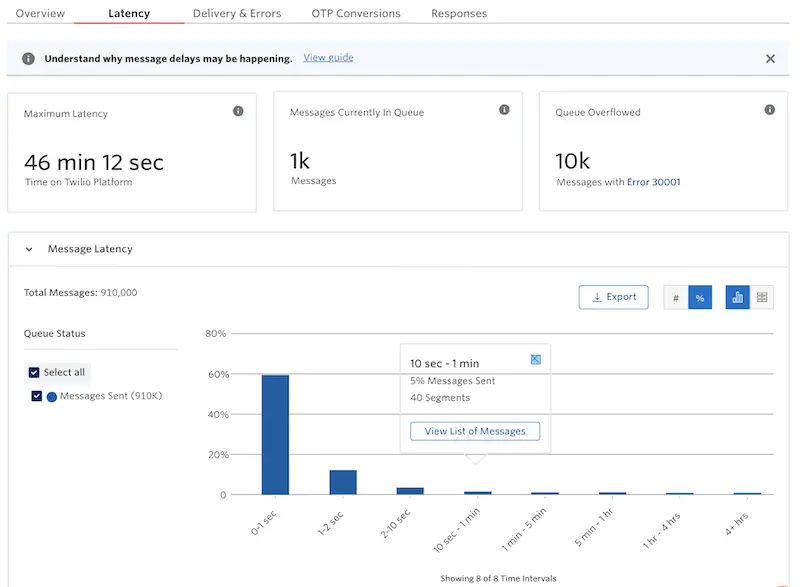
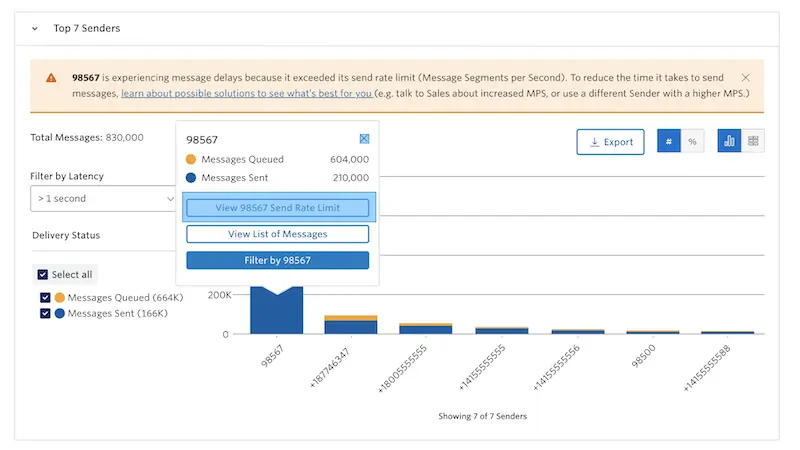
When any of these entities--Senders, Messaging Services, or Account-level issues--cause too much latency and large queues, you can see the send rate limits by hovering over the column of interest and clicking the View Limits button. Twilio also provides guidance of what to do next within the modals that appear upon clicking.
You can use the dashboards in Messaging Insights to monitor your messaging throughout the day, as the sales roll in from your smart pre-Black Friday planning.
Say your billing systems go down and you need to notify all your customers that sales will be delayed for a while. Your normal account limits may not suffice in such large situations. Reach out to Twilio and we may be able to help by adjusting the limits applied to your account, senders, or messaging services.
Here's a quick reference on how you could calculate your queueing / sender needs as described above.
- Messages to Send: 1000000 message segments
- Validity period (default) 36000 seconds
- Approximate MPS needed: 70 messages/second
- Applied Buffer factor: 200%
- Total MPS to plan for: 140 messages/second
| Promotional Sender Pool Type | Why? | Quantity | MPS Capacity | Total MPS Capacity✝ |
|---|---|---|---|---|
| Short Code | High Capacity (but pricey) | 1 | 100 | 100 |
| UK Long Code | For UK fallback | 2 | 10 | 20 |
| US Long Code | For US fallback | 10 | 1 | 10 |
| Canada Long Code | For Canada Fallback | 10 | 1 | 10 |
| Total | 23 | 140 |
✝ Total MPS Capacity = Quantity * MPS Capacity
- Assumed Click Conversion to Login: 2%
- Number of OTP messages: 20,000 message segments
- Validity Period: 180 seconds
- Approximate MPS needed: 110
- Buffer applied 200%
- Total MPS to plan for: 220
| OTP Sender Pool Type | Why? | Quantity | MPS Capacity | Total MPS Capacity✝ |
|---|---|---|---|---|
| Short Code | High Capacity (but pricey) | 1 | 100 | 100 |
| Toll Free | Medium Capacity, Cheap | 2 | 25 | 50 |
| UK Long Code | For UK fallback | 4 | 10 | 40 |
| US Long Code | For US fallback | 10 | 1 | 10 |
| Canada Long Code | For Canada fallback | 2 | 10 | 20 |
| Total | 19 | 220 |
✝ Total MPS Capacity = Quantity * MPS Capacity
Customers sending large volumes of messages may encounter errors such as Queue Overflow, in order to track these errors programmatically use Twilio's Debugger by setting a webhook for these types of errors. If you, for example, get a 30001 error you can slow down your application by implementing backoff and retries.
This guide walked you through how to set up two Messaging Services for a time-sensitive, high-volume event using Twilio Messages. As you can scale, you can implement the steps and strategies in this guide across multiple Twilio Accounts, each containing one or more Messaging Services as you build different applications. Let's build something amazing.