Build your Account
Welcome to the "Build your account" section of the Programmable Messaging API Onboarding Guide. When you complete this milestone, as long as your regulatory requirements are fulfilled, you'll be ready to message your customers whenever you need and at whatever scale you require. We encourage you to complete all the steps presented here.
Who are your stakeholders at this stage?
- Business Team: Ensure that your Subaccount strategy aligns the technical build with how your team will operationalize messaging for use with customers, departments, and consumers.
- Finance Team: Proactively discuss how you can use your account architecture to break up billing as much or as little as your organization requires.
- Developers: Make decisions that ensure your team can maintain a high degree of account security while also managing access to Parent Account, Subaccount, and data flow between Twilio and your systems.
This guide will cover how to:
- Create an account architecture.
- Create Subaccounts, API keys, and Messaging Services.
- Complete data configurations such as webhooks and status callback URLs.
The action(s) associated with each step below are marked as required, recommended, or optional to help you navigate this guide efficiently while providing all the information needed to develop a solid messaging program.
Before you start sending text messages, you need to architect your account in a way that promotes growth and flexibility. There are two main pieces of Twilio functionality you should understand before diving into your account architecture: Subaccounts and Messaging Services.
- Subaccounts: A Subaccount is a child of your parent account. You can create as many of these as you want and they give you the ability to silo out different use cases and clients. By utilizing Subaccounts, you can create API keys for each Subaccount, set up phone numbers on each Subaccount, and even track spending, sending, and error rates based on the Subaccounts. It is highly recommended for any ISV to utilize Subaccounts, but it can be just as helpful for direct use cases. Important: Subaccounts are a critical part of your compliance strategy. The siloing of message streams means that if one Subaccount is found to be non-compliant, the impact will be contained and the rest of your accounts can continue operation. In worst case scenarios, customers who send directly from a parent account can see all their traffic impacted during a compliance violation.
- Messaging Services: You can think of Messaging Services as a bucket of senders. For example, if you purchase 100 numbers, you can put all those numbers into a Messaging Service. By doing so, these numbers can all be linked to the same Messaging Use Case, throughput, and Brand, ensuring messaging compliance. Out-of-the-box features include geomatching, sticky sending, and advanced opt-out. Messaging Services are recommended regardless of your number type, and they are also required for US A2P 10DLC registration. A default Messaging Service is automatically generated for your Account upon creation.
Info
We recommend that all users, regardless of sender type, set up their account utilizing Subaccounts and Messaging Services.
Below, we provide two account architecture examples. Read through the architecture that best suits your business.
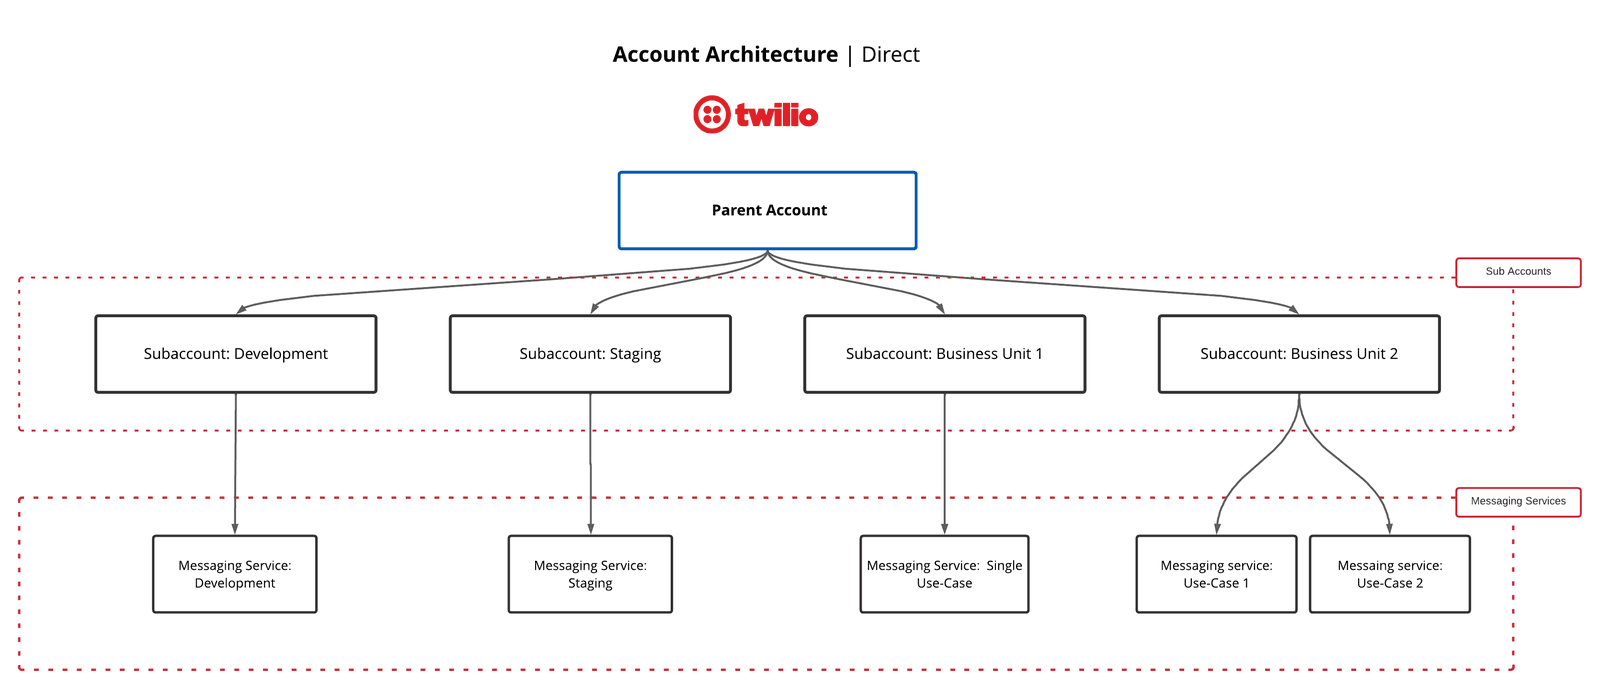
- Architecture for a Direct Customer: This architecture is best for a business-to-consumer (B2C) model, where you send messages to your own customers directly.
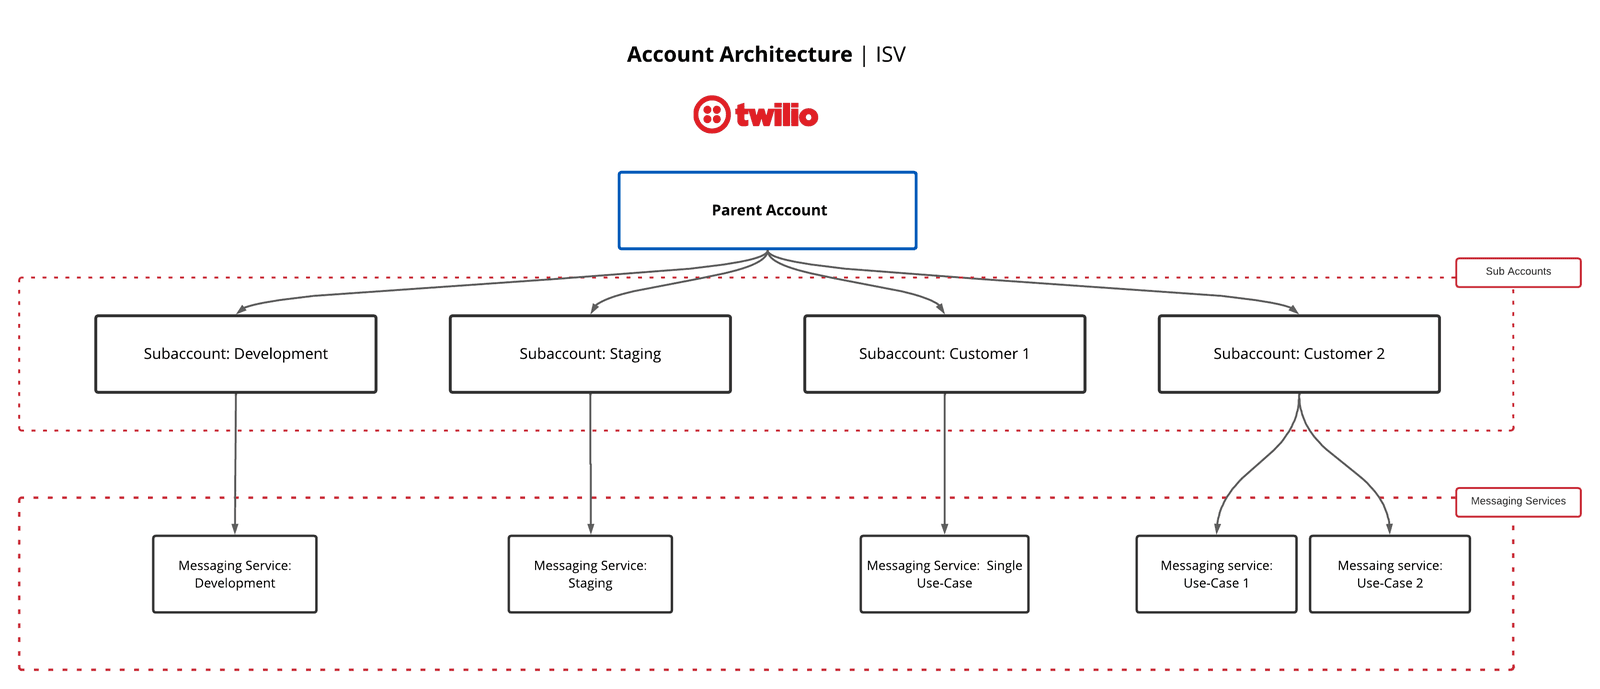
- Architecture for an Independent Software Vendor (ISV): This architecture is best for a business-to-business (B2B) model where you embed Twilio APIs into your software solutions to power digital communications. If you provide full featured solutions to other businesses and want to offer omni-channel solutions via Twilio, this is the architecture for you.

As a direct customer it is important to think through how your organization works internally. One of the biggest advantages to setting up Subaccounts is reporting on usage. The architecture shows how you could break up your Subaccounts by business unit or team. You could also do so by product, region, or in an industry specific way.
We recommend setting up both a Development Subaccount and Staging Subaccount to ensure you have separate environments for development and testing. Within each Subaccount, you then have the opportunity to further separate your traffic based on Messaging Service use cases. Sometimes, it can make sense for one Messaging Service to have multiple use cases. However, for optimal compliance and reporting, we recommend separating out Messaging Services by use case as much as possible.

Our recommended ISV architecture is structured to segment and containerize each customer with Subaccounts.
There will be a parent account where no sending will occur; it acts more as a shell account for administrative settings and privileges. All sending will happen in the Subaccounts below it. We recommend setting up both a Development Subaccount and Staging Subaccount to ensure you have separate environments for development and testing. From there, your production accounts will be broken up by customer. We only list two customers below, but you can have as many Subaccounts as you want.
Within each Subaccount, a Messaging Service should be created to hold all relevant senders. Depending on the amount of use cases you have for a given customer, you may want to separate out your client's use cases by Messaging Service and have multiple Messaging Services in one account, as shown in the diagram under customer 2. Note that this can incur extra costs if utilizing A2P 10DLC numbers, but will allow the customer to ensure that each use case has its own throughput and number pool.
Now that you've reviewed one or both approaches to account architecture, we suggest you select one as a foundation for your planning and map out your account needs as a team.
If you completed step 1 in "Prepare your sender strategy," you created and configured your parent account. If you haven't completed that step yet, we advise that you do so before proceeding.
Using your account architecture, navigate to the documentation and build out the remaining key elements of your account.
- Create your Subaccounts (recommended)
- Create API keys for each Subaccount (recommended)
- Create Messaging Services or use your auto-generated default Messaging Service (recommended)
There are plenty of options for reviewing data in the Twilio Console, but for many of our customers, ensuring that you have this data securely stored internally is of the utmost importance. By utilizing your own data storage methods, you can use your reporting tools to review your sending in the exact way you want. Even if you don't have a solid data visualization software to use, it is important to store the data you need for archival purposes.
As a team, we recommend discussing and deciding on where you will hold your data. We highly recommend the use of our Status Callback Webhook because it is the easiest and quickest way for you and your team to get consistent updates on how your messages are faring in the SMS ecosystem.
Read about the actions below and navigate to the relevant documentation to plan your data storage strategy.
- Review documentation on the different webhooks available to your team (recommended)
- Set up the Status Callback Webhook (recommended): you can set these up at the Messaging Service level or the phone number level.
- Set up alerts based on your Status Callback Webhooks (optional)
- Retrieve your data through log archives (optional)
At this point, you should be able to create a structure for your account that will best serve your business needs, including Subaccounts with API keys and Messaging Services. You should also be able to build a data configuration that allows you to track delivery metrics for your application.