No-code SMS quickstart with Twilio Studio
With a few drag-and-drop actions, you can build an application that sends and receives SMS messages.
In this quickstart, you'll build a no-code application to send and receive text messages with Twilio Programmable Messaging. This quickstart uses Twilio Studio, the Twilio low-code application builder, and the Twilio Virtual Phone.
For a developer quickstart that uses programming languages and the REST API, see the SMS developer quickstart.
- Sign up for Twilio. When prompted to select a plan, click Continue with trial.
- From the Twilio Console, open Messaging and select Overview.
- On the Messaging overview page, click Try out SMS.
- Follow the prompts to verify a recipient and send your first SMS using the assigned trial number.
To continue with Studio after the guided trial flow, use the assigned trial number and your verified recipient from the SMS trial setup.
A Flow is a visual representation of your application, similar to the flowchart you might draw when planning its logic.
To create a Flow, follow these steps:
-
Open the Studio Flows page in the Twilio Console.
-
Click Create new Flow.
If you created a Flow before, click the + icon under the Flows heading.
-
Give your new Flow a name, then click Next. A list of templates you can use displays.
-
Select Start from scratch, then click Next.
After you create a new Flow, Studio displays the following elements:
- Canvas: The space where you build your application.
- Trigger Widget: The Trigger Widget tells Studio when to start, or "trigger," your Flow. To learn more, see Trigger Widget.
- Widget Library: The Widget Library, on the right side of the Canvas, contains all the available Widgets. Widgets are the building blocks of a Studio Flow and perform the functions that make up your application.
To create a system that automatically responds to an incoming message with the Send Message Widget, follow these steps:
-
From the Widget Library on the right, drag the Send Message widget onto the Canvas and place it under the Trigger widget.
-
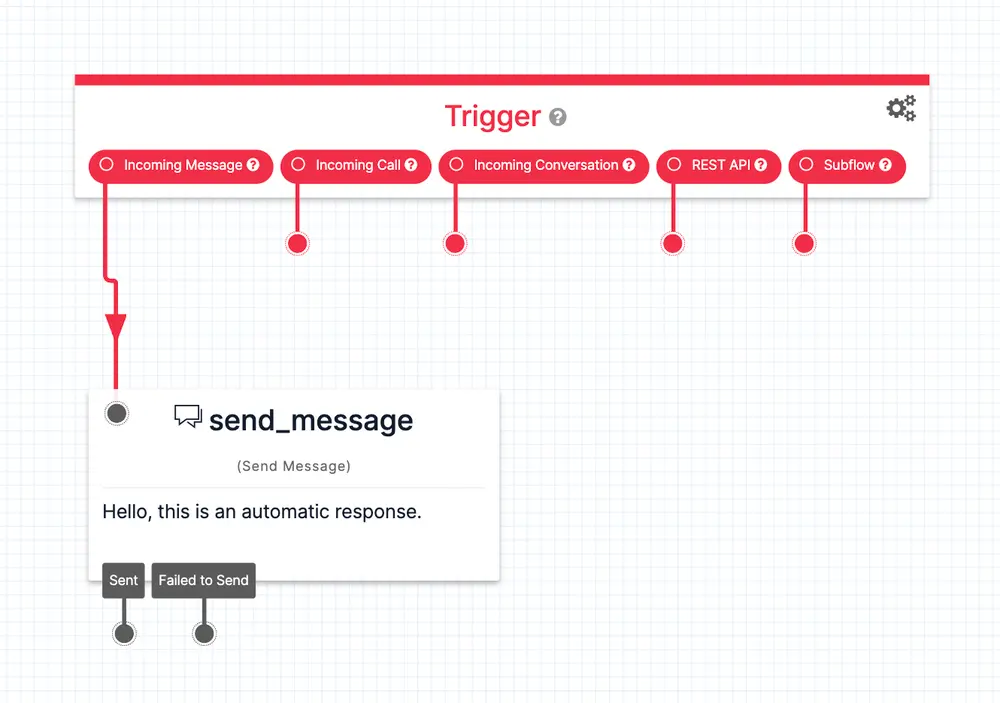
Click the red dot underneath Incoming Message on the Trigger Widget and drag it to the Send Message Widget to connect them.
Studio now triggers the Flow when it receives a message and then executes the Send Message widget.
-
Configure the Send Message Widget.
With the Widget selected, the Widget Library displays the settings for the Widget:
-
Enter a name in Widget Name. The name must start with a letter and can't contain spaces; use underscores (
_) to separate words. -
Enter a message into the Message Body field. This is the message a user receives when they text your Twilio number.
You can also add a JPG, PNG, or GIF to the message by entering the URL of the media into the Media URL field.
-
Click Save.
Your Flow should resemble this:
-
-
Click Publish to publish your Flow.
Publish your Flow whenever you make changes to make them live.
To tell your Twilio phone number to use your Flow when it receives a text message, follow these steps:
- Open the Numbers & senders page in the Twilio Console.
- Select the Twilio phone number you'd like to connect to your Flow.
- Select Configuration details, click Messaging, and select Edit configuration details.
- Update the method to Webhook, TwiML Bin, Function, Studio Flow, Proxy Service, select Use Studio Flows, and then select the Flow you created.
- When you've finished updating your configuration, click Save.
To test your application, complete the following steps:
-
Open the Send an SMS page in the Twilio Console.
-
On the Send to Virtual Phone tab, select the number that Twilio gave you from the Phone number list.
-
Click Virtual Phone. Messages you send with your application display on the Virtual Phone.
-
Send an SMS to your Twilio phone number:
- Enter a message in the Click here to reply field at the bottom of the Twilio Virtual Phone.
- Click the send icon.
Your application processes the request, and you get the response back as an SMS on the Twilio Virtual Phone.
After you've built your first no-code SMS application, explore these resources:
-
Learn about toll-free verification and Application-to-Person (A2P) 10-Digit Long Code (10DLC) registration. Regulations require:
- Toll-free verification to send SMS messages from toll-free numbers to mobile phones in the US and Canada.
- A2P 10DLC registration to send SMS messages from local numbers to mobile phones in the US.
-
Learn more Twilio Studio basics with Get Started with Twilio Studio.
-
Build more applications with Twilio Studio:
- To create a two-way conversation with your users, use the Send & Wait For Reply widget. See the Build a chatbot with Twilio Studio and Conduct an SMS survey with Twilio Studio tutorials to see the Send & Wait For Reply widget in action.
- Send Appointment Reminders with Twilio Studio.