Direct Sole Proprietor Registration Overview
This guide provides an overview for Direct customers who want to register A2P 10DLC messaging capabilities as a Sole Proprietor Brand. You will do this using the Twilio Console A2P registration tool, as directed below.
Following this process lets US Carriers know who you are and what types of messages you'll be sending to end-users. This is important so that end-users can trust that they are receiving legitimate SMS traffic and so that carriers do not filter your messages to your customers. Learn more about A2P regulations and registration options here.
Sole Proprietor registration is available for customers in the United States and Canada who do not have a business Tax ID. A Tax ID in this case would be a U.S. EIN or a Canadian Business Number, which you would use to file Federal U.S. or Canadian income tax as a corporate entity. If you are registering on behalf of a business and DO have a Tax ID, or if you are registering for a business located outside of the United States or Canada, you must register for a Standard or Low-Volume Standard Brand rather than a Sole Proprietor Brand.
If you are an Independent Software Vendor (ISV) and want to register your customers for A2P as Sole Proprietors, see this overview.
Info
Not sure if you are an ISV? See this support article to understand what an ISV is.
NOTE: Are you seeking to register your Brand solely in the service of an OTP (One-Time Password) use case, or any other type of 2-Factor Authentication (2FA) use case? If so, you should investigate Twilio's Verify service to see if this is a better option for you. With Verify you do not need to worry about A2P registration (Brand or Campaign) or any other aspect of sender provisioning.
You will complete A2P 10DLC registration in the Twilio Console. The process involves the following steps:
- Create a Twilio Starter Profile (Messaging > Regulatory Compliance)
- Register a US A2P Sole Proprietor Brand
- A Brand verifies who you are with US carriers
- Register a new Campaign and link to a Messaging Service with your 10DLC phone number
- A Campaign describes the messages you will be sending to users and how they can opt in or out of these messages
- Once you create a campaign, you will attach the campaign to a Messaging Service. Sole Proprietor Campaigns can only have one 10DLC phone number attached to them.
Info
The Campaign Registry (TCR) supports all "utf8mb4" supported characters.
The first step is to create your Twilio Starter Profile, which can then be used to register as a Sole Proprietor. This step validates your identity with Twilio before you register for A2P 10DLC. You will only need to do this once.
Navigate to the Twilio Console → Messaging → Regulatory Compliance → Onboarding page:
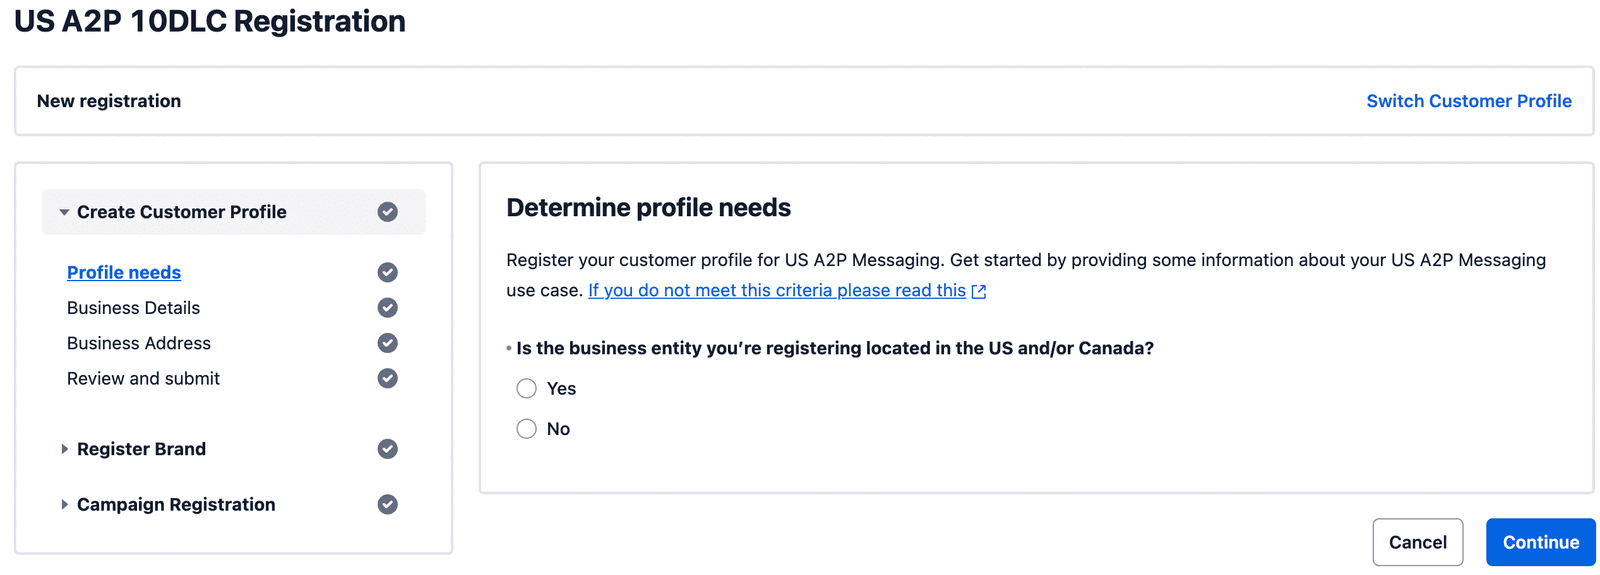
You'll begin by answering questions about your Profile needs to determine the best type of Trust Hub profile to register for. To create a Starter Profile and register as a Sole Proprietor, you must have a US or Canadian address and you should NOT have a business Tax ID. Once you answer Yes to the location question shown above, this page will expand to ask about the Tax ID:
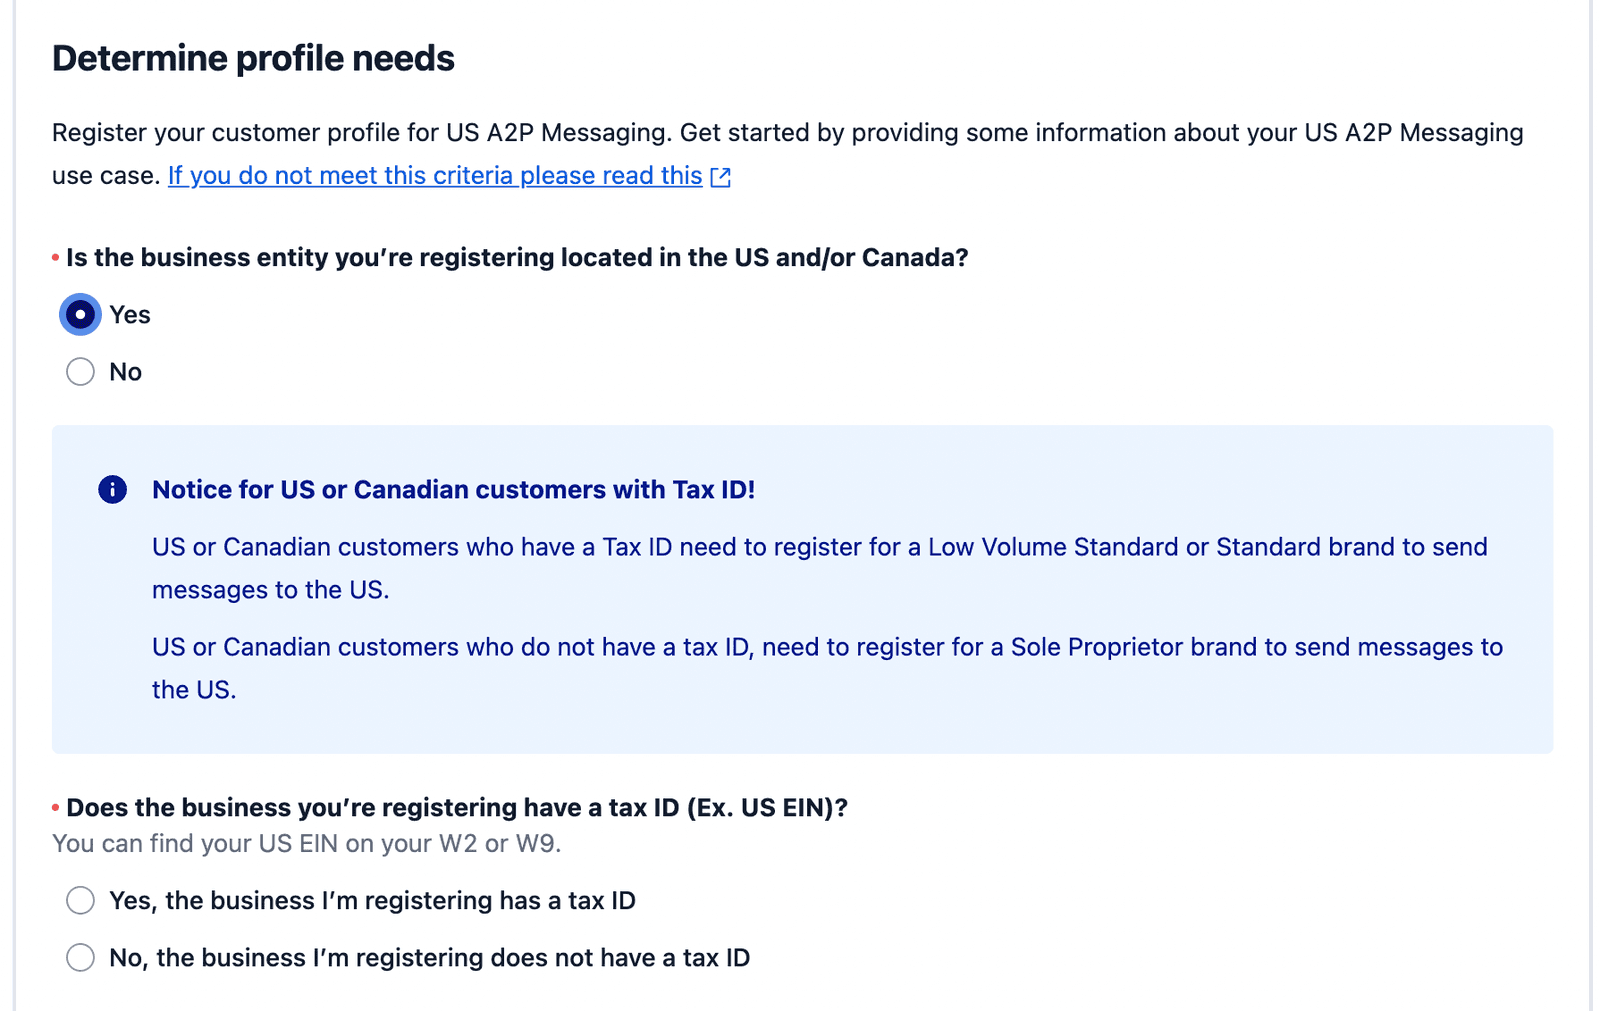
Again, a Tax ID would be a U.S. EIN or a Canadian Business Number, which you would use to file Federal U.S. or Canadian income tax as a corporate entity. If you DO have such a number, you are not eligible for a Sole Proprietor Brand but must instead register as a Standard or Low-Volume Standard Brand. A Sole Proprietor is either a hobbyist or an individual businessperson who uses their own Social Security number (or Canadian Social Insurance Number) when filing income taxes. So for the purposes of the Sole Proprietor use case we are considering here, the answer here must be No.
Once you have clicked No, the page will change to one displaying a list of messaging capabilities and fees associated with the Sole Proprietor Brand and Campaign registration. At the bottom of this page, you will be asked to indicate whether you wish to continue registering as a Sole Proprietor; answer yes and click Continue. You will then see a popup dialog asking you to confirm your Profile Type selection.
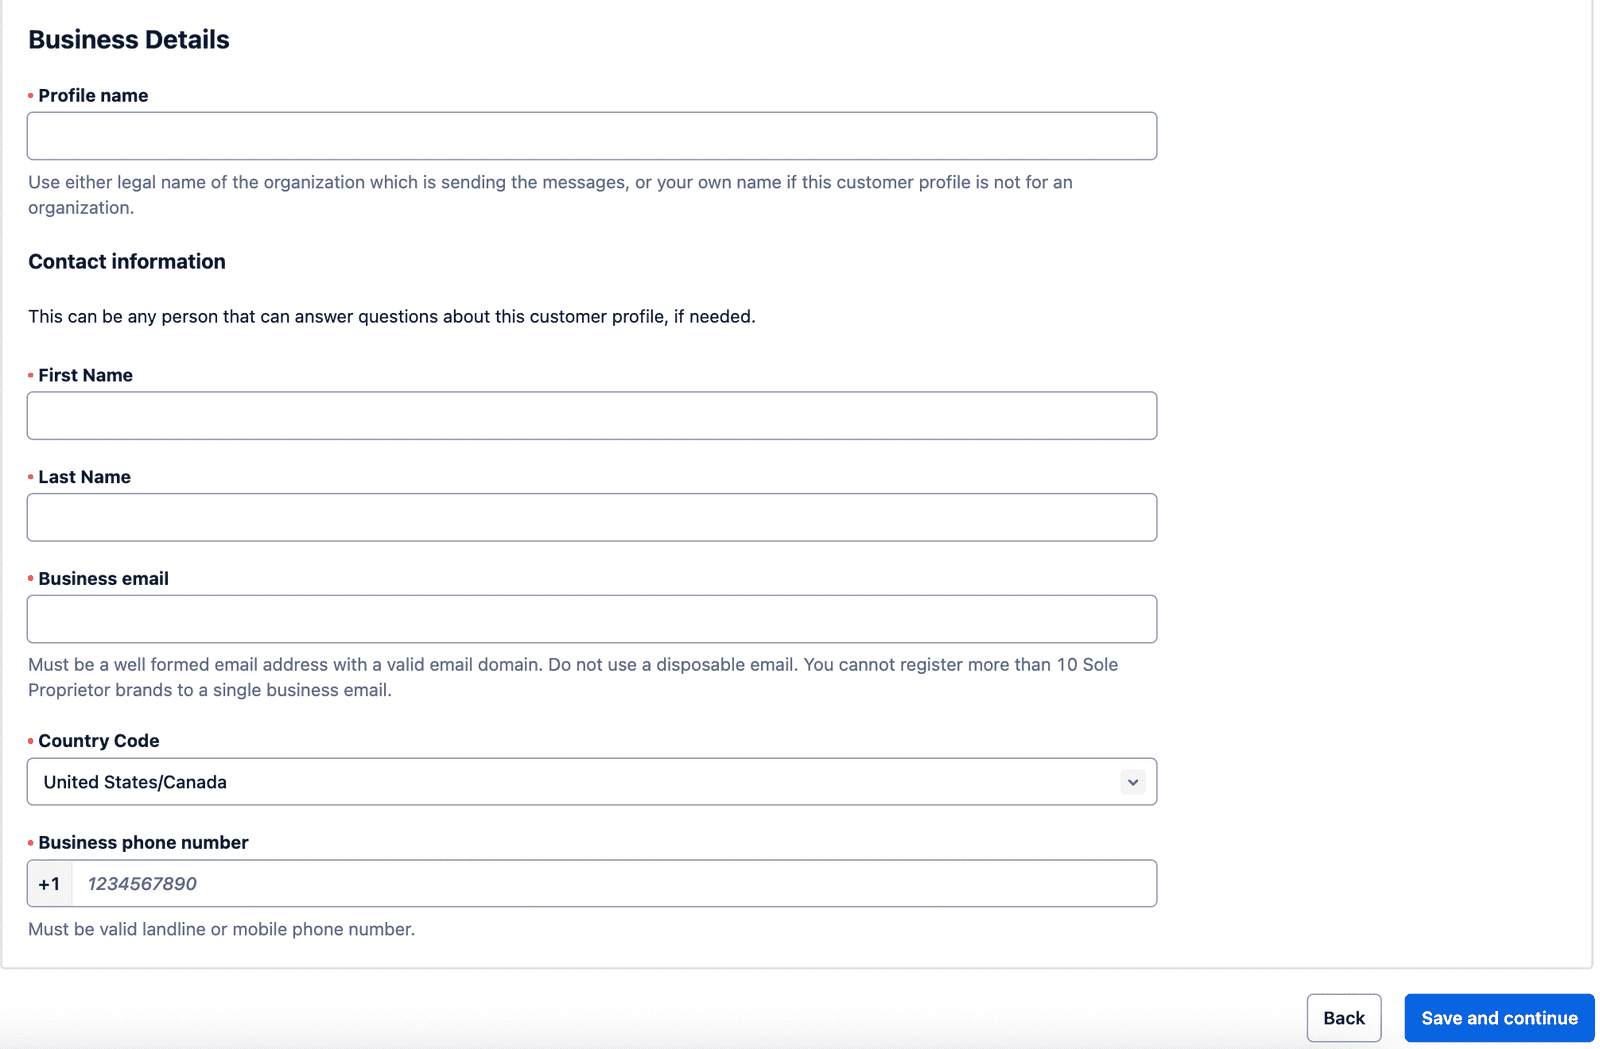
On the next screen you will begin providing information for your Starter Profile:
-
Profile Name: The name you wish to give this Starter Profile. This can be your own name or your business name if you are operating as a business.
-
First name
-
Last name
-
Email address: This must be a well formatted address with a valid domain and cannot be a disposable address.
- This email address can only be used a maximum of 10 times across all A2P Brand registrations with TCR. If you are registered for A2P 10DLC with another vendor using this email address, that counts towards this limit.
-
Phone number country code
-
Your contact phone number: Must be a well-formatted number for your designated country, and can be a landline, mobile, or other number.
When you have entered this information, click Save and Continue at the bottom of the page. This will save your Starter Profile, but it will not yet be submitted.
On the next screen you will provide your business address (this can also be your personal address if you are registering for yourself and not as a business). This must be a valid US or Canadian address. You can also select an existing address if you have previously registered an address with Twilio.
Like your email, this address can only be used a maximum of 10 times across all A2P Brand registrations with TCR. If you are registered for A2P 10DLC with another vendor using this address, that counts towards this limit:
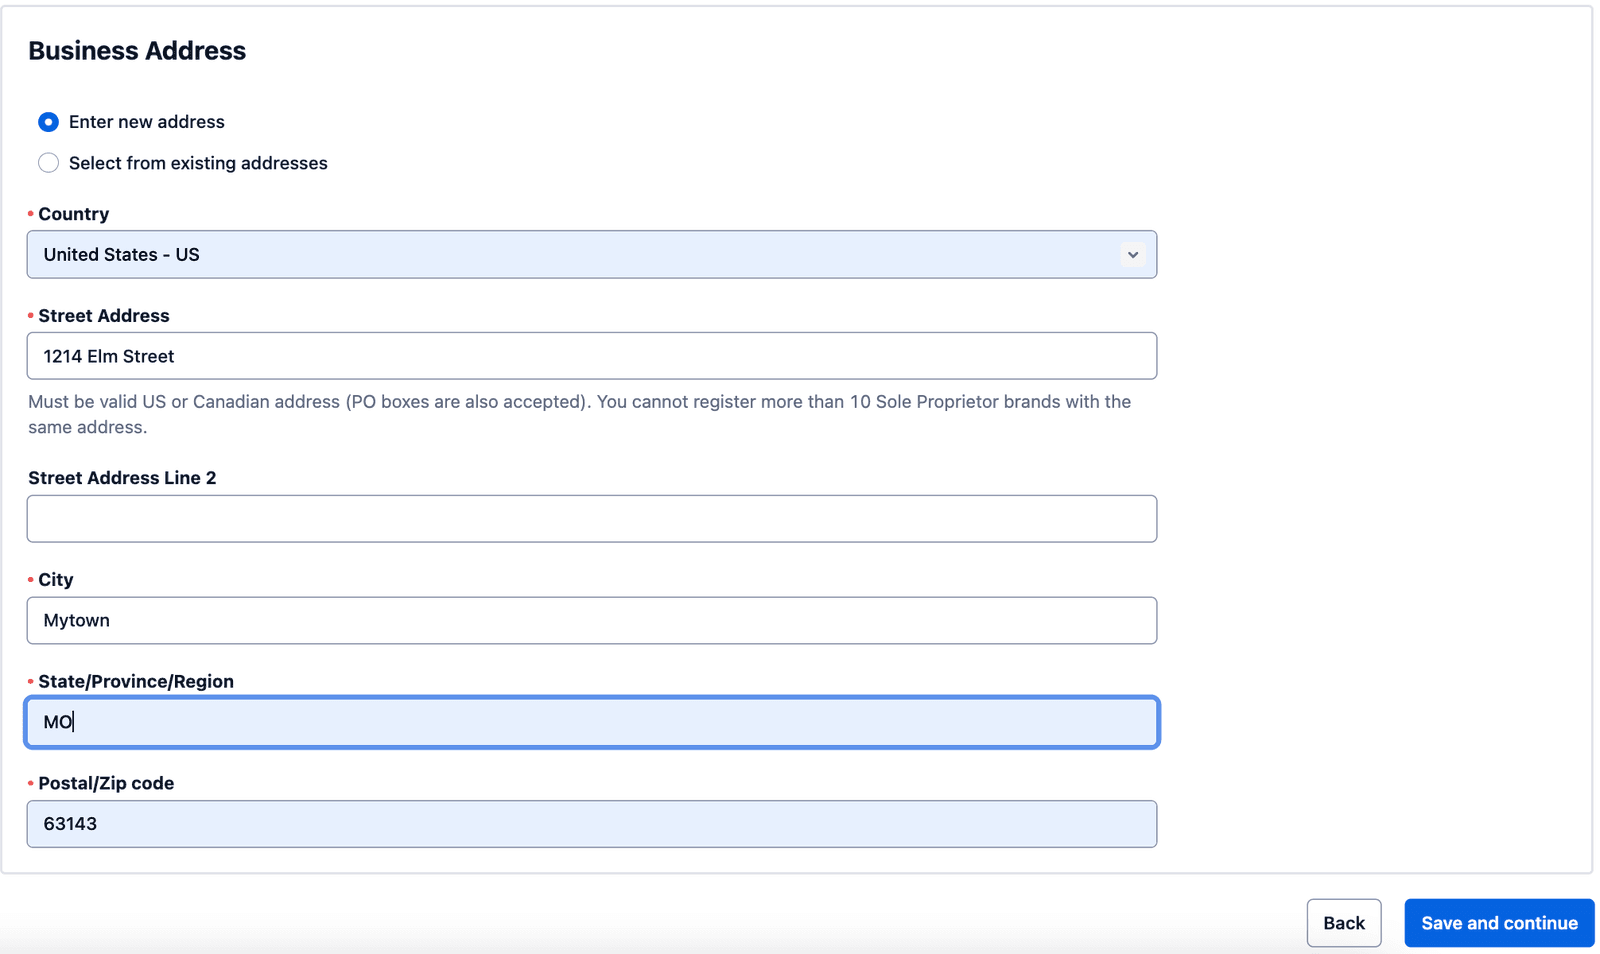
Click Save and Continue to move on.
The final screen of this first Profile step displays the Profile details you have entered. Confirm the details on the page are correct. You can select Back to go back and edit these details, or select Submit for review to submit the Profile.
Once the Profile is submitted, you may proceed to the next step to Register your US A2P Brand.
Next, register your Starter Profile for A2P 10DLC capabilities by creating a US A2P Brand. You will do this on a single screen:
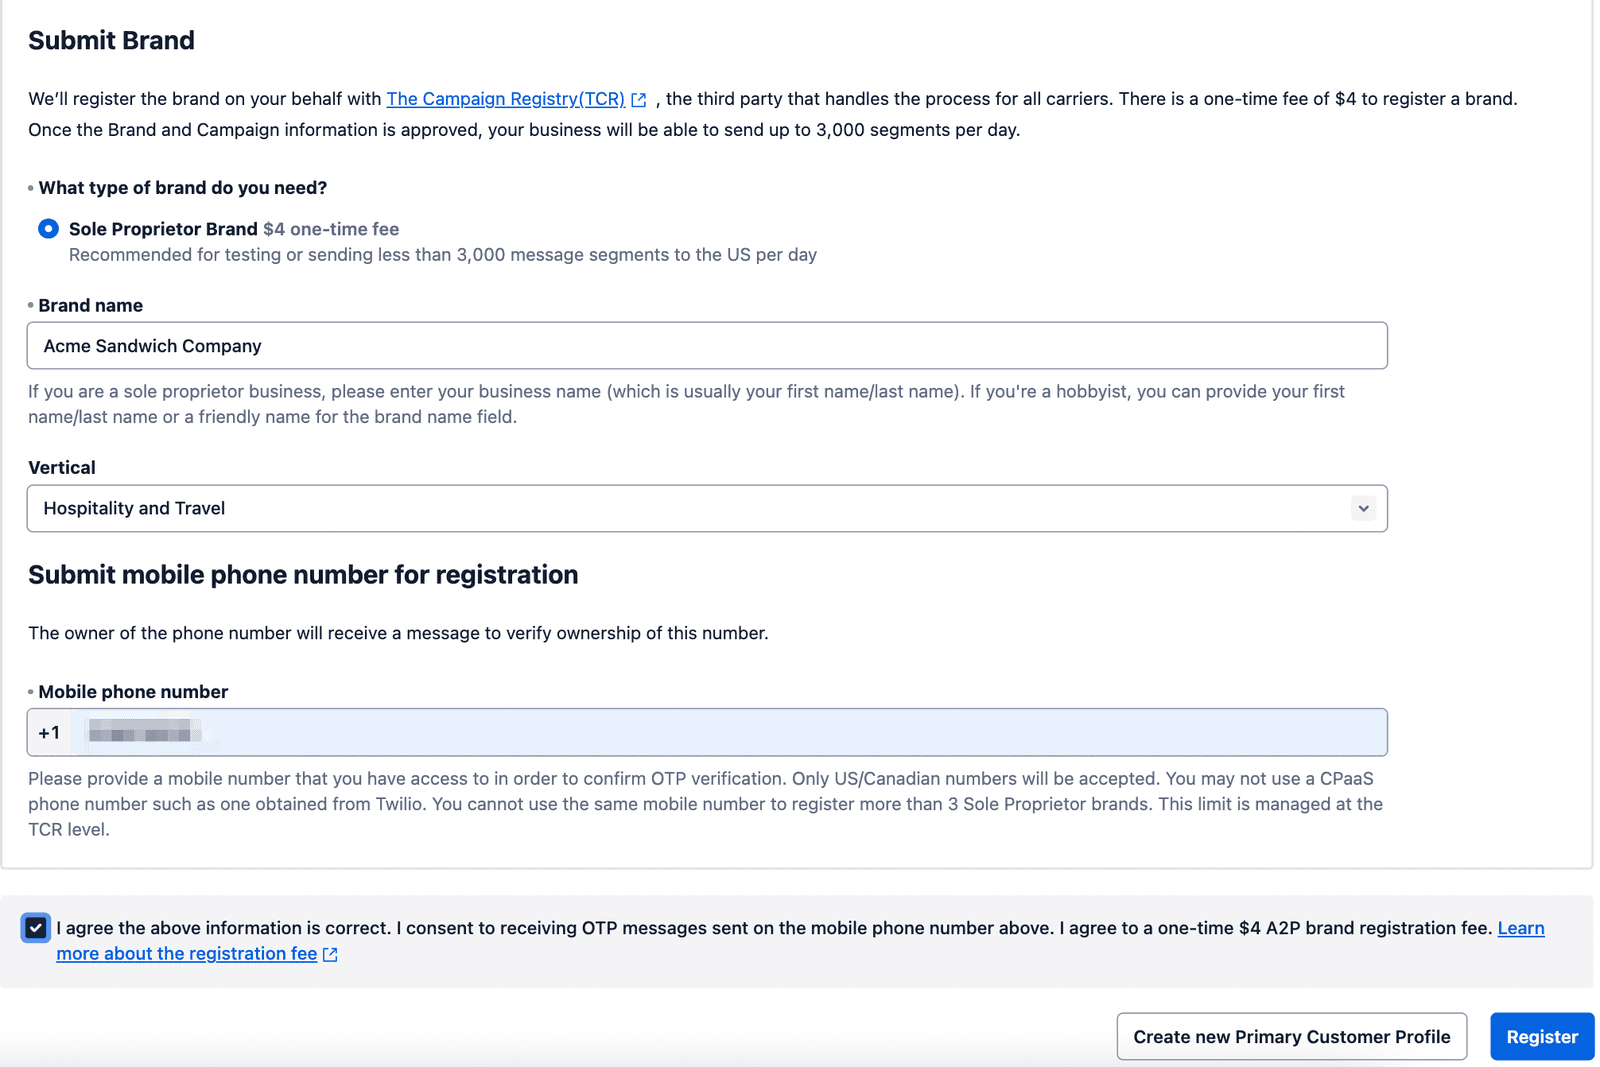
You need to include:
- Your registered Starter Profile from Step 1
- This will be automatically filled out for you after you create your Starter profile, but you can switch profiles if you would like to register your Brand for a different customer profile you have created in your account
- Your Brand type: The system selected this only permitted value:
Sole Proprietor. - Your Brand name: Either your business name, or your first and last name if you register as an individual
- (Optional) Your business vertical
- Your mobile phone number: As part of the registration process, Twilio sends the One Time Password (OTP) verification request to this mobile number from which you must respond.
- This mobile number must belong to a valid U.S. or Canadian mobile device.
- You can't acquire this mobile number from a CPaaS provider such as Twilio.
- You can use this mobile number no more than three times for exclusive A2P 10DLC Sole Proprietor Brand registrations with TCR.
- If you registered an A2P 10DLC with another vendor using this mobile number, that registration counts towards this limit.
- You may use the same number for both the Phone Number field during Profile creation and the Mobile Number field on this screen, provided that this number satisfies all of these requirements.
You are also asked to agree to the one-time Brand registration fee before submitting your Brand, and consent to an OTP verification request using the mobile number you've provided. When you have completed these details, click Register to submit your Brand for approval.
Once you click Register, Twilio submits your application for approval. Approval typically occurs within a few minutes of submitting. You will receive an email and see a message on screen when your registration is complete.
Before your Brand can be fully approved, you will receive an SMS OTP to the mobile number you provided. You must respond to this OTP within 24 hours for your Brand to be approved. If you've failed to respond to this OTP within 24 hours, you can come back to this screen to re-trigger the OTP request.
If your Brand registration fails, you will see the failure reason on the screen and instructions for how to proceed. You may also refer to this Guide for details on troubleshooting and rectifying Brand registration failures.
If your Brand registration shows as Suspended, see this section of our Troubleshooting Guide.
If your Brand registration is approved, you will be able to continue to the next Campaign registration step.
Once you have created and registered your Starter Profile and your Sole Proprietor Brand has been approved, you can register a Sole Proprietor Campaign for sending messages over A2P 10DLC routes.
For more information on Campaign use cases, see the Support Article on List of Campaign Types and the Support Article on Pricing for A2P 10DLC Service.
A2P 10DLC Campaign vetting process
All new Twilio US A2P 10DLC Campaign registrations are subject to a manual vetting process and are charged a campaign verification fee at the time of external vetting. If a Campaign is denied during external vetting, additional charges might apply for resubmission.
With this vetting process, a newly submitted Campaign is put in a "Pending" state until it is approved in the manual vetting process. You can send compliant messages using A2P only once the campaign is fully approved. Due to high volumes, this vetting process might take several weeks.
Once vetted and approved, the 10DLC phone number within the connected Messaging Service will be identified as A2P 10DLC with the associated Campaign use case, and you should see lower message filtering.
You'll need the following information for the Campaign creation process:
- The Messaging Service to be associated with the Campaign (or, you can create a new service after filling out your Campaign details)
- The A2P use case type (must be Sole Proprietor)
- The Campaign use case description
- Two sample messages, each up to 1024 characters long
- The message flow: details around how a consumer opts-in to your campaign, therefore giving consent to receive your messages
- At least one Twilio Phone Number to add to the Messaging Service's Sender Pool. You can purchase a Twilio Phone Number ahead of time through the Console, REST API, or Twilio CLI.
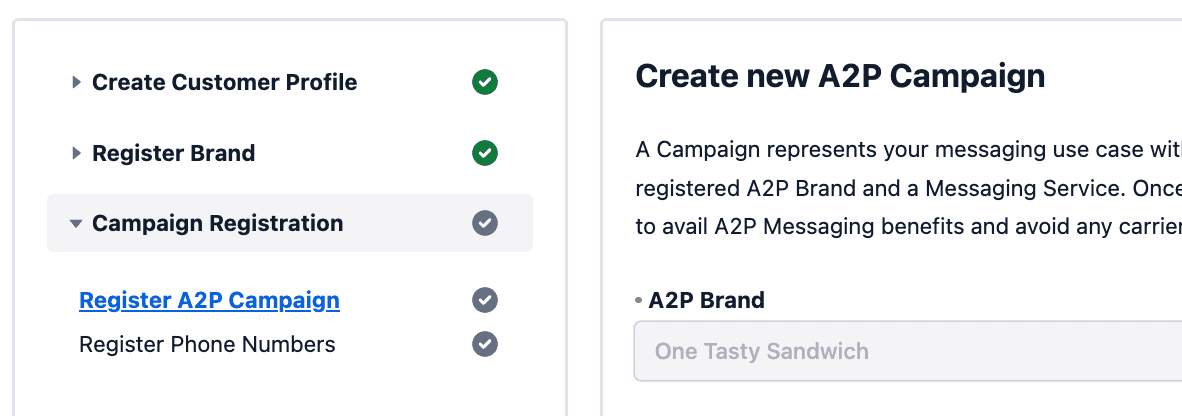
In the A2P Console, Campaigns are registered via a one-page form, the Register Campaign form. You should be taken to this form upon the successful completion of your Brand registration, or you can come back to this form later via the Campaign Registration > Register A2P Campaign link of the Onboarding workflow shown below on the left:
As you can see, the A2P Brand name has already been specified (it is the Business Name you indicated in the profile you just created) and is a read-only field. On the remainder of this page you will be asked to define your new Campaign in a number of ways:
Available A2P campaign use cases — For a Sole Proprietor Brand, there is only a single Sole Proprietor use case; this will be the one item that can be selected in the dropdown, as shown:

Messaging Service — Here is where you will indicate whether you want to reuse an existing messaging service for this new campaign, or create a new one:

If you were to choose Select existing Messaging Service here, a dropdown would appear below, listing all existing Messaging Services under your account and indicating, in each case, whether that Service was already attached to an A2P Campaign. A Messaging Service cannot be associated with more than one Campaign at a time, so if you did want to reuse one, any existing Campaign it was associate with would have to be deleted first before it could be selected for the new Campaign. However, if you are a direct customer registering a Sole Proprietor brand, it is unlikely that you'd be reusing an existing Messaging Service here. Direct customers registering Sole Proprietor Brands are typically new to the Twilio ecosystem, so it's much more likely that you'd instead want to create a new Messaging Service.
If you make this selection, the service will be created automatically upon submission of this new campaign. A 10DLC Phone number can be purchased (if necessary) and added to the Messaging Service after the Campaign has been created.
Campaign description — A description of the campaign use case: The description should be thorough and provide an explanation of the campaign's objective or purpose. This is an important field in determining whether your Campaign is approved, especially as the single Sole Proprietor use case doesn't give any substantive indication of the Campaign's purpose. Single-word answers, such as "Marketing", or not sufficient here; instead one might say "This campaign sends periodic SMS messages to end customers who have opted, informing them of product sales, seasonal sales and special discounts." This description should align closely with the samples message(s) you provide below.
Sample Messages
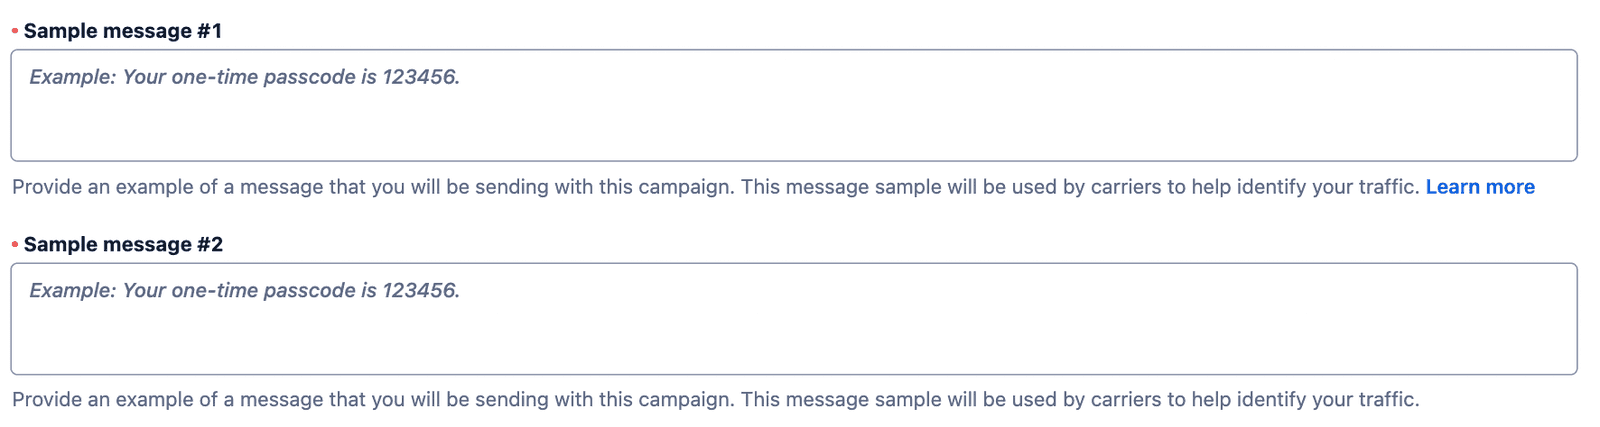
The Campaign Registry mandates that two sample messages be included in your Campaign registration. If your specific Campaign use case is such that only a single message text would ever be sent (as for example with One-Time Password messages), you may make the second message a duplicate of the first. But in the case of a marketing Campaign, for example, one could come up with several message samples. Consider these examples:
Sample Message #1
This is a message from the Acme Sandwich Company (www.acmesandwich.com) about this week's Special Deals. This week, pick up a large [sandwich type A], [sandwich type B], or [sandwich type C] for only [price]. You are currently signed up to receive this information via SMS. To opt-out of these messages, text STOP in reply.
Sample Message #2
It's summer at the Acme Sandwich Company (www.acmesandwich.com)! Come in and check out our new cool and tasty ICE CREAM sandwiches, all for [price]! Flavors include [list of flavors]. You are currently signed up to receive this information via SMS. To opt-out of these messages, text STOP in reply.
As part of our compliance review, we conduct automated checks on any URLs provided during campaign and brand registration. Our system captures a public-facing screenshot, and evaluates it against compliance rules. This compliance check is a mandatory step in our registration process. If you have any questions or concerns about the process, contact our support team.
Note a few things about these sample messages which indicate best practices for successful approval of campaigns:
- The sample messages relates to the campaign description indicated, in this case periodic Marketing messaging about specific products and sales.
- The sample messages specify the company name and website of the sender, which clearly relate to the business name indicated in the Business Profile. This must be a real, functional business website or the campaign will be rejected.
- Brackets [] are used in both sample messages to indicate templated information.
- Both messages indicate an opt-out mechanism (texting STOP in reply to any given marketing message). Further down in the form you will specify the opt-in method for the end user to opt into these SMS messages in the first place, but it is also good practice to indicate a subsequent opt-out path in the sample message itself, as these examples do.
Message contents — in our examples, the website name is an embedded link and should be specified as such. Any embedded link must relate directly to the specified use-case of the message. You can expect any embedded link to be scrutinized during the approval process as this is a common vector for smishing.
How do end-users consent to receive messages? This is a mandatory field, and very important for campaign approval. Any SMS messaging campaign must have an explicit end-user opt in, and this consent cannot be solicited via a (not-yet-consented-to) SMS message! Typically, the opt-in mechanism would appear on the company website when the user creates an account. Example: End users opt-in by visiting www.acmesandwich.com, creating a new user account, and explicitly consenting to receive marketing information via SMS message and providing a valid mobile phone number. Users are also informed on the website as well as in each message that they can opt-out of these marketing messages at any time.
Opt-in Keywords
If end users can text in a keyword (for example, "SUBSCRIBE") to start receiving messages from your campaign, those keywords must be provided. If you do not support opt-in via text, leave this blank. It would be blank in our example Campaign, as one can only opt-in to marketing messages on the website itself, not via SMS.
Opt-in Message
If you have specified a mechanism for opting-in to the Messaging Campaign via SMS, i.e. by users texting in a keyword to the Twilio number associated with this service, the auto-reply message they receive in response would go here. Example: Acme Sandwich Company: You are now opted-in to marketing messages by means of SMS to this mobile number. If you'd like to subsequently opt-out of these messages, text STOP in reply to any marketing message. If you do not specify an SMS opt-in method, leave this field blank.
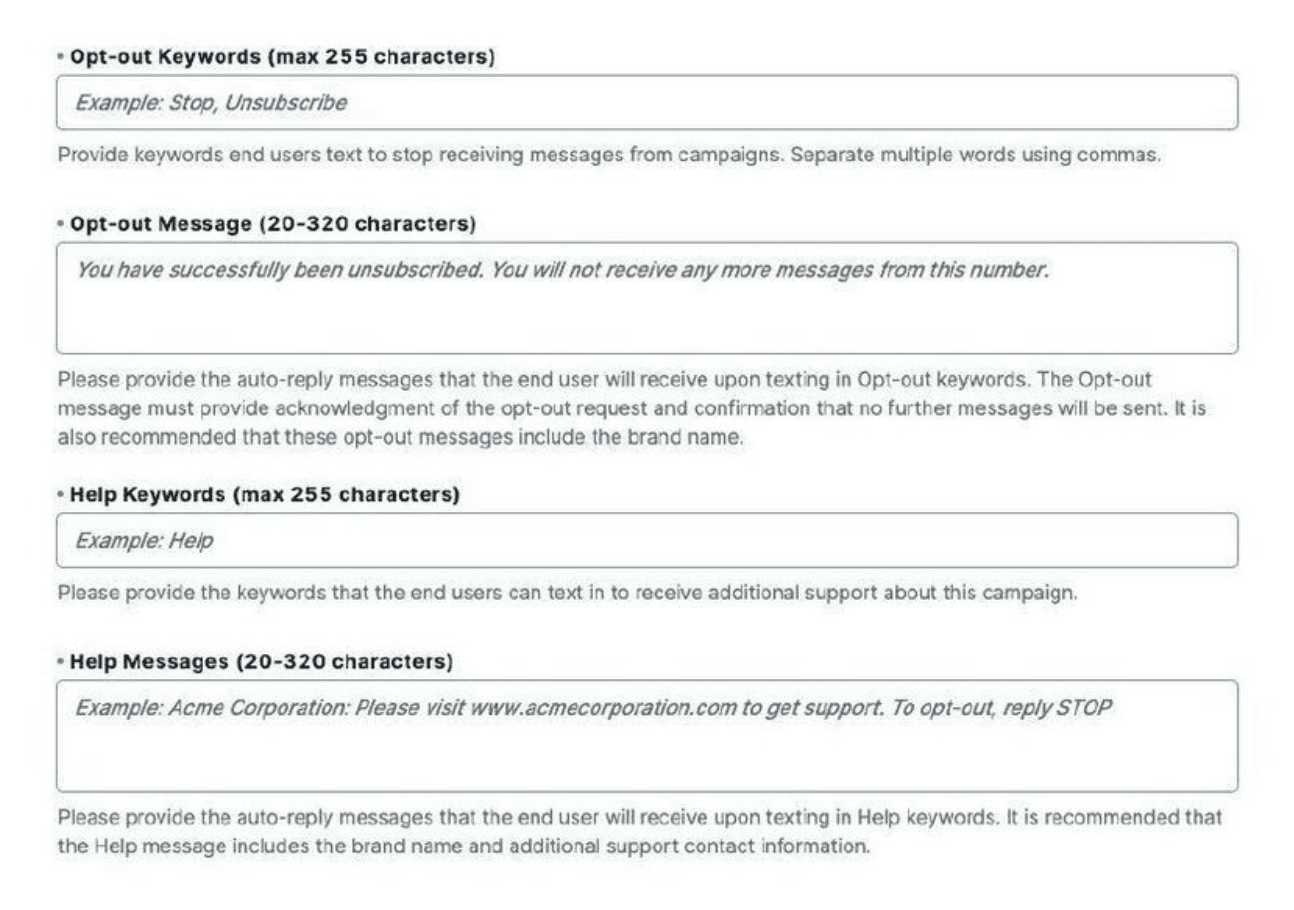
Indicate user opt-out and help options
Users must also have a way to opt out of campaigns and receive help. Most Twilio customers use default or advanced opt-out and will not need to provide these details. Twilio will complete this information for you with either the default opt-out and help messaging, or with the messaging you've configured as part of Advanced Opt-Out.
If you manage your own opt-out and help, you will see additional fields that you need to complete for your campaign:
- Opt-out keywords: The keywords end users can text to stop receiving messages from this campaign
- Opt-out message: The automated message end users will receive when they text in one of the opt-out keywords
- Help keywords: The keywords end users can text to receive help
- Help message: The automated message end users will receive when they text in one of the help keywords
Once you are satisfied with your answers to each of the above fields, click the blue Create button in the bottom right of the form. You will then see a confirmation popup:
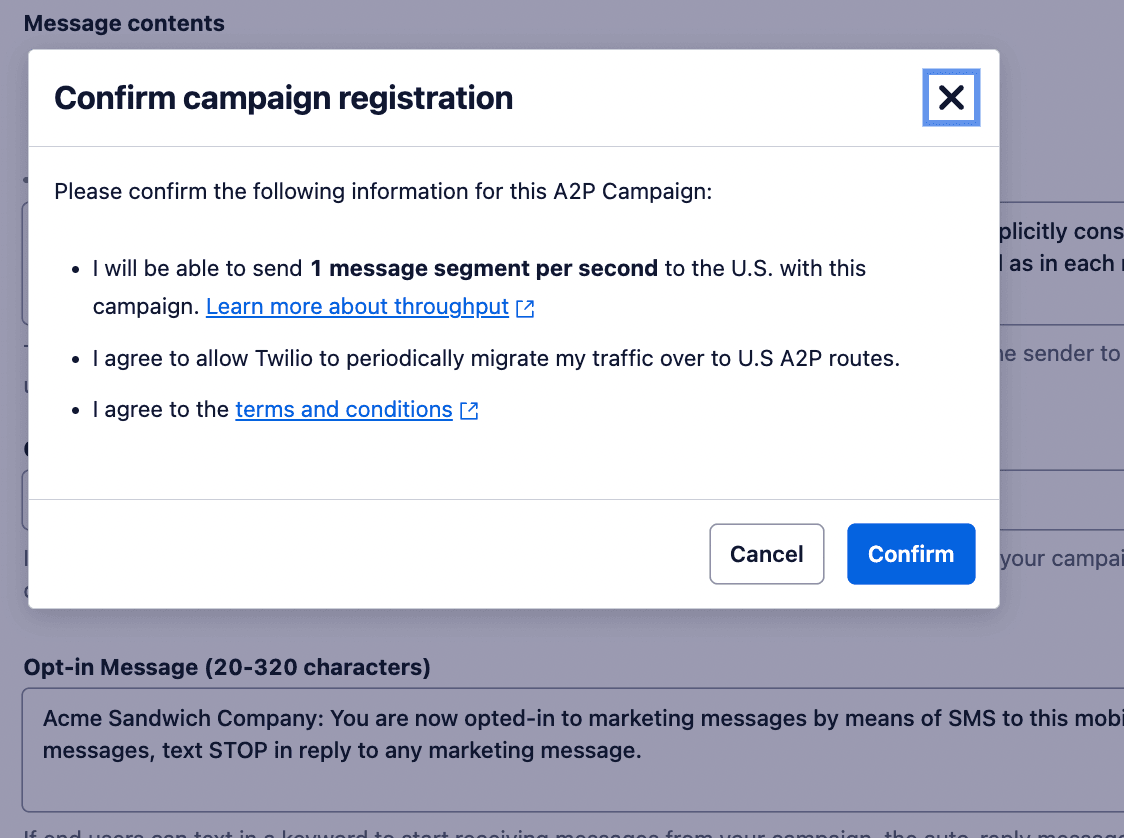
Once you've confirmed this, a Campaign details summary page will appear, displaying all of the information you've entered for this Campaign, as well as some defaults set by Twilio (if you want to customize any of the latter, go to Messaging Service - Opt-Out Management).
Note that immediately upon submitting your Campaign, the top of this details summary page will display a message indicating that the registration of your Campaign is now In Progress:

At this point your Campaign has been submitted for review; this review is a manual process and can take several days. You can come back later to this Onboarding workflow to re-check the status of your Campaign (or find it under Messaging > Regulatory Compliance > Campaigns).
At some point your Campaign's status will change from In Progress to either VERIFIED or FAILED. If your Campaign's status is FAILED, you will be presented with one or more Failure Reasons. These may necessitate revising some of the information you entered on the Campaign registration form. To edit your Campaign submission, or if you wish to delete the Campaign submission and start again, you may do so using the links shown below near the top of the Campaign details page:

In certain rare cases, a failed Campaign will instead have the status of SUSPENDED. If you see this status, consult this section of our Troubleshooting Guide.
While your Campaign registration is still PENDING, or at any point thereafter, you can move on to the final step of the onboarding workflow, which is to associate a Twilio phone number (or Sender) with this new campaign/messaging service.
If you selected an existing Messaging Service to use for this new Campaign, any Twilio 10DLC number associated with that existing service will be automatically brought over to the new Campaign. As noted above, however, this would be unusual for a direct customer registration of a Sole Proprietor Brand and Campaign. Much more typically you will have chosen to create a new Messaging Service for the new Campaign. If you have done so, Twilio will automatically create this new Messaging Service, using the specified Use Case for the name of the service (in this case "Sole Proprietor").
A newly-created Messaging Service will not have any Sender phone numbers associated with it by default. You will need to add a phone number now.
Warning
Sole Proprietor Campaigns can only have one 10DLC phone number attached to them.
If you register an existing Messaging Service with multiple 10DLC numbers to your Sole Proprietor Campaign, a random 10DLC number will be chosen from your 10DLC numbers as the verified 10DLC route. We do not currently support the capability for customers to choose which number to get registered. So if there's a specific number you want to use for A2P, remove all other phone numbers in the Messaging Service before associating it with the Campaign. Alternatively, you can use an empty Messaging Service for Campaign registration, and later add only the number you wish to use into this Messaging Service.
If you add additional 10DLC phone numbers to your Messaging Service, they will not be considered verified A2P 10DLC routes.
Do you have any Twilio phone numbers free to use?
Prior to the Sole Proprietor Brand or Campaign registration process, you may already have purchased a Twilio 10DLC phone number for use with this new Sole Proprietor Brand; or you may have freed up an older number you were using for a different Brand or Campaign. You can see all the Twilio numbers associated with your main account by going to Phone Numbers > Manage > Active numbers in the left navigation. In this example we see two active numbers that have already been configured for Voice, SMS, MMS and Fax use, and have Voice and Messaging webhooks configured, but which are NOT currently associated with a Messaging Service. These would be free to use in the new Messaging Service:

If no active numbers are displayed (or none that are not associated with Messaging Services you wish to keep), you will need to purchase a new Twilio phone number by going to Phone Numbers > Manage > Buy a number. This page will display all Twilio 10DLC phone numbers available for sale, and is searchable by e.g. area code, in case you would like an area code corresponding to your local or regional area of business. Each number will indicate its capabilities and the monthly fee to use it, e.g. $1.40/month. Once you've purchased one of these numbers, it will appear in your Active numbers list.
Add a Sender number to a new Campaign
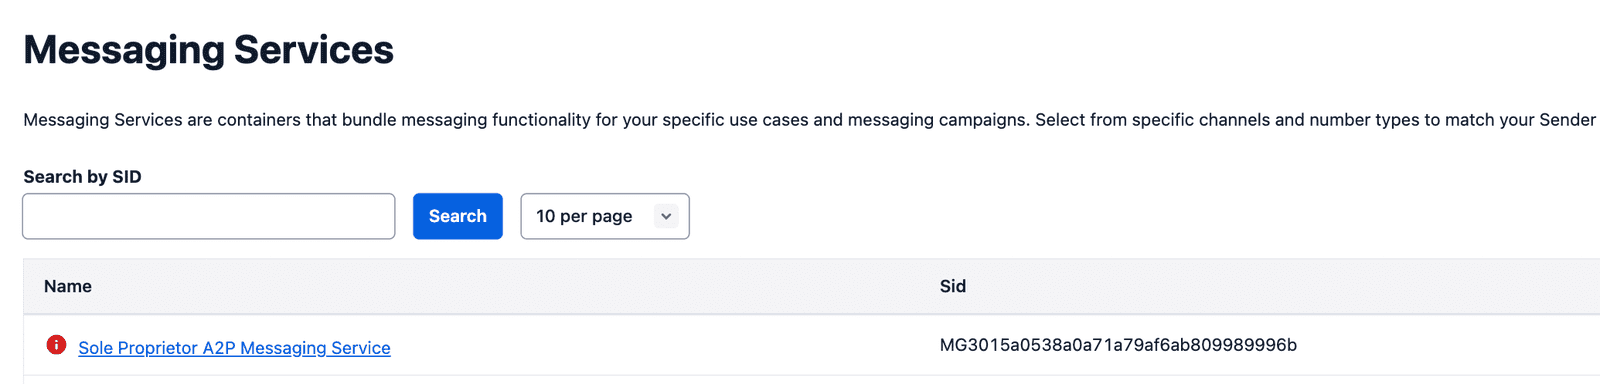
IF you had unassigned phone numbers available at the time you submitted your new Campaign at the end of Step 3 above, at the bottom of the Campaign detail summary page you would be shown a list of numbers you could Register with your newly-created Messaging Service. If you did not have such numbers available, but had to leave that workflow and purchase a new Twilio number, you can return to the new Messaging Service you've just created in the left navigation via Messaging > Services, which will display a list of all services that currently exist under your main account:
In the case of a new Sole Proprietor registration, we will assume you'll find at least a single Messaging Service here, which will be named for the Sole Proprietor use case under which it was just created. You will select this, which will then open a page inviting you to Add Senders to Service:

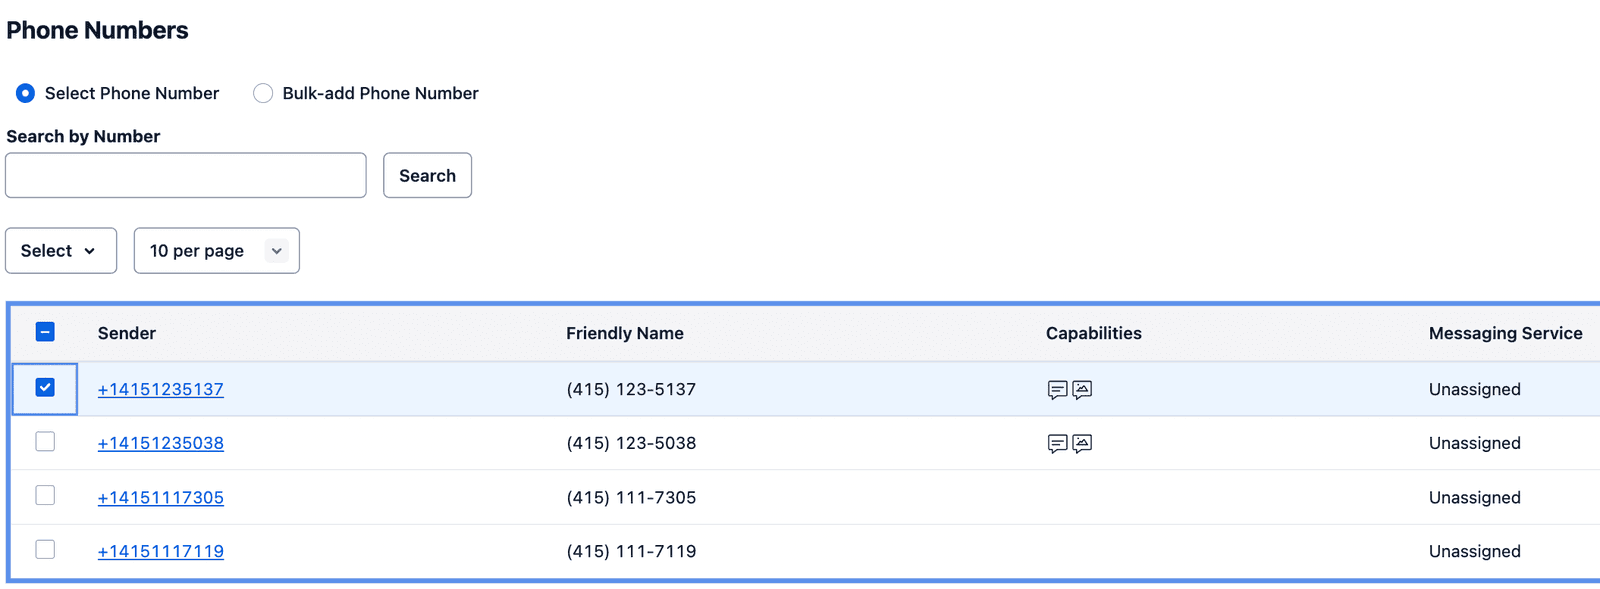
The Add Senders button will invoke a pop-up allowing you to select the type of Sender you'd like to add; the default selection is phone number, which you'll keep, and press Continue. This will present a new list of phone numbers. Note that under Messaging Service the number you want to add must be Unassigned; a phone number can only be assigned to one Messaging Service at a time. In the screenshot below we happen to have four such unassigned numbers, but at a minimum you will have one — the number you have just purchased. Select this number and click the blue Add Phone Numbers button below the list:
This will open the Sender Pool page, showing the number you have just selected. Select it again on this page and click the blue Add Senders button. Now you will see the list of available numbers again, but this time for your selected number the Messaging Service will no longer be Unassigned, but will instead show the Sole Proprietor Messaging Service to which you wanted to add this number:

You've now successfully associated the newly-purchased phone number with the newly-created Messaging Service for your Sole Proprietor Campaign.
Congratulations! Once the new Campaign has been verified, you'll be able to start using it to send SMS messages to your end users.