Skip to contentSkip to navigationSkip to topbar
Rate this page:
On this page

Migrating from a Sole-Proprietor Brand to a Standard Brand


Twilio offers a Sole Proprietor Brand A2P 10DLC registration experience for low-volume customers of Independent Software Vendors (ISVs) who do not have an EIN/Tax ID. Because of its simpler process, many ISVs start off their US A2P journey by registering Sole Proprietor Brands for their customers.

However, Sole Proprietor Brands do come with significantly more limitations on message volume, throughput, and phone number allotment than Standard Brands. As a result, when customers experience growing messaging needs that surpass these limits, they see a need to upgrade their customers from Sole Proprietor to Standard or Low-Volume Standard (LVS) Brands. Aside from growing messaging needs, Sole Proprietor Brands must also transition to Standard or LVS Brands once they have acquired an EIN/Tax ID, as for example upon registering as an LLC or other corporate entity. Sole Proprietor Brands cannot have an EIN/Tax ID, while Standard and LVS Brands must have them.

Note that direct customers of Twilio A2P Messaging might also decide at some point to migrate their Brand registrations from Sole Proprietor to Standard or Low-Volume Standard. This can be accomplished via the Twilio A2P Compliance Console in a way essentially identical to the process outlined for ISVs in Option 1 or Option 2 below, with the only difference being that when you begin Customer Profile creation you do not mark this as a secondary profile, as you would if you were an ISV client.

This guide will provide an overview of this process.

(information)

Info

If you're still wondering about whether you need to upgrade from a Sole Proprietor to a Standard Brand, please refer to this guide which outlines some scenarios in which upgrading your brand is a good fit.


What does the migration process look like?

what-does-the-migration-process-look-like page anchor

For ISV customers with clients who already have Sole Proprietor Brands, there isn't actually a process to directly upgrade or transform those existing brands into Standard Brands. Instead, what you will do is register those clients for a separate Standard Profile, Brand and Campaign, in addition to the Sole Proprietor Profile, Brand and Campaign they already have. Before moving on, please check out the following documents, which provide a detailed walkthrough of how to register for a Standard (or Low-Volume Standard) Brand and campaign:

Once you've decided you want to move one or more of your clients from Sole Proprietor to Standard brands, there are two basic decisions to make:

  1. Do you want to use the Twilio API or Twilio A2P Compliance Console to register the new Standard Brands and Campaigns? For a small number of secondary brands, the console route might be more convenient. Also, If you are not closely familiar with secondary client onboarding for A2P compliance at Twilio, it might be worth going through this process in the Console for one client, even if you have many more, simply because the Console onboarding workflow is an excellent way for you to concretely visualize the sequence of steps involved in this process, and the choices and inputs involved in each step. Ultimately, though, if you have more than a handful of clients to convert from Sole Proprietor Brand (or legacy Starter Brand) to Standard Brand, you will likely want to use our API for this.
  2. Do you want to continue using the Messaging Service that is attached to the existing Sole Proprietor Campaign, or create a new Messaging Service to use with the new Campaign? Both options have pros and cons. Below is an overview of these two options described in more detail:

Existing or New Messaging Service?

existing-or-new-messaging-service page anchor
Option 1: Existing Messaging ServiceOption 2: New Messaging Service
Use the existing Messaging Service that is attached to the Sole Proprietor campaign. Existing phone numbers are automatically moved to the new Standard campaign.Use a new Messaging Service for Standard registration. You may choose to use new phone numbers in the registration process, or you can create the New Messaging Service with no associated number at all. You can move over the existing numbers later, after verification. See the NOTE following this table.
Pro: Maintains Messaging Service Opt-Out and Sticky Sender setting.Pro: No disruption of service in the process.
Con: As of August 31st, 2023, messaging traffic is blocked while Campaign is waiting to be approvedCon: Loses Opt-Out and Sticky Sender settings from the old Messaging Service
(information)

Info

NOTE: Reusing a Phone Number vs reusing a Messaging Service vs reusing Neither

Reusing the phone number from an older Sole Proprietor Brand should be considered a separate option from reusing the entire Messaging Service associated with that Sole Proprietor Brand (to which the phone number is attached). The latter option will be considered in the next major section of this document. Both have their pros and cons, as does reusing neither the old Messaging Service nor the old phone number.

When you create a new Campaign for your new Standard or LVS Brand, you must at the time of Campaign creation specify a Messaging Service that the Campaign will use, either new or existing. Otherwise the Campaign registration step is not complete, and Campaign verification cannot proceed. If you specify an existing Messaging Service to reuse, the benefit is that any associated phone numbers will be brought over automatically, along with any existing Opt-in/Opt-Out and Sticky Sender settings. However, new Campaign verification is not instantaneous: it can take several days or even several weeks. During the interval before verification is complete, the Sender number or numbers associated with that reused Messaging Service will lose their A2P registration status, meaning that US 10DLC SMS messaging traffic will be blocked from that service altogether, until the new Campaign has been verified.

If your secondary client is currently sending significant and regular traffic through their existing Sole Proprietor Campaign, the best way to deal with this wait for the new Campaign's verification is probably to leave that existing Campaign in place and running during the interval, which means leaving both the Messaging Service and its associated 10DLC number in place. Thus in this case, creating a new Messaging Service to go with the new Standard/LVS Campaign would be the best choice. Keep in mind that it isn't necessary to associate any Sender phone number with the new Messaging Service at the time of its creation. You have the option of simply waiting until you've confirmed that the new Campaign has been fully verified, and then bringing over the old number from the Sole Proprietor Campaign at that point, following the process outlined below. On the other hand, some ISVs, particular those with many clients, might simply find it easier to buy a new Twilio 10DLC number and provision that one for the new Messaging Service, rather than having to keep track of the verification status of each secondary brand and bringing over old numbers individually as the new Campaigns are verified.

Electing instead to reuse an existing Messaging Service, or creating a new Service but reusing the old phone number immediately, both run the risk of a service interruption for however long the new Campaign verification takes. But this might still be a valid option for ISVs with clients that have only intermittent messaging via their existing Sole Proprietor services. There is also, of course, potential value in retaining the original sender number that your secondary clients' end users have gotten accustomed to, as opposed to introducing new Sender numbers.

Ultimately, ISVs will need to weigh the various pros and cons and decide the appropriate approach, as it applies to any or all of their clients.

The following document will first walk through the Existing-Message-Service and New-Message-Service options above via the Twilio Console; then it will address the same processes executed via the Twilio API.

(information)

Info

Note: For all information entered as part of this registration process, either via Console or via API, please note that The Campaign Registry (TCR) supports all "utf8mb4" supported characters. Please see the list for all Unicode 15.0 supported scripts and characters here: https://www.unicode.org/charts/(link takes you to an external page)


Console Option 1: New Profile, New Standard Brand, New Messaging Service

console-option-1-new-profile-new-standard-brand-new-messaging-service page anchor

Step 1: Create a new Standard Secondary Profile

step-1-create-a-new-standard-secondary-profile page anchor

Log into the main Twilio console using your ISV account. If the Messaging link is pinned in your left navigation, choose Messaging > Regulatory Compliance > Onboarding. Otherwise search for the "Regulatory Compliance" link.

Here you will be taken to the Customer Profile page. By default, as below, this will show your own ISV (or "primary") customer profile:

Switch Customer Profile.

To begin creating a new, secondary profile for a client business, click the Switch Customer Profile link at the top right of the Custom Profile page. This will open a Select a Customer Profile dialogue, where you will select the + New Customer Profile button:

Add New Customer Profile.

This will take you to a Customer Profile New Registration page. Here you will first indicate whether the business entity you're registering is located in the U.S. or Canada. If you indicate yes, the page will then expand to ask whether this business entity has a Tax ID, such as a US EIN. The purpose of this question is to determine whether any brand being registered is eligible to be a Sole-Proprietor Brand (for which the two prerequisites are U.S. or Canadian location and no Tax ID). The overall use-case for the present document is the migration from a Sole Proprietor Brand to a Standard or Low-Volume Standard Brand. One would use the same general Console workflow to register a Standard or LVS Brand for a business outside of the U.S. or Canada, in which case the EIN/Tax ID question simply wouldn't be raised in the workflow. But here we will assume migration from an existing Sole-Proprietor Brand (which required a U.S. or Canadian location) to a Standard/LVS Brand, which requires a Tax ID (if your client has not yet acquired a U.S. or Canadian Tax ID, it is not eligible for migration to Standard or LVS).

Once you confirm that your secondary brand does have a Tax ID, the page will now change to display information on the messaging capabilities and the fee structures that pertain to Standard and Low-Volume Standard as opposed to Sole Proprietor brands and campaigns.

You will finally be asked whether you'd like to register this profile as a secondary profile, and you'll answer yes, then press continue:

primary or secondary brand.

On the next screen you'll be asked to enter a U.S. EIN number for the entity you're registering. Again, this question is ONLY pertinent if you're registering a business entity located in the U.S. If so, please enter a valid, 9-digit EIN number for your client, then hit the Search button. Twilio will use a third-party service to attempt to validate the EIN you have entered. There are a number of reasons why this service might not be able to find a record of your client's EIN, and you may proceed with the registration whether it does or not. You will simply need to be careful that the business details you enter subsequently in the client's profile exactly match those to be found on the client's W2/W9 or other Federal Tax form.

Hit Continue here to proceed with the profile registration process.

On the next screen, you will be asked to enter profile details such as the Legal business name (which must exactly match the one associated with the Tax ID you've supplied), the Business Type, the Business Registration Number (Tax ID again, i.e. U.S. EIN or Canadian Business Number), Business Industry, business website URL, and Region(s) of operation. Note that among these different fields and selectors, the Business Identity field is greyed out with Direct Customer as the only option. This is because you've already indicated that this is a Secondary Customer Profile with respect to your own primary customer profile. You are the ISV, so this secondary customer cannot also be an ISV:

Business Identity.

After submitting this screen, on the next screen you'll enter Business Address information, which again must exactly match the information associated with the EIN/Tax ID. On the following screen you'll enter information for an Authorized Representative of the secondary profile/brand in question. This should be someone who can verify that the secondary profile information is correct, and it must be a person associated with the secondary brand you're registering here, NOT your own business as the ISV.

Finally you'll be presented with a summary screen, summarizing all of the secondary Business Profile information you've entered to this point. The Submit for Review button at the bottom of this page does just what it says: the Profile information you've submitted will need to be reviewed and where possible validated, but while that is happening you may proceed to Brand and Campaign registration.

Step 2: Create a new Standard Secondary Brand

step-2-create-a-new-standard-secondary-brand page anchor

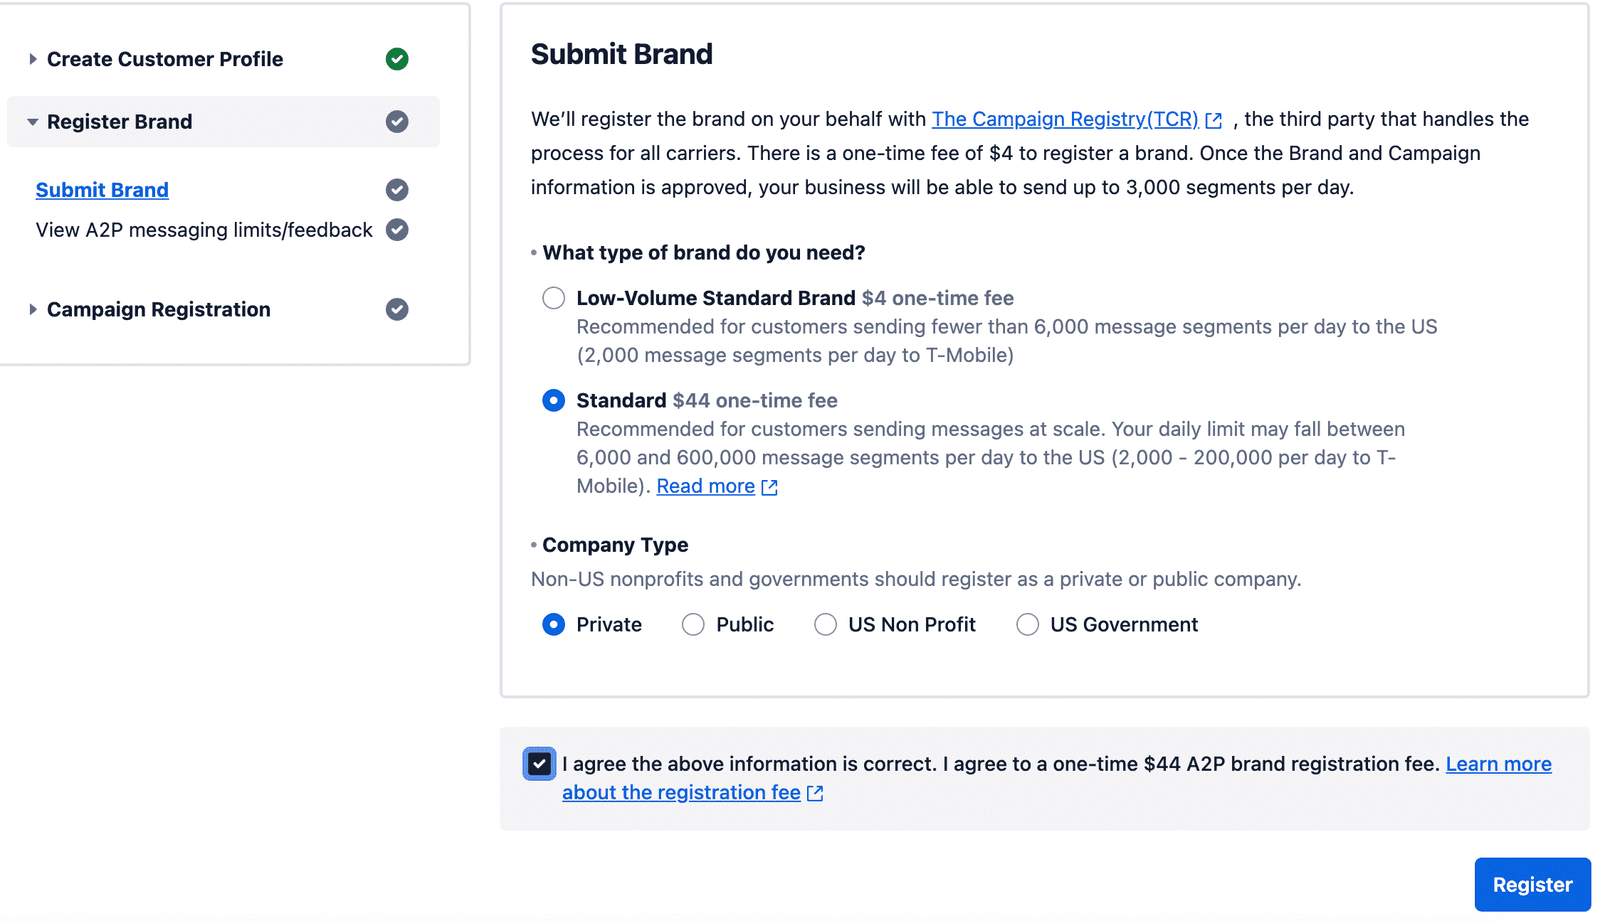
After you've submitted your new Standard Profile for review, you'll be taken to a screen to submit a Brand. This is a single-screen process and entails answering just two questions: 1) Do you want this to be a Standard or Low-Volume Standard Brand? (see this document for an overview of the differences); and 2) Is your client organization a private business, publicly-owned business, U.S. non-profit org or U.S Government org?

Submit a Brand.

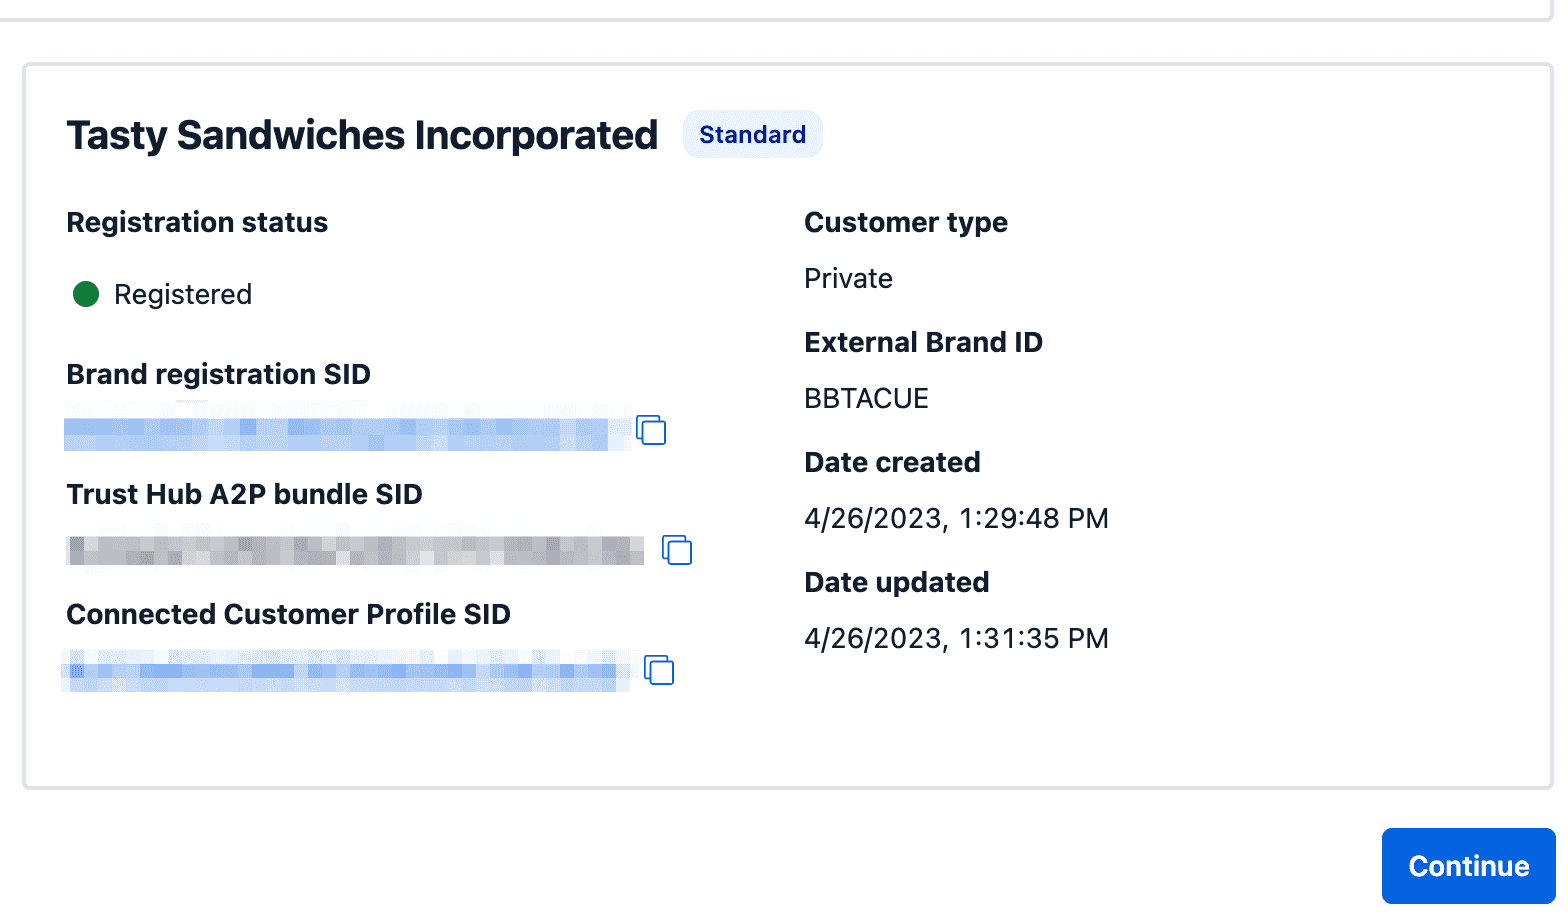
Upon hitting Register, Twilio will submit the Secondary Profile and Brand you have just created to The Campaign Registry. You should receive a Registration confirmation page looking something like this:

Brand Registration Complete.

Hitting Continue here will bringing up another screen showing you your messaging limits for this newly-registered brand, as calculated by TCR and the mobile carrier based on your trust score, which is calculated from all of the information you have provided, for example:

Trust Score.

Please see this document(link takes you to an external page) for information about Trust Scores, how these are calculated by TRC, and how they relate to your allowed messaging throughput.

Step Three: Create a New A2P Campaign Using a New Messaging Service

step-three-create-a-new-a2p-campaign-using-a-new-messaging-service page anchor

Having registered your new secondary client profile and standard brand, the final step is to create and register a new A2P campaign associated with that brand. As noted at the top of this document, in creating this campaign you have the choice to either create a new messaging service to use with this new campaign, or to use an existing messaging service, presumably one that was associated with your client's Sole Proprietor brand and campaign. We will consider the first option here, and then the second option in the next part of this document.

Once you've successfully registered your brand and been shown your trust score, clicking continue will take you into the Campaign Registration workflow. Whether you plan to use a new or existing messaging service, you will need to create a new campaign for this new Standard Brand. This is accomplished on the Create new A2P Campaign page:

Create new A2P Campaign.

As you can see, the Brand name has already been specified (it is the Business Name you indicated in the profile you just created) and is a read-only field. On the remainder of this page you will be asked to define the campaign in a number of ways:

Choose an A2P campaign use case — For a Sole Proprietor Brand, there is only a single Sole Proprietor use case. For a Standard Brand, you can select from a wide variety of use cases in the dropdown here (be sure to scroll through the entire drop down to see them all). Note that the second group of use cases require additional review by the mobile carrier. Each use case in the dropdown has a description, and also indicates the monthly fee.

Messaging Service — Here is where you will indicate whether you want to reuse an existing messaging service for this new campaign, or create a new one. If you select "Create new Messaging Service", this service will be created automatically upon submission of this new campaign. A 10DLC Phone number can be purchased (if necessary) and added to the Messaging Service after the Campaign has been created.

(warning)

Warning

Give some care to your entries for Campaign description and the next four boxes in this form, as these answers are crucial in determining whether or not a Campaign is approved. Read the in-form instructions for each entry carefully, and you may also wish to consult this document(link takes you to an external page) on best practices in Campaign definition.

Campaign description — This is an overall description of the proposed campaign's objective or purpose, which should be closely aligned with the Use Case you selected above. For example, if you choose "Marketing" as your campaign Use Case above, your campaign description might be: "This campaign sends periodic SMS messages to end customers who have opted, informing them of product sales, seasonal sales and special discounts."

Sample message #1 — Provide an example of a message that you will be sending with this campaign. This message sample will be used by carriers to help identify your traffic. Example:This is a message from the Tasty Sandwich Company (www.tastysandwich.com(link takes you to an external page)) about this week's Special Deals. This week, pick up a large [sandwich type A], [sandwich type B], or [sandwich type C] for only [price]. You are currently signed up to receive this information via SMS. To opt-out of these messages, text STOP in reply.

Sample message #2 — Each Campaign registration, regardless of use case, needs to include two separate Sample message entries. For some use cases (like Account Notification, Customer Care, Marketing, etc) one can easily imagine two or more substantively different message texts. In the case of Marketing, for example, a second sample might be: It's summer at the Tasty Sandwich Company (www.tastyandwich.com(link takes you to an external page))!! Come in and check out our new cool and tasty ICE CREAM sandwiches, all for [price]! Flavors include [list of flavors]. You are currently signed up to receive this information via SMS. To opt-out of these messages, text STOP in reply.

  • NOTE: As part of our compliance review, we conduct automated checks on any URLs provided during campaign and brand registration. Our system captures a public-facing screenshot, and evaluates it against compliance rules, which can be found here(link takes you to an external page) . This compliance check is a mandatory step in our registration process. If you have any questions or concerns about the process, please contact our support team.

For other use cases such as 2FA, OTP or Delivery Notification, coming up with a second, substantively different sample message might be more difficult. In such cases, you may simply repeat your text for Sample message #1 in this second field. Some entry here is mandatory in all cases.

Note a few things about our example Sample messages which indicate best practices for successful approval of campaigns:

  1. The sample messages relate obviously to the use case and campaign description indicated, in this case Marketing.
  2. The sample messages specify that they come from a website, TastySandwiches.com , which clearly relates to the corporate name indicated in the Business Profile. This must be a real, functional business website or the campaign will be rejected.
  3. Both sample messages indicate templated information with brackets []
  4. The messages specify an opt-out method for the end user, i.e. texting STOP in reply to any marketing message. Further down in the form you will specify the opt-in method for the end user to opt into these SMS messages in the first place, but it is also good practice to indicate a subsequent opt-out path in the sample message itself, as this example does.

Message contents — in our example, the website name is an embedded link and should be specified as such. Any embedded link must relate directly to the specified use-case of the message. You can expect any embedded link to be scrutinized during the approval process as this is a common vector for smishing.

How do end-users consent to receive messages? This is a mandatory field, and very important for campaign approval. Any SMS messaging campaign must have an explicit end-user opt in, and this consent cannot be solicited via a (not-yet-consented-to) SMS message! Typically, the opt-in mechanism would appear on the company website when the user creates an account. Example: End users opt-in by visiting www.TastySandwiches.com(link takes you to an external page), creating a new user account, consenting to receive marketing messages via SMS, and providing a valid mobile phone number. If you indicate that a website is used for opt-in, please provide a link to that website. The website must include Privacy Policy and Terms of Service statements.

Opt-in Keywords —If end users can text in a keyword to start receiving messages from your campaign, state that keyword here. This field should be left blank if you do not support opt-in via SMS.

Opt-in Message — If end users can text in a keyword to start receiving messages from your campaign, the auto-reply messages sent to the end users must be provided. The nature of this message will of course depend on the use-case. For the Marketing use case, for example, a message would be in response to a user texting START to a specified Twilio Sender number, and the message might read: Tasty Sandwiches Inc: You are now opted-in to marketing notifications by means of SMS to this mobile number. If you'd like to subsequently opt-out of these, text STOP in reply to any message. For help, reply HELP.

Whatever the use case, the opt-in response should include the Brand name, confirmation of opt-in enrollment to a recurring message campaign, how to get help, and clear description of how to opt-out. If you do not support opt-in via text, please leave this field blank.

Indicate user opt-out and help options

Users must also have a way to opt out of Campaigns and receive help. Most Twilio customers use default or advanced opt-out(link takes you to an external page) and will not need to provide these details. Twilio will complete this information for you with either the default opt-out and help messaging, or with the messaging you've configured as part of Advanced Opt-Out(link takes you to an external page).

If you manage your own opt-out and help, you will see additional fields that you need to complete for your campaign:

  • Opt-out keywords: The keywords end users can text to stop receiving messages from this campaign
  • Opt-out message: The automated message end users will receive when they text in one of the opt-out keywords
  • Help keywords: The keywords end users can text to receive help
  • Help message: The automated message end users will receive when they text in one of the help keywords

Once you have completed these fields, double-check that your answers conform to all instructions given. When you are satisfied with this, press the Create button.

You will now be presented with a Campaign details summary page, with text at the top indicating that "A2P Campaign registration is in progress.." Campaign confirmation is not instantaneous and may take from several days to several weeks to complete; you can track its status in the Console by going to Messaging > Regulatory Compliance > Campaigns. However, while this registration is pending or at any point thereafter, you can move on to the final step of the onboarding workflow, which is to associate a Twilio phone number (or Sender) with this new campaign/messaging service.

Step 4: Register a Twilio Phone Number (Sender) with the New Campaign

step-4-register-a-twilio-phone-number-sender-with-the-new-campaign page anchor

Clicking Continue at the bottom of the Campaign details summary page will take you to the Register Phone numbers screen. What you see here will depend on whether or not you have any 'free' Twilio numbers, i.e. any not currently associated with an existing Messaging Service. In the following screen shot, for example, the number shown is not connected to an existing MS and is therefore free to select for association with the newly-created Messaging Service:

Register New Phone Number.

This number could be free for use because you have just purchased it (via the Phone Numbers link in the left navigation), or because you purchased it or freed it up some time in the past and haven't used in yet in a new Messaging Service.

But you might not have any Twilio numbers free at the moment to use in your newly-created Messaging Service for your new Standard/LVS Campaign. Since the overall use case for this document is the migration of your clients' Sole Proprietor Brand/Campaign to a Standard Campaign, you might at least consider reusing the Twilio number currently connected to the Messaging Service associated with that client's existing Sole Proprietor Brand/Campaign. However, please review the considerations in the first part of this document before making this decision.

Reusing an Existing 10DLC Number

If you've elected to reuse the Twilio number that was associated with your client's old Sole Proprietor Campaign (but not that Campaign's overall Messaging Service), you would first need to disconnect it from its existing Messaging Service. To do this, go to Phone Numbers in the left navigation, then Manage > Active numbers.

Manage phone numbers.

As shown in the screenshot above, here you'll see a list of all Twilio numbers currently active in your overall (i.e. ISV) account, both those currently connected to a Messaging Service and those free for immediate use. While there is a 'free' number in this case, let's assume that you wanted to use the first number shown, which we can see is currently associated with a Sole Proprietor Messaging Service. You would thus want to remove this association. To do this, click on the phone number itself, which will bring up the configuration page for that particular number. Scroll down that page to the Message Configuration section, and you'll find a Messaging Service selector dropdown, with the Sole Proprietor Messaging Service currently selected:

Messaging Service Selector for Twilio number.

Here you would click the link beneath the dropdown itself, labeled "Remove this phone number from Sole-Proprietor A2P Messaging Service." Clicking this link will take you to a Sender Pool page, where you will click the Delete link to the right of the phone number in question. This will disassociate the number from the Messaging Service. If you now return to the new Messaging Service you've created to go with your new Standard Brand and Campaign, you'll find that this first number is now also shown as free and available for association with the new Service:

newly freed-up Twilio number.

If you were now to select the 4151235038 number (or the second number, or both), the blue Register button below this panel would now be enabled:

ready to register number for Messenger Service.

Clicking Register would associate this number as the Sender for the new Messenger Service. Again, this registration may be done immediately upon creation of the new Service, or at any point thereafter, such as once you've confirmed that the new Campaign has been verified.

In the next section we'll consider the fairly modest differences in process if you chose to reuse the overall Messaging Service from the old Sole-Proprietor Brand.


Console Option 2: New Profile, New Standard Brand, Reuse Existing Messaging Service

console-option-2-new-profile-new-standard-brand-reuse-existing-messaging-service page anchor

For this option, Steps 1 and 2 (creating a new Standard secondary business profile, and creating a new Standard Brand) are identical to Steps 1 and 2 of the first option, so please refer to the directions for those steps above, and return here once you have completed Brand registration and been taken to the Campaign Registration workflow and the Create new A2P Campaign page.

Step 3: Create a new A2P Campaign with an existing Messaging Service

step-3-create-a-new-a2p-campaign-with-an-existing-messaging-service page anchor

On the Create a new A2P Campaign page, once you have specified your Campaign's use case from the dropdown, you come to the Messaging Service section of the form. This is the one major point where your answer will necessarily differ from that of Option One, Step 3 above. For that option you would choose "Create new Messaging Service", while for this second option you would choose "Select Existing Messaging Service". Upon selecting this second option, you'll be presented with a search/dropdown box, which will be populated with any existing Messaging Services associated with the Twilio account you've used to log into the console:

Select existing messaging service.

In the case of the screenshot above there are two existing Messaging Services: the first one was created during the Option One process above (new secondary profile, new secondary Standard Brand, new campaign with new Messaging Service). The second service was created earlier and associated with a different, Sole Proprietor brand that is also a secondary brand under the same ISV. The general use case for this document is migrating an ISV's secondary client from a Sole Proprietor Brand to a Standard Brand, so in this case you would choose the second of the two Messaging Services shown here, as this is the one you'll want to repurpose from the Sole Proprietor Brand's campaign.

However, immediately upon selecting the Sole-Proprietor messaging service, you'll be presented with the following popup:

Existing Messaging Service already in use.

As the text here reminds us, a Messaging Service cannot be associated with more than one campaign at a time, and this one is already associated with the Sole Proprietor Campaign. The Messaging Service you're trying to repurpose cannot simply be uncoupled from the existing Campaign, because Campaigns can't exist except in association with some Messenger Service. So the Sole Proprietor Campaign needs to be deleted, in order to free up this service. Here you would press the blue Delete Campaign button.

Twilio does not want you to undertake this deletion lightly, however, so here you'll be presented with a second popup:

campaign delete warning popup.

The messaging in this popup reminds us that this second option (of re-using the Sole Proprietor's messaging service when creating a new, Standard Brand and campaign) carries some potential downsides. Re-using an existing messaging service means that you can preserve any and all of its settings, such as the associated Twilio phone number and Opt-Out and Sticky Sender settings. However, because the new Campaign you're creating here will need to be verified, and this verification is not instantaneous but can take from several days to several weeks, during the interval before verification is complete any numbers associated with the service will be de-registered as A2P numbers, meaning that any SMS messaging conducted via this number will be blocked until the new Standard-Brand campaign is verified.

If you're satisfied that you do want to go this route, press Confirm Delete Campaign. This will allow you to proceed with the creation of the new Campaign.

From this point on, the guidance for Campaign description, sample messages, end-user consent flow, opt-out and opt-in messages and keywords, is all identical to that for Option 1, Step 3 above, so please see that Step for details on these important fields for defining your Campaign.

Once you have completed these fields, double-check that your answers conform to all instructions given. When you are satisfied with all of your answers here, press the blue Create button.

You will now be presented with a Campaign details summary page, with text at the top indicating that "A2P Campaign registration is in progress.." Again, campaign confirmation is not instantaneous and may take up to several days to complete. However, while this registration is pending, you can immediately move on to the final step of the onboarding workflow, if this isn't completed already, which is to associate a Twilio phone number (Sender) with this campaign/messaging service.

Step 4 (if necessary): Register a Twilio phone number with the Campaign/Messaging Service

step-4-if-necessary-register-a-twilio-phone-number-with-the-campaignmessaging-service page anchor

In most real-world cases of a migration from Sole-Proprietor to Standard Brand and Campaign, a Twilio phone number will already be associated with the Messaging Service you have just repurposed. Since this existing phone number will have been brought over immediately with the existing service into the new campaign, this would be indicated at the bottom of the campaign details summary page, as in the following screenshot:

Connected phone numbers.

However, if for some reason the Sole-Proprietor messaging service you repurposed did NOT have a Twilio phone number associated with it, or you had already removed that number, you would be shown no Connected Phone Numbers at the bottom of this screen; and you'd instead have the option to Continue, which would take you to a Register Phone numbers page:

Register New Phone Number.

In the case of the above screenshot, a Twilio phone number has been purchased for this account but is not yet associated with a Messaging Service. Here you would select this number and hit the Register button, which would bring up a dialogue confirming that you indeed wish to associate this number with the Messaging Service (and Campaign) in question. You will confirm this.

At this point you have completed the Onboarding process with the second option. Please proceed to the next section (Step 5) of this document.

Step 5 Delete the Sole Proprietor campaign, if it still exists

step-5-delete-the-sole-proprietor-campaign-if-it-still-exists page anchor

If you chose the second option above, then you already had to delete the Campaign associated with the Sole Proprietor Brand, in order to free up that campaign's associated Messaging Service for reuse in the newly-created Standard Campaign. If you instead chose the first option, this legacy Sole Proprietor campaign still exists. Once you know that the new Standard Brand and Campaign have been approved, it is a very good idea to delete the old Sole Proprietor campaign, since otherwise you will continue to be charged a monthly fee for it (and you also don't want its messaging service to continue operating in parallel with that of your new Standard Campaign's messaging service, to avoid end-user confusion).

This legacy campaign can be deleted by going to Regulatory Compliance > Campaigns in the console left navigation, which will present a list of any and all campaigns you have currently registered under your ISV account. Delete the campaign associated with your Sole Proprietor Brand.


Upgrade to Standard/Low-Volume Standard Using the Twilio API

upgrade-to-standardlow-volume-standard-using-the-twilio-api page anchor

If you have more than a handful of clients to migrate from Sole Proprietor Brand (or legacy Starter Brand) to Standard Brand, you will likely want to use our API for this.

As previously noted, there is no means to convert an existing Sole Proprietor brand directly into a Standard/LVS Brand; what you are really doing is registering a new Standard Business Profile, Standard Brand and Standard Campaign for that same client, for which you may or may not choose to reuse the messaging service used in the original Sole Proprietor Campaign. Thus, for this process via API you can rely for the most part on this guide, which addresses the use case of new (secondary) Standard and Low-Volume Standard Registration via the API. Please read that document carefully and follow the detailed directions there. We will not reproduce this guide in the current document, but will call attention here to specific points relevant to applying that walkthrough to the present migration use-case.

Prerequisite: Trust Hub profile for your own (ISV) business. Given the upgrade use case of the present document, we can assume that your own ISV business profile already exists. Note that you will need the SID of this primary business profile for subsequent steps. This can be found by logging into the main Twilio console using your ISV account. From the left navigation choose Messaging > Regulatory Compliance. This link will take you to the Customer Profile page, and by default this will show your own ISV (or "primary") customer profile

Section 1.3 business_type: for the purposes of the present "upgrade" use case, the business_type of Sole Proprietorship is not allowed, since by definition you are upgrading from this type of business to one of the others.

Section 3 Create a Brand: Standard or Low-Volume Standard? This question applies to all Standard Brand creations, not just when upgrading from Sole Proprietor, but it's a significant decision point in the A2P onboarding process and should be given some consideration. Please see this document for details on the Standard vs Low-Volume Standard service tiers.

Section 4: new or existing Messaging Service? As this question has been highlighted in the console-based migration path detailed above, you may be wondering how this choice is implemented in the API path. The directions for Step 4.1 instruct you to create a new messaging service for the new Standard (or LVS) Brand you've just created. The json returned from the specified API call here includes, as its second attribute, a SID for the new Messaging Service you've just created; this would then be used as the messaging_service_sid (begins with "MG") in the creation of the new Standard Campaign in Section 5.

However, if you instead want to reuse an existing Messaging Service, how you would proceed depends on where that existing Messaging Service comes from. Since our general use case here is the migration of a secondary client from Sole Proprietor to Standard or LVS Brand, it's quite possible that you'd like to reuse a Messaging Service currently associated with your customer's Sole Proprietor Campaign. If that association itself still exists, you will need to break it by deleting the Sole Proprietor Campaign itself (there is no other way to break the association between a given Messaging Service and an existing Campaign).

You would do this using the delete API call illustrated in Step 5.4, where you would input the messaging_service_sid of the MS you'd like to reuse, and the hardcoded compliance type QE2c6890da8086d771620e9b13fadeba0b to indicate you were deleting an A2P Campaign. Once this delete is successful, the specified Messaging Service is free for you to use in creating the new Campaign in Step 5.2 (if you attempt Step 5.2 with a messaging_service_sid that is still associated with another Campaign, that step will fail).

If you plan to use a Messaging Service that is NOT currently associated with another Campaign, simply specify that messaging_service_sid when creating the new Campaign in Step 5.2.

Add a Twilio 10DLC Phone number to your Messaging Service. If you have chosen, in Section 4 above, to reuse an existing Messaging Service for your new Standard/LVS Campaign, this will automatically bring over whatever 10DLC number or numbers were attached to that Service (just remember that these will not be functional for messaging until the new Brand and Campaign have been fully approved). If you are instead creating a new Messaging Service, you will need to add at least one Twilio 10DLC number to that new service in order for the new Campaign to function. To do this, you will find these documents useful:

Get help with A2P 10DLC

Need help building or registering your A2P 10DLC application? Learn more about Twilio Professional Services for A2P 10DLC.

Get help(link takes you to an external page)

Rate this page: