How to capture payment during a voice call (Generic Pay Connector)
In this tutorial, you will create an interactive voice response (IVR) that collects payment details from a customer and passes the information in a PCI-compliant manner to your payment processor of choice. This tutorial uses a TwiML Bin with the <Pay> verb and a Generic Pay Connector.
In this tutorial, you will learn how to:
- Enable PCI Mode on your account
- Install and configure a Generic Pay Connector
- Create a TwiML Bin with <Pay>
- Create a TwiML Bin to be executed after <Pay>
- Purchase a Twilio phone number
- Configure a Twilio number to use a TwiML Bin for incoming calls
- Create a mock payment processor using Twilio Serverless Functions
- Test capturing credit card details
Danger
Generic Pay Connectors only handle sending payment details to a payment processor. It is up to the payment processor of your choosing to process a transaction and return a response to Twilio in the required format.
In this tutorial, we will create a mock payment processor that is not PCI compliant and not production-ready.
Depending on your real-life use case, you may choose to create your own PCI-compliant payment processor application or use another, existing payment processor. If you choose an existing payment processor, they will need to write custom code to interface with Twilio's Generic Pay Connectors.
Twilio also offers branded Pay Connectors that are already designed to integrate with the following payment processors/gateways: Stripe, CardConnect, Base Commerce, Chase Paymentech, Braintree, and Adyen.
Before you continue with this tutorial, you should familiarize yourself with the <Pay> and Generic Pay Connector docs.
To use Twilio's Pay Connectors, you must enable PCI mode in the Twilio Console. This ensures Twilio captures payment details in a PCI-compliant manner and redacts sensitive PCI information from all call logs. Learn more about PCI workflows.
Warning
PCI Mode will redact sensitive information from ALL of your account's logs. Turning on PCI Mode cannot be undone.
If you want to avoid redacting information from all logs on an account, consider creating another Twilio account, enable PCI Mode on that account, and use that account when collecting payments with <Pay> or Agent Assist/Payment API.
To enable PCI Mode, complete the following steps:
- Navigate to the Twilio Voice Settings in the Twilio Console. (In the left navigation pane, click on Voice > Settings > General.)
- Click on the Enable PCI Mode button.
- Click on I Agree on the pop up to accept Twilio's Terms of Service.
- Click on the Save button.
In order for Twilio to send payment information to your payment processor, you must install the Generic Pay Connector on your Twilio Account.
-
In the Twilio Console, navigate to the Pay Connectors page. (In the left hand navigation pane, click on Voice > Manage > Pay Connectors.)
-
Click on the Generic Pay Connector tile.
-
Click on Install.
-
Give the Generic Pay Connector a UNIQUE NAME of "My_Pay_Connector"
-
In the USERNAME and PASSWORD field, you can put any fake credentials. This is where you would put the credentials used by your payment processor.
-
For now, set the ENDPOINT URL to https://example.com. This is the endpoint where your payment processor will receive
HTTPS POSTrequests from Twilio. We will create a Twilio Function endpoint to handle thesePOSTrequests later in this tutorial.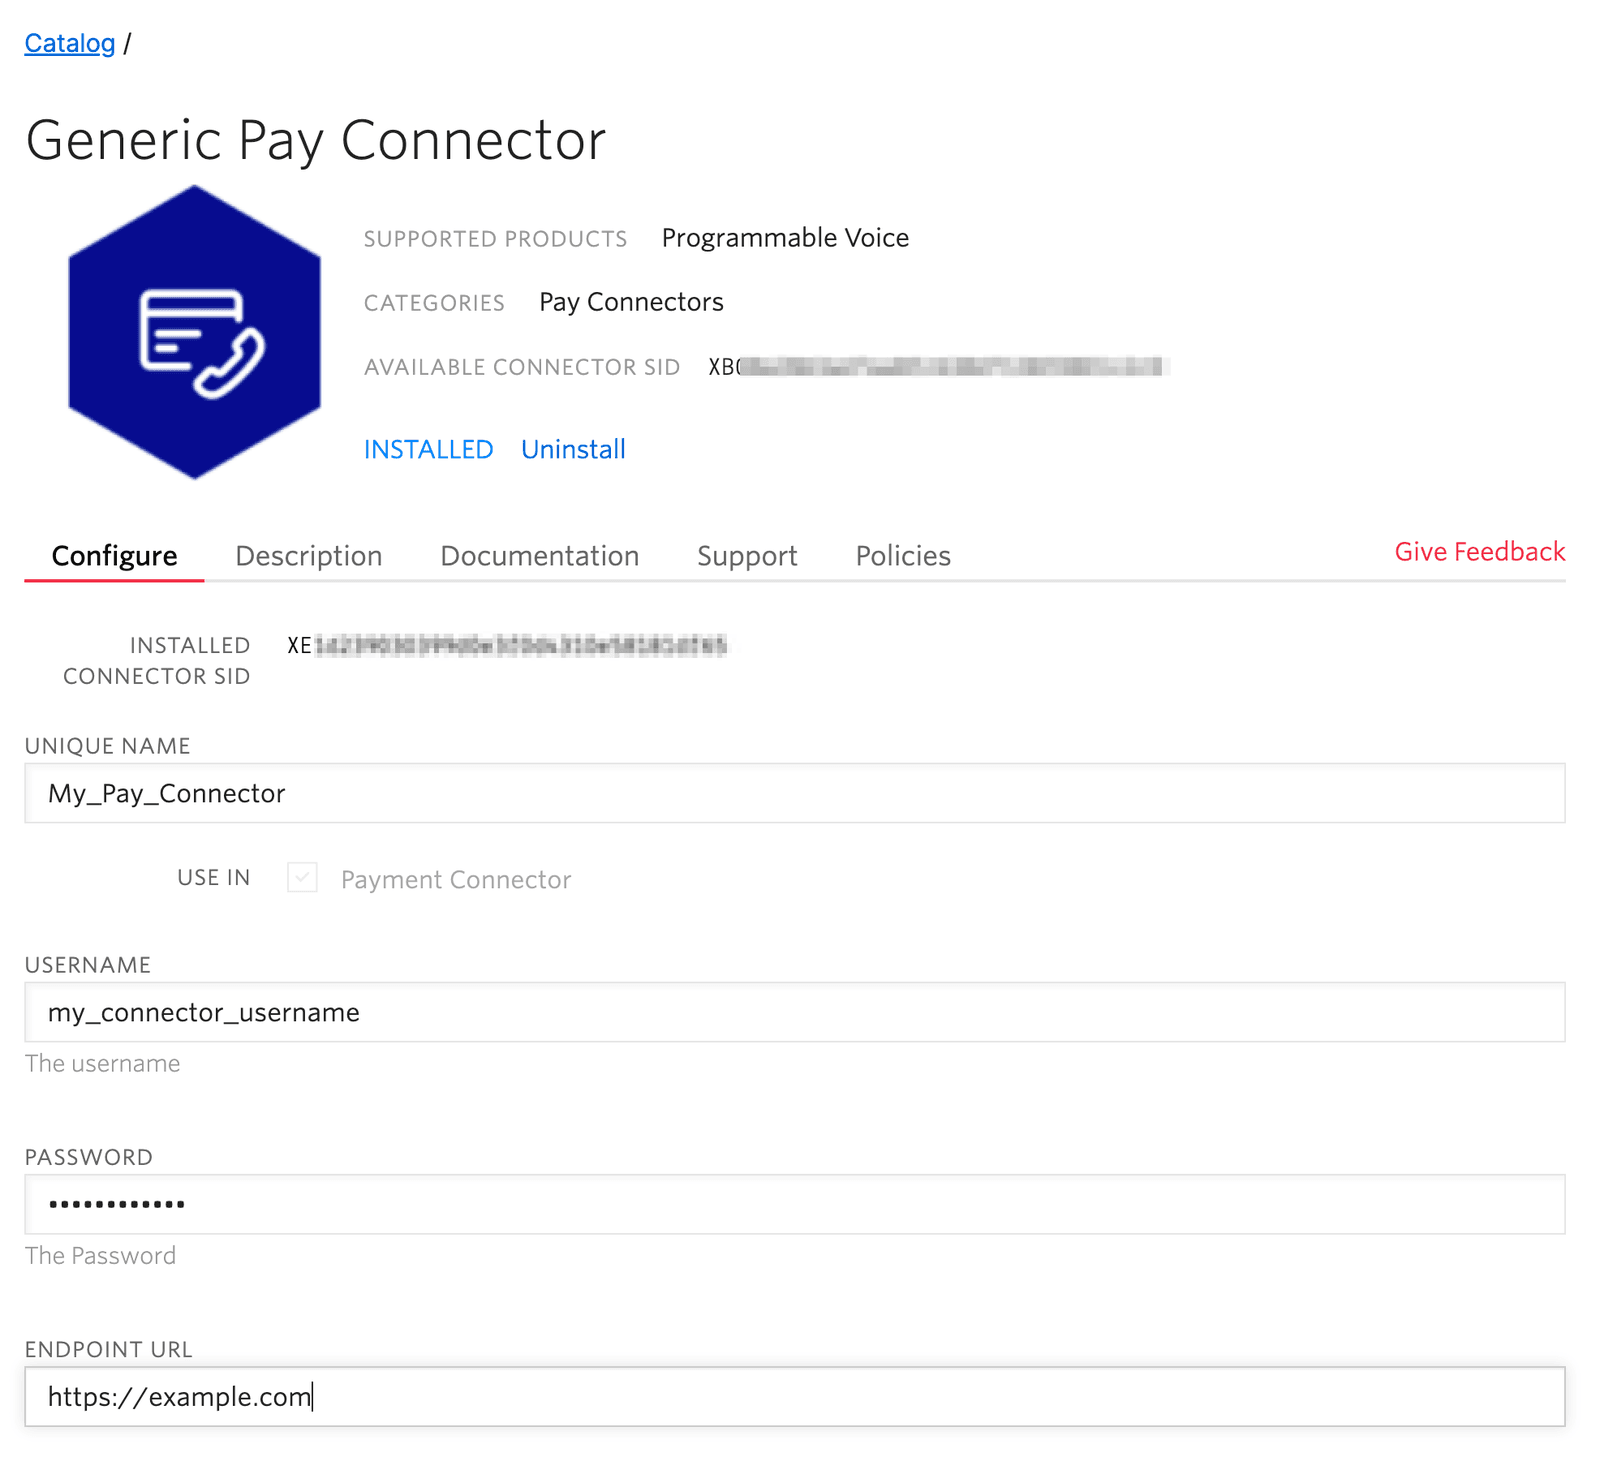
-
Click the Save button. Leave this tab open, as we'll need it later.
Next, we'll use a TwiML Bin to provide Twilio with the <Pay> TwiML instruction. When Twilio executes the <Pay> verb, a customer will hear prompts to enter their payment information.
-
Open a new browser tab and navigate to the TwiML Bins page in your Twilio Console.
-
Click on the blue + button to create a new TwiML Bin
-
Give the TwiML Bin a FRIENDLY NAME of "Generic Pay Connector Tutorial <Pay>"
-
Copy and paste the following TwiML into the TWIML input box:
1<?xml version="1.0" encoding="UTF-8"?>2<Response>3<Pay paymentConnector="My_Pay_Connector" action="" chargeAmount="10.00" />4</Response>Notice how the <Pay> verb has three attributes:
paymentConnector,action, andchargeAmount.
ThepaymentConnectorattribute's value is the Pay Connector you want to use with this <Pay> verb. In this case, it's the Generic Pay Connector you just created called "My_Pay_Connector".
Theactionattribute is left blank for now. This attribute will be a URL. Upon the completion of a <Pay> transaction, Twilio will send a webhook to youractionURL to get a new set of TwiML instructions. We'll create another TwiML Bin with a new set of TwiML instructions for Twilio to execute after a completed <Pay> transaction and put that new TwiML Bin's URL in thisactionattribute.
ThechargeAmountattribute is set to 10.00, representing a charge of $10.00. (If you wanted to create a tokenize transaction, you would set this attribute value to 0 or omit the attribute altogether.) -
Click the Save button at the bottom of the page.
-
Navigate to the TwiML Bin page in your Twilio Console by clicking My TwiML Bins at the top of the page of the TwiML Bin you created in the previous section. (You can also search for "TwiML Bins" at the top of the Twilio Console.)
-
Click on the blue + button to create a new TwiML Bin.
-
Give this TwiML Bin a FRIENDLY NAME of "Generic Pay Tutorial Action"
-
In the TWIML input box, paste the follwing TwiML:
1<?xml version="1.0" encoding="UTF-8"?>2<Response>3<Say>Thank you for entering your payment information.</Say>4{{#PaymentError}}5<Say>Sorry. There was an error: {{PaymentError}}</Say>6{{/PaymentError}}7<Hangup />8</Response>When Twilio executes this TwiML Bin, a caller will hear "Thank you for entering your payment information." and the call will end.
If Twilio's webhook request to this TwiML Bin contains a PaymentError property (meaning that an error occurred), the caller will also hear "Sorry. There was an error." along with a description of the error before the call ends. (This TwiML Bin uses a conditional content template. Read more about TwiML Templates on the "How to use templates with TwiML Bins" support page.)
-
Click on the blue Save button at the bottom of the screen. (You'll be asked to confirm due to "invalid" TwiML syntax. It is valid, so ignore this bug.)
-
Find the URL field at the top of the page for this TwiML Bin and copy the URL by clicking on the Copy button (on the right side of the URL field). You will set this URL as the
actionattribute for the other TwiML Bin you created, so that Twilio will execute this set of TwiML instructions after the <Pay> verb has completed in your other TwiML Bin. -
Click on My TwiML bins at the top of the page.
-
Click on the Generic Pay Connector Tutorial <Pay> TwiML Bin.
-
Paste the copied URL between the
actionattribute's quotation marks. Your TwiML Bin should look something like this:1<?xml version="1.0" encoding="UTF-8"?>2<Response>3<Pay paymentConnector="My_Pay_Connector" action="https://handler.twilio.com/twiml/EHXXXXXXXXXXXXXXXXXXXXXXXXX" chargeAmount="10.00" />4</Response> -
Click the blue Save button at the bottom of the page.
If you don't already own a Twilio Voice-enabled phone number, complete the following steps:
-
In the Twilio Console, navigate to the Buy a Number page.
-
Make sure the "Voice" checkbox is checked and click the Search button.

-
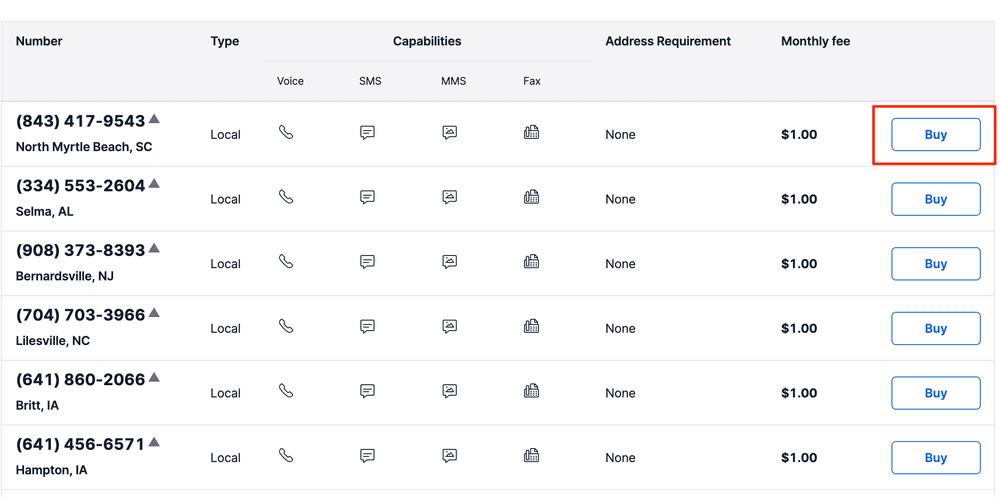
You'll see a list of available phone numbers and their capabilities. Find a number that you like and click the Buy button.
-
In the"Review Phone Number" pop-up, review the information and click on Buy (xxx) xxx-xxxx to confirm your purchase.
Now you'll navigate to the configuration page for the phone number and configure it to use your Generic Pay Connector Tutorial <Pay> TwiML Bin when someone calls the number.
- If you see the Number Purchased modal from the last step, click on Configure (xxx) xxx-xxxx. (If you navigated away from the previous step, navigate to Phone Numbers > Active numbers in the left navigation pane and select the phone number you just bought.)
- Give the phone number a FRIENDLY NAME of "Generic Pay Connector Tutorial".
- Scroll down to the Voice & Fax section.
- Find the A CALL COMES IN label.
- Click on the dropdown (it currently says "Webhook") and select TwiML Bin.
- In the dropdown that says Select a TwiML Bin (directly under the dropdown from the previous step), select Generic Pay Connector Tutorial <Pay>.
- Click the blue Save button at the bottom of the page.
At this point, you can call your Twilio phone number from another phone. You should hear "Please enter your credit card number."
You can try entering the following test card details:
- Credit card number:
4111 1111 1111 1111 - Expiration date (MM/YY):
12 25(or any date in the future) - Zip code:
94105 - CVC security code:
333
You should hear: "Thank you for entering your payment information. Sorry. There was an error: Payment Gateway rejected charge creation. Got malformed response from Payment Provider."
This makes sense, given that our Generic Pay Connector's Endpoint URL was configured to be "https://example.com". That's not a real payment processor.
In the next section, we'll create a very basic endpoint that will be able to handle the POST request that Twilio would send to a payment processor. This is just to illustrate the flow of information between your caller, Twilio, and the payment processor's endpoint.
When <Pay> has completed gathering valid payment information from the caller, the Generic Pay Connector will initiate an HTTPS POST request to the endpoint URL specified in the Pay Connector's configuration.
In an actual, production situation, this is the step where a PCI-compliant payment processor would send the payment information and transaction details (i.e. whether the transaction is a tokenize or charge transaction) with the payment gateway, handle any timeouts or failures from the payment gateway, process any errors, and send back a response to Twilio in Twilio's required format.
For this tutorial, we will create an endpoint that will:
- accept the
POSTrequest from Twilio with the transaction information and payment details - log the request from Twilio so you can understand what Twilio is sending to the payment processor
- return a fake successful response to Twilio
You will use Twilio's Serverless Functionsto write and host this code. Twilio Functions allow you deploy Node.js-based applications without needing to install anything locally on your own machine.
-
Navigate to the Functions > Services page in your Twilio Console.
-
Click on the Create Service button to create a new Functions service.
-
In the Name your Service pop up, give your service the name mock-payment-processor

-
Click Next on the Name your Service pop up.
-
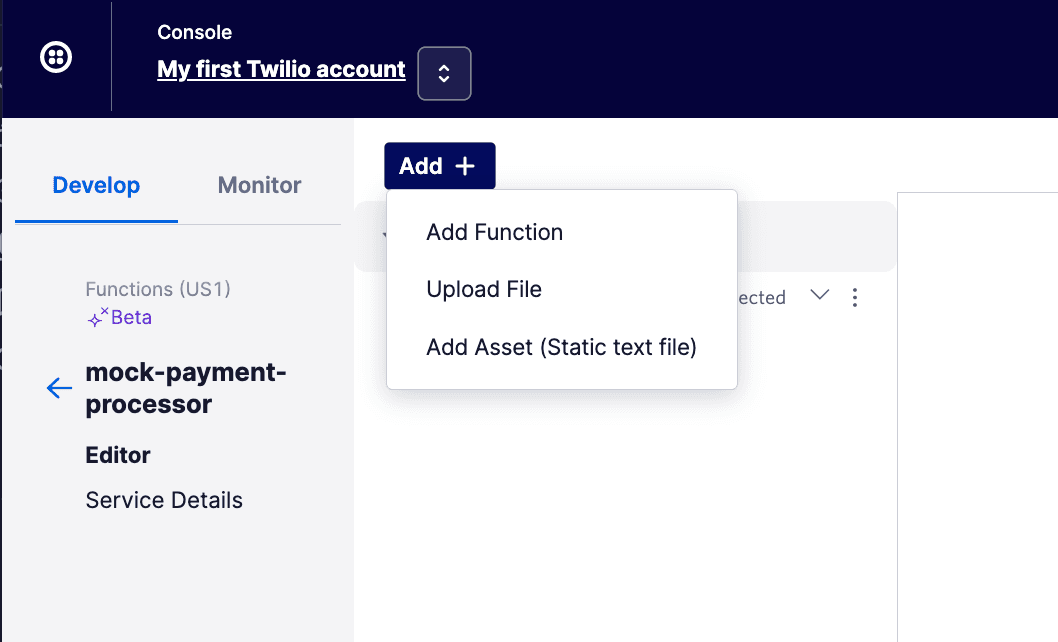
Click on the Add + button in the top left corner of the page and then click on Add Function.
-
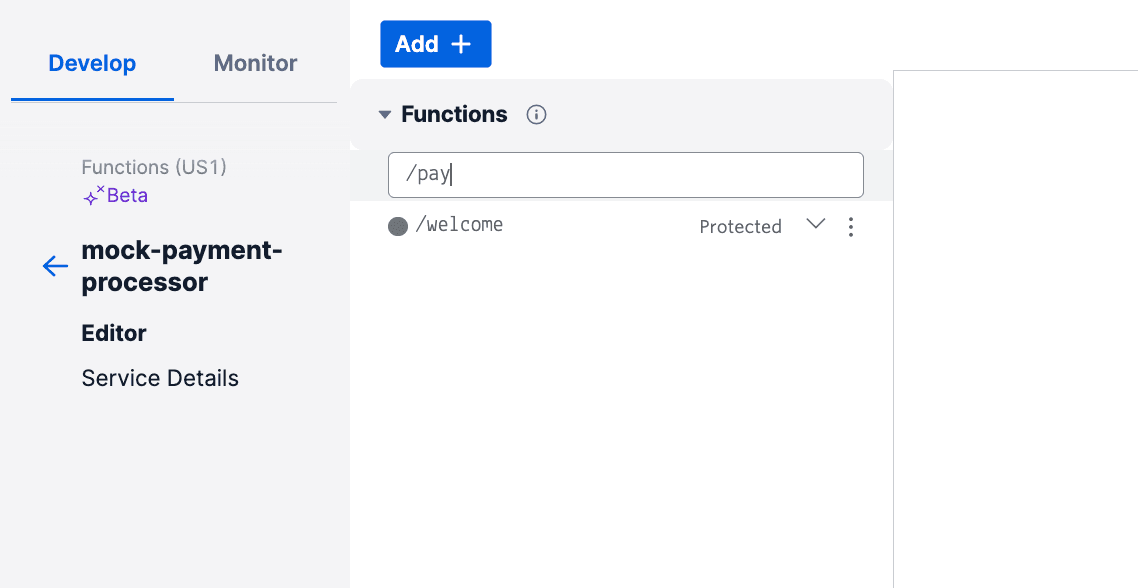
In the Functions pane on the top left, find the input that contains /path_1 and change it to /pay and hit Enter.
-
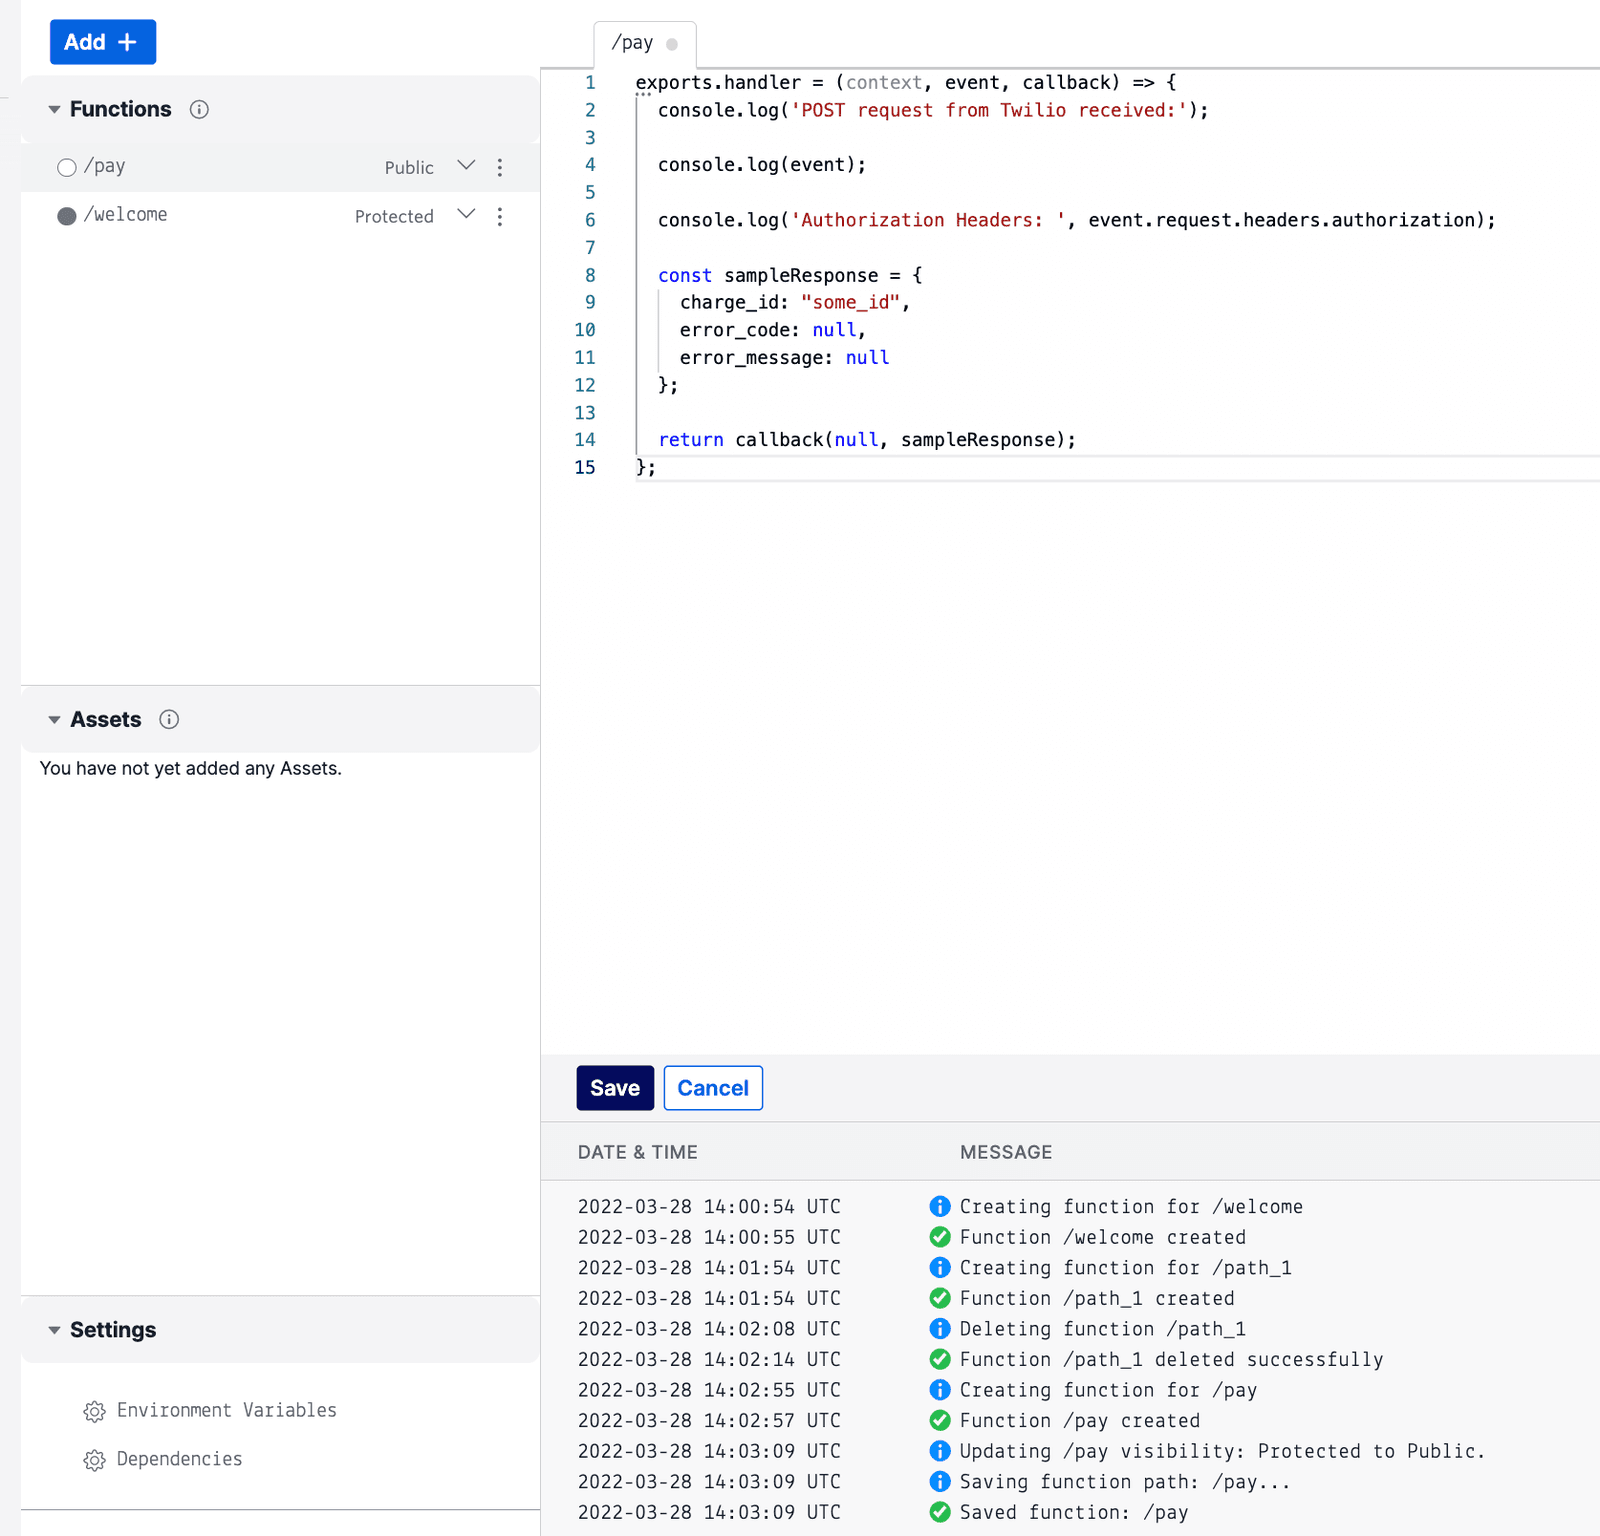
Next to the /pay path name, you should see Protected. Click on the downward arrow next to Protected and then Public.
-
Select all of the provided sample code and delete it.
-
Copy and paste the following code into the code editor of your /pay function:
1exports.handler = (context, event, callback) => {2console.log('POST request from Twilio received:');34console.log(event);56console.log('Authorization Headers: ', event.request.headers.authorization);78const sampleResponse = {9charge_id: "some_id",10error_code: null,11error_message: null12};1314return callback(null, sampleResponse);15}; -
Click on the blue Save button at the bottom of the code editor pane.
-
Click the Deploy All button at the bottom of the page. This deploys your Twilio Function to the internet.
-
Click on the Enable live logs switch so that you'll see live logs when your /pay endpoint receives a request from Twilio.

-
Now, copy the URL for your new endpoint by clicking on Copy URL (below the code editor pane).
-
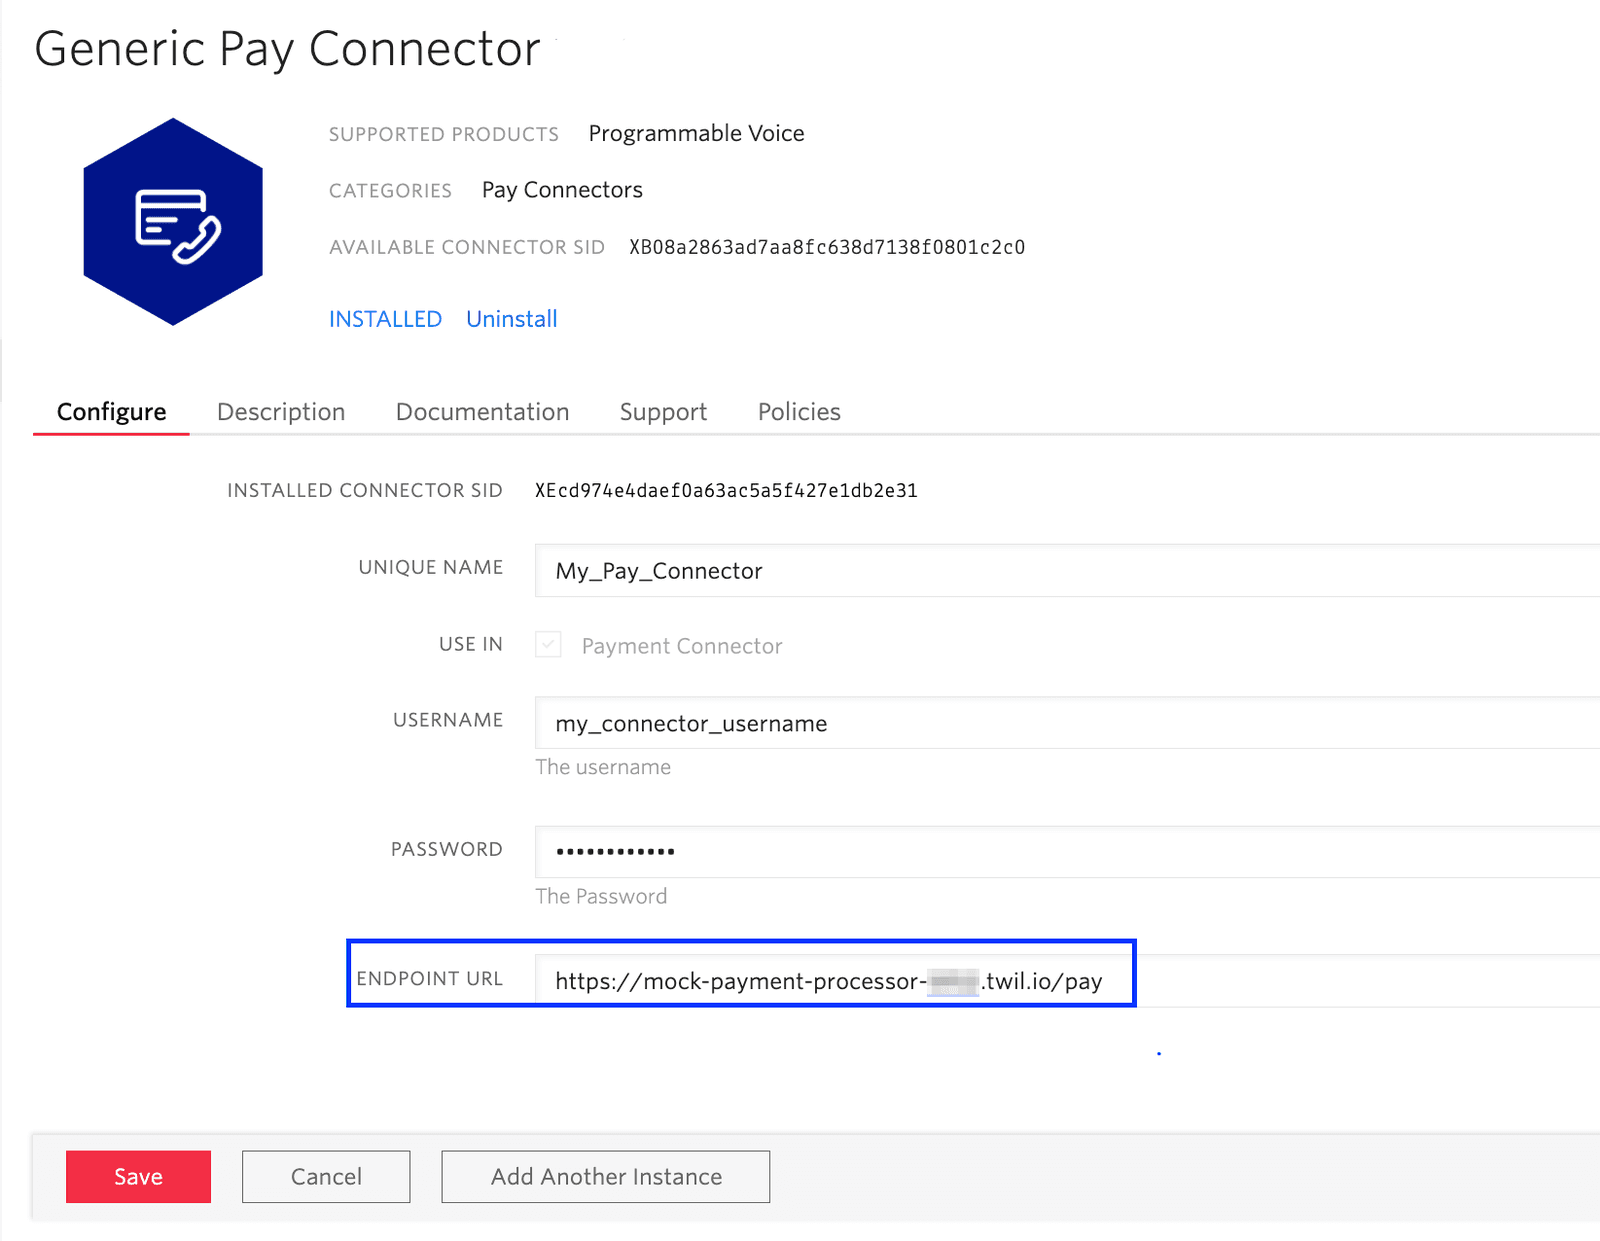
Go to your browser tab with the Generic Pay Connector's configuration page. (Or in a new tab, navigate to Voice > Manage > Pay Connectors > Generic Pay Connector in the left navigation pane of your Twilio Console.)
-
Paste your Twilio Function's URL into the ENDPOINT URL field.
-
Click the Save button.
Before you call your Twilio phone number, review what should happen:
- You dial your Twilio phone number
- The phone number's configuration points to the "Generic Pay Connector Tutorial <Pay>" TwiML Bin.
- Twilio executes the <Pay> verb, so you hear prompts to enter your payment details.
- You enter your payment details.
- Twilio sends a request to your Twilio Functions endpoint URL (because your <Pay> verb's
paymentConnectorattribute pointed to your Generic Pay Connector called "My_Pay_Connector", which is configured with your Twilio Functions URL). - Your Twilio Function (your fake payment processor) returns a response object to Twilio.
- The response object doesn't contain an error, so you hear "Thank you for entering your payment information" and the call ends. This is because once Twilio received a response from your fake payment processor, it sent a
POSTrequest to your "Generic Pay Tutorial Action" TwiML Bin. (Remember, the <Pay> verb in the other TwiML Bin had anactionattribute that pointed to this TwiML Bin.)
-
Make sure you can see your Twilio Functions Console page for your mock-payment-processor function.
-
Make sure you've clicked on the Enable live logs toggle (it should now be blue and say "Disable live logs").
-
Call your Twilio number.
-
Enter your test payment information:
- Credit card number:
4111 1111 1111 1111 - Expiration date (MM/YY):
12 25(or any date in the future) - Zip code:
94105 - CVC security code:
333
- Credit card number:
-
In your Twilio Functions log, you should see the logs of your Twilio Function print out something like the following:
12POST request from Twilio received:34{ request: '[Object]', transaction_id: '72500aba-328c-445c-a12e-da5700e10b17',5cardnumber: '4111111111111111', cvv: '333', expiry_month: '12',6expiry_year: '25', description: '[Object]', amount: '10.00',7currency_code: 'USD', postal_code: '94150', method: 'charge',8parameters: '[Object]' }910Authorization Headers: Basic bXlfY29ubmVjdG9yX3VzZXJuYW1lOnRlc3RpbmcxMjM=11Notice that the card information is not redacted, since it is presumed that the payment processor is PCI-compliant.
Also, you can see that the request that Twilio sends to the payment processor contains anAuthorizationheader that conforms to HTTP Basic Authentication. It contains the credentials you used in your Generic Pay Connector's configuration in Base64-encoded form. (The above example decoded is:my_connector_username:testing123.)
Your mock-payment-processor Function also returns an object in the format that Twilio expects:1{2charge_id: "some_id",3error_code: null,4error_message: null5} -
To see what Twilio sends to your <Pay> verb's
actionURL, you can go to your Call Logs in your Twilio Console.-
In the left navigation pane of your Twilio Console, click on the Monitor tab, then click on Logs > Calls.
-
On the Call Logs page, click on your most recent Call SID.
-
Click on + Expand All on the right side of the page under the Request Inspector heading. You should see two
POSTrequests. -
Twilio made its first
POSTrequest to your Generic Pay Connector Tutorial <Pay> TwiML Bin. (Look at the Response Body to verify this.) -
Twilio made a second
POSTrequest to theactionURL from your <Pay> verb. (Remember that youractionURL pointed to your Generic Pay Connector Tutorial Action TwiML Bin.) Inspect the Parameters in thisPOSTRequest and see the parameters related to this <Pay> transaction:PaymentCardNumberPaymentConfirmationCodeResultSecurityCodePaymentCardTypeExpirationDatePaymentCardPostalCodePaymentTokenPaymentError
-
Congratulations! You completed a mock payment with <Pay> and a Generic Pay Connector. You should now understand the flow of information between a caller (your customer), Twilio, and your payment processor.
In order to become production-ready, you'll need to create your own PCI-compliant payment processor or find an existing, PCI-compliant payment processor that can properly respond to Twilio requests, process charge and tokenize transactions with a payment gateway, and handle timeouts and retries.
If you've already chosen a payment processor to work with, you can share the Generic Pay Connector docs with them so they can customize their code to work with Twilio's Generic Pay Connectors.