Configure Auth0 IdP with Twilio Flex
Auth0 is a platform that provides authentication as a service, so you don't have to manage your users' credentials yourself. This guide shows you how to configure Auth0 as a SAML identity provider (IdP) with Flex. To learn more about how Auth0 works, visit the official Auth0 overview page.
-
Navigate to Applications > Applications, and click Create Application.
-
Enter a name for your application, select Regular Web Applications as the application type, and then click Create.
-
Select the Addons tab and click SAML2 Web App.
-
Click the Settings tab and set the Application Callback URL to the appropriate value for your SSO configuration type:
- Enhanced SSO configuration:
Copy the ACS URL value from the Set up your identity provider page, which provides the specific value for your account. Your value will look similar to this:https://login.flex.us1.twilio.com/login/callback?connection=JQxxxx - Legacy SSO configuration:
ReplaceACxxxxwith your Account SID, which you can find on the Twilio Console.https://iam.twilio.com/v1/Accounts/ACxxxx/saml2
- Enhanced SSO configuration:
-
Copy and paste the appropriate SAML Protocol Settings for your SSO configuration type in the Addons Settings:
-
Enhanced SSO configuration
1{2"binding": "urn:oasis:names:tc:SAML:2.0:bindings:HTTP-POST",3"signResponse": true,4"audience": "urn:flex:JQxxxx"5} -
Legacy SSO configuration:
1{2"binding": "urn:oasis:names:tc:SAML:2.0:bindings:HTTP-POST",3"signResponse": true4}
-
-
Click Usage and download a copy of your Auth0 certificate.
-
To save your settings, scroll down and click the Enable button, and then click Save.
-
Select Settings.
-
Scroll down to Application URIs, and confirm or add the appropriate value for your SSO configuration type to the Allowed Callback URLs:
- Enhanced SSO configuration:
Ensure that this field contains the ACS URL value from the Set up your identity provider page, which provides the specific value for your account. Your value will look similar to this:https://login.flex.us1.twilio.com/login/callback?connection=JQxxxx - Legacy SSO configuration:
Ensure that this field contains the ACS URL and entity ID values for your account. Remember to replaceACxxxxwith your own Account SID.https://iam.twilio.com/v1/Accounts/ACxxxx/saml2, https://iam.twilio.com/v1/Accounts/ACxxxx/saml2/metadata
- Enhanced SSO configuration:
-
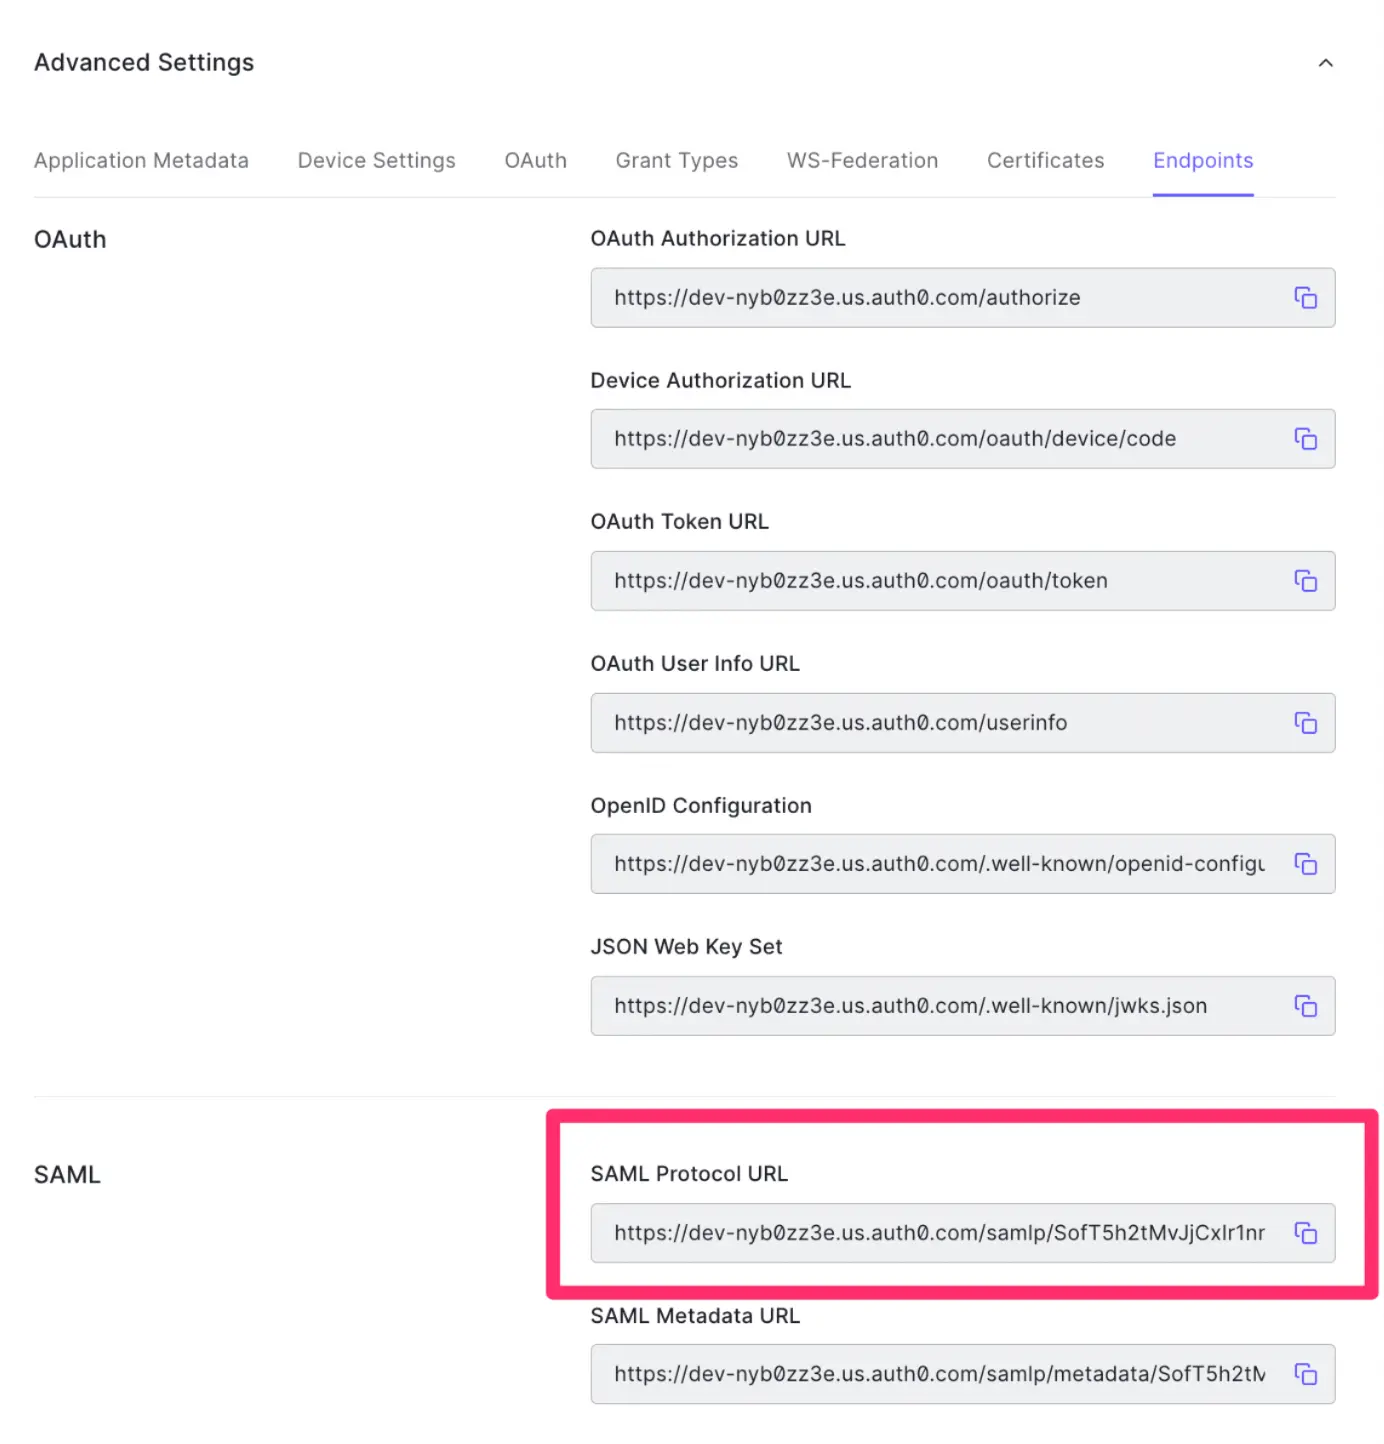
Scroll down to Advanced Settings and select the Endpoints tab. Copy the SAML Protocol URL and Save the settings.
Actions are Node.js functions that execute at certain points in Auth0. You can use custom actions to customize or extend Auth0's default capabilities. To learn more about actions and how they work, visit the official Auth0 docs on Auth0 Actions.
-
Navigate to Actions > Flows, and click Login.
-
Click + Actions and select Build from scratch.
-
Enter a name, and then click Create. The Trigger and recommended Runtime values are set for you.
-
In the Actions code editor, add the following code. If you want to send additional attributes to use for routing during login, you can also add them to this definition:
1exports.onExecutePostLogin = async (event, api) => {23api.samlResponse.setAttribute("email", event.user.email || null);4api.samlResponse.setAttribute("full_name", event.user.name || null);5api.samlResponse.setAttribute("image_url", event.user.picture || null);6api.samlResponse.setAttribute("roles", event.user.app_metadata.flex.roles);7}8Note You will configure the roles property when you add a user in the next section.
-
Click Deploy, and then return to the flow.
-
In the Add Action section, select the Custom tab.
-
Drag and drop your custom action into the flow, and then click Apply.
-
Navigate to User Management > Users, and click + Create User.
-
Enter the Email, Password, and any required user details, and then click Create.
-
Scroll down to app_metadata and assign the required roles (agent, admin or supervisor).
Example:1{2"flex" : {3"roles" : ["admin"]4}5}Note If you don't configure the roles for the user, the Post Login action you created in the previous section will fail.
-
Click Save.
-
Navigate to Twilio Console > Flex > Users and access > Single sign-on (SSO).
-
Under X.509 Certificate, copy and paste the contents of the Auth0 certificate you downloaded earlier. You can read the .pem file by using the cat command in your command prompt or terminal. For example:
cat ./name/of/certificate-file.pem -
For Identity Provider Issuer, go to Applications > Your App > Addons > SAML2 Web App. Click Usage, and copy the value of "Issuer".
-
For Single Sign-On URL, paste the url for the SAML Protocol URL that you copied from step 10 of Create an Application on Auth0. Be sure to also append the query string at the end:
?connection=Username-Password-Authentication -
Add your trusted domain which you can find under your application's settings, and copy the value under "Domain".
-
Turn on Login Using Popup.
-
Click Save to save your settings.